Ideal Steel update

  • Active since 1995, Hearth.com is THE place on the internet for free information and advice about wood stoves, pellet stoves and other energy saving equipment.

    We strive to provide opinions, articles, discussions and history related to Hearth Products and in a more general sense, energy issues.

    We promote the EFFICIENT, RESPONSIBLE, CLEAN and SAFE use of all fuels, whether renewable or fossil.
Status
Not open for further replies.
I am curious if you don't mind me asking. How do you get the heat to the upstairs level from a wood stove in the basement? Are you leaving the door to the stairs open to let heat rise? Are you using fans to move the air around or are you hooking into existing duct work. Reason I'm asking is that I am very interested in the method your using the achieve that much warmth up-stairs as I would like to do the same. I have been reluctant to put a wood stove in my basement of fear of not getting the results up stairs like I would like. I to leave in a ranch style house.

Thanks in Advance,
 
I have been reluctant to put a wood stove in my basement of fear of not getting the results up stairs like I would like. I to leave in a ranch style house.

Thanks in Advance,

Unless the basement is insulated put the stove where you spend your time. If you spend your time on the main level that's where I would install the stove. Some people have been successfully with basement installs, more often than not people don't have the best luck.

One of my neighbors heats from the basement with good luck, they have an open staircase leading to the basement in the middle of the house and the basement is insulated. The stove is pretty close to the bottom of the stairs so the heat travels well right up the stairs and into the family room/kitchen area.

That's similar to our setup except our stove room is small, helping to force the heat up the stairwell. Bedrooms are small and somewhat above this room, also. We are only heating about 1200 sf total.

Tectop, Will the stove be directly under your living /and or bedrooms? How close to the stairs?
 
I am curious if you don't mind me asking. How do you get the heat to the upstairs level from a wood stove in the basement? Are you leaving the door to the stairs open to let heat rise? Are you using fans to move the air around or are you hooking into existing duct work. Reason I'm asking is that I am very interested in the method your using the achieve that much warmth up-stairs as I would like to do the same. I have been reluctant to put a wood stove in my basement of fear of not getting the results up stairs like I would like. I to leave in a ranch style house.

Thanks in Advance,

OK. So half of my upstairs is above the garage. This was a huge problem because my bedrooms were always freezing cold. So I cut a section of drywall out of the garage ceiling and found a single layer of fiberglass which was not tight against the upstairs floor. I had a company come in and blow 26 bags of cellulose into the joist bays. Huge difference.
I got some new windows. I'm about half way done with that.

Then I checked into the attic. It only had r 13 fiberglass. I pulled up the insulation around all the top walls and air sealed the gaps with spray foam. I'm hoping this stops mice as well. I built a 10" higher floor in the center with a cat walk for the air handler. Blew in 10" of new fiberglass covering the air ducts as well.

Then, I took all the old fiberglass Batts out of the rim joists in the basement. I caulked all of the joints and installed r 23 roxul comfort batts. I air sealed any foundation gaps, then covered the block walls with owens corning insul - pink foam board. This attached with furring strips. You attach the drywall to the strips. I installed a stainless steel liner and built a hearth for the new stove. I did this all in the summer to early fall. It was a lot of work especially working in the 120 degree attic, but I was determined!

The only thing left to do would be to remove the aluminum siding and insulate the exterior walls. I don't want to even think about doing that...

The result.... Huge improvement. Not only in the winter, the house stays much cooler in the summer. I leave the door open to the staircase and the convective loop does its thing.
 
Can you ballpark a total cost for the insulation upgrade JA?
 
I've read one of the main things that enable a BK stove to achieve a ridiculous burn time is the great air control.

BK uses special magic Sasquatch sauce. It gets those long burn times on softwood no less.

So that's the secret? I need some of that sauce to try in my insert.

It comes from deep in the Blue Mountains.

The Blue Ridge Mountains? I think that's a sheepsquatch.

No, the Blue Mtns of Oregon. Though it looks like Clackamas county is Sasquatch territory. That would be in the Cascades.

Oh, THAT sauce. Know it well. "Blue Juice" My 1st cuz makes it. (I'm originally from Coos County) BTW, he's extremely hairy, scratches and grunts a lot. Goes by the handle of "Squatch". Tell him, "uh huh" if you see him. He'll know what you mean.
 
Last edited:
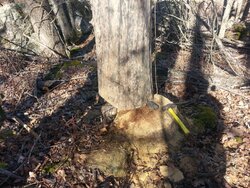
By the way, folks. Place my order for the new IS Thursday. Mike from Woodstock touched base with me personally. Great folks so far! May even get lucky with an expedited order if we're lucky and production holds. Meanwhile, the old 'gates of hell' in the limestone chimney is cleaned up of all the stage 3 creo, should have new pre-insulated Easy-Flex with all the attachments by late next week, Monday after at the latest. Got a "Nifty Lift" reserved for next Saturday AM to do the install myself and have promised the Bro-in-law a steak dinner for his time and assistance. May even share some of my "Blue Juice" with him if he doesn't fall asleep on his back lying in the fireplace. Now, if I can just get this monster 40" x 60' tall Mulberry to cooperate, I'm picking in high cotton!
 

Attachments

  • Mulberry.jpg
    Mulberry.jpg
    481.7 KB · Views: 308
  • Like
Reactions: Tenn Dave
Am I seeing the picture of that tree correctly?????

Holy cow!
Yessir. And that's real close to my own response when it spun instead of leaned. You're about half way there.
 
Can do!
 
Can you ballpark a total cost for the insulation upgrade JA?

Attic insulation $1100 - $500 PPL rebate =$600 + 10" joists, screws, my own labor
Garage ceiling insulation = $600 plus 5/8" drywall repair.
Insul -pink garage insulation ran me a couple hundred dollars, furring strips, screws, drywall, putty I installed all that myself. And did all drywalling.
I got one bag of the roxul comfort batts for about $40-50.
I probably used 20 cans of spray foam at about $5 a can.
 
  • Like
Reactions: osagebow
I'm trying to figure out what the heck to do with my cape cod style upper floor where the ceiling of the bedrooms is mounted to the roof trusses and only 4" of space between (and no insulation currently).
I'd have to say if it were mine, off with the ceiling, put 4" thick closed cell styro panels between the rafters, spray foam up any gaps -there will be gaps unless you cut them EXACTLY to size and use a floor jack to push them up into place!-, add a vapor barrier over all that and replace the ceiling. No attic space, no need for any air flow under the roof. We did exactly this to a log cabin's loft expansion where we raised the roof 4'. Works like a champ.
 
I'd have to say if it were mine, off with the ceiling, put 4" thick closed cell styro panels between the rafters, spray foam up any gaps -there will be gaps unless you cut them EXACTLY to size and use a floor jack to push them up into place!-, add a vapor barrier over all that and replace the ceiling. No attic space, no need for any air flow under the roof. We did exactly this to a log cabin's loft expansion where we raised the roof 4'. Works like a champ.
That's probably the best way to do it. I really didn't want to tear down the ceiling/walls they are good old plaster walls that are in fine shape. Though I could use some drywall experience, never done much more than patches before. There is a small crawl attic along the sides though. Currently zero ventilation I was hoping to put vents in the one gable end then add ridge vents.

I was browsing through some of the IS designs, and while some I've seen I didn't care for I've found lots I like. Some look better I think if they are the same color as the stove so they don't stand out as much.

Unfortunately I've decided to give this pellet stove a second chance and ordered some 4" duravent to line my masonry chimney. We'll see how it works then. My other stove, is an insert that I wouldn't mind swapping for a bigger stove but I fear the hearth will take more to modify than I'm willing. I may take some pics and entertain ideas and costs on a new thread though. If I was building a new home or replacing a smoke dragon I think an IS would be at the top of the list.
 
  • Like
Reactions: CptJera and JA600L
Good luck, and be safe. Let us know how it goes, and how you manage it.
Got the beast on the ground. Had to 'domino' two buckeyes where an upper mulberry limb had hung and balanced the entire act. Also swallowed my pride -I'm old, not stupid- and called on a neighbor with much more experience in felling trees. Wise move, that. He spotted a nest of "widow-makers" overhead and had me stand off about 40 yards while he cut the buckeyes. About 3/4 way through they started leaning, he dropped the saw and moved much faster than I thought possible. And the beast came a'tumbling down. Happy ending! Best part? The mulberry MC % is only 5%. This is very good wood and LOTS of it!
 
  • Like
Reactions: rideau
To continue on with my update, I have to include some negative things I have found.


The andirons warp. The plate that runs horizontal bends and you are not able to flip the andirons front. This can easily be pulled out and straightened but it is a minor inconvenience.

The radiator plate above the cat turns bright red and warps. This also can be pulled out and straightened, but I think it is weakened and will do it again.

Otherwise, it is still burning great. I have not found any cracks or performance issues. I want to be transparent about the good and bad and not just tell you what you want to hear. I believe this stove is going to be a great performer, they just have a few bugs to work out.
 
JA600L: Hope and expect you have notified Woodstock about those issues. They are both interested in learning about and proactive about remedying any issues with their stoves.
 
  • Like
Reactions: Tenn Dave
Indeed. Tell them ASAP. I have been cranking mine a bit more and have not had those issues. Bad batch of steel maybe?
 
If I remember right the soapstone is attached to the design plate thingy. If not, can you place soapstone on the stove after buying the base model?
 
To continue on with my update, I have to include some negative things I have found.


The andirons warp. The plate that runs horizontal bends and you are not able to flip the andirons front. This can easily be pulled out and straightened but it is a minor inconvenience.

The radiator plate above the cat turns bright red and warps. This also can be pulled out and straightened, but I think it is weakened and will do it again.

Otherwise, it is still burning great. I have not found any cracks or performance issues. I want to be transparent about the good and bad and not just tell you what you want to hear. I believe this stove is going to be a great performer, they just have a few bugs to work out.
Honest feedback helps us all. I'm sure Woodstock will be making tweaks just like they did on the PH as real world field results come in.
 
Good review JA600L.
As others have already stated contact Woodstock ASAP. I know they want to hear and I'm sure they'll send you out replacement parts.
My cousin started this season with an IS. Within a week of burning the bypass lever jammed. He forced the issue and broke something inside. Being a mechanic he surmised it was too tight tolerances on some hole that didn't allow for paint thickness and heat expansion. He fixed it himself and called Woodstock to let them know. Even though it was fixed they sent him out all the parts anyway. What really impressed him with their customer service is they also sent a reamer so he could adjust the fit to his liking.
Sending parts is nice. Buying specialty tools to keep your customers happy is exemplary.
The stove may need tweaking but you gotta give them an A + on customer service.
Once you own a Woodstock, you become part of the Woodstock family and you will always have a safety net of support and guidance to fall back on.
 
Family . . .cult . . . ;) :)

I kid of course . . . the only other stove that has ever really caught my eye and made me seriously consider swapping out my stove was the Woodstock PH . . . I still think it's their best looking stove.
 
I have been burning my Ideal Steel since beginning of December this year. I've had it up to 575 - 600 degrees on the flue pipe thermometer, have not seen any warping as described earlier.
I did not order the andirons on mine and really see no benefit other than a decorative accent, I think they would get in the way of loading the stove.

My smoke flap suffered some damage and I really think they over complicated it by making it pop up automatically when you close the door, the little tab is also a pain when you load wood. I bent my smoke flap about two weks ago, and just took it out, my stove before I took them out also, its a great way to get your arm or hand burned.

I do wish the ash fender was made a little heavier, not a big deal, its just is a little flimsy if you put your hand or a piece of wood on it while you are loading, nothing functional just percieved feel.
It has taken some time to get acustomed to my first hybrid stove, takes time to get a routine down for loading and engaging the cat. I wish there was some type of temperature alarm you could set so you know when the stove comes up to temperature to engage the cat. My stove is downstairs and I am getting to old to keep running down the stairs, sometimes it takes 10 minutes other times much longer.
I get by with loading my stove twice a day for my house, if the daytime temps do not get out of the teens, I may have to throw a couple pieces on when I get home from work to keep the stove top temps in the 200 range till loaded again, but my house is always in the 70-73 range. We have had some below zero temps this year in my part of Ohio.

greg
.
 
Status
Not open for further replies.