Okay, depending on how far you want to take it:
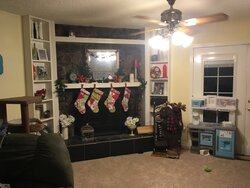
1. Get rid of that popcorn ceiling. No old farm house has ever had a popcorn ceiling. Either scrape it down, or if it's solid, just trowl over it. My ceilings, which vary from 200 - 250 years old (the second floor ceilings weren't added until 1820) aren't smooth, and show plenty of repairs, so trowling over doesn't need a lot of skill or perfection.
2. Remove skinny door and window casings, and replace with proper 4" wide casings. Pull that wimpy 4" baseboard, and replace with 1x8 trim board and your favorite base cap molding. This is so often missed, but is probably the single biggest impact item in making a house look "right".
3. The issue with your stone is more orientation than color. No stone house or fireplace has EVER been built with stones oriented on the flat, like flagstone glued to a wall. When you look at any stone house construction, you are looking at the EDGES of the stone, not the flat faces. This is the biggest problem with most stone veneers, and why 90% of them just look wrong. There are realistic veneer stone products, but again, they all simulate looking at the edges of the stone, they don't look like flagstone glued to a wall.
4. I'd tear up the carpet and put down random width pine flooring, but that's one that could be debated. I've seen a few nice rustic farmhouse living rooms with carpet, but I despise the stuff, myself.
5. I like the built-ins, but they're too streamlined / contemporary for your desired motif. This could be resolved with some simple edge and case moldings on what you already have.
edit: Those Home Depot bricks might look nice on a wall, but given they're edge profile, might look funny on the floor. Do they make a face profile version, too? You can do a lot to age them with a little shoe polish and wax.

") I'm about half swedish so my swedish grmpa would probably roll over in his grave if he knew I was buying a Norwegian stove. lol! My German half of me thinks its a great decision though!
I'm about half swedish so my swedish grmpa would probably roll over in his grave if he knew I was buying a Norwegian stove. lol! My German half of me thinks its a great decision though!  Nothing wrong with paint, if you keep up after it, but must we call on a random sampling of our hundreds of posted photos of old enameled vs. painted stoves?


") right now vacuuming is easier.
right now vacuuming is easier.