Improving energy efficiency with IR imaging

  • Active since 1995, Hearth.com is THE place on the internet for free information and advice about wood stoves, pellet stoves and other energy saving equipment.

    We strive to provide opinions, articles, discussions and history related to Hearth Products and in a more general sense, energy issues.

    We promote the EFFICIENT, RESPONSIBLE, CLEAN and SAFE use of all fuels, whether renewable or fossil.

Autonomous

New Member
Jan 2, 2024
10
Massachusetts
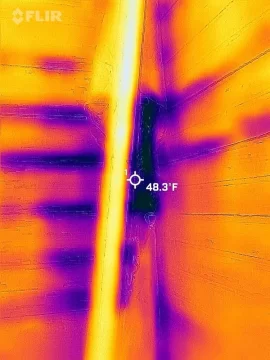
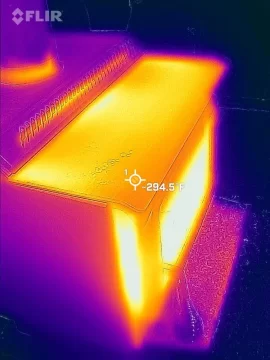
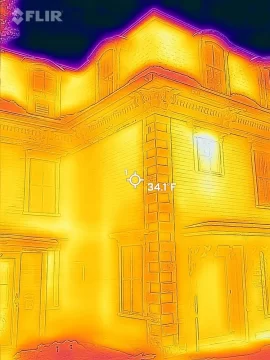
After testing a FLIR camera that attaches to a phone, I would say it was worth the $200 investment. I am in a 4800 sqft house that was built in 1858 and there are many areas where cold air infiltration occurs. The FLIR camera made it possible to easily locate where the cold air was entering the house or where heat is escaping. I also use the FLIR camera to inspect electrical wiring and measure the temperature of the woodstove and flue.
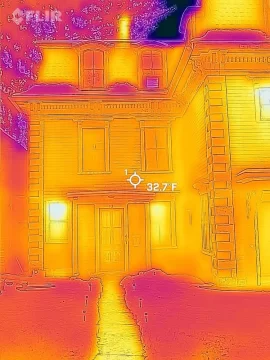
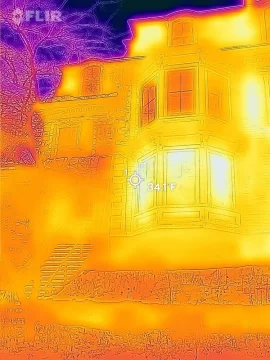
FLIR_20240119_024315_597.jpgFLIR_20240119_024806_387.jpgFLIR_20240112_055905_918.jpgFLIR_20240114_011334_873.jpgFLIR_20240112_052455_935.jpg
 
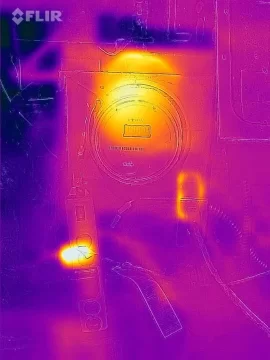
Nice. That power strip looks HOT.
 
Nice. That power strip looks HOT.
Haha, it's actually just a little warm. There was a hole in the foundation wall behind the electric meter that was cooling down the area. I would have never discovered that leak without the camera.
 
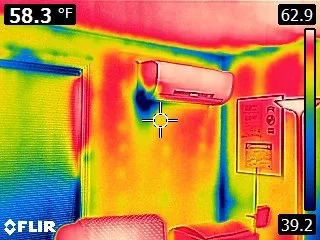
One thing to keep in mind using a thermal imager is that they usually autorange by setting an upper and lower range based on the hottest and colder surface they see and then assigning a color scale in between. Therefore what looks to be on fire may only be a minimal increase in temperature. On the other hand if the temp range is large the colors may have quite different temps. I posted this previously on a -20F day. The scale on the right is the high and low temps the sensor is seeing with the colors bar showing the range of temps. The target in the middle reads out in the upper left hand corner . The coldest spot is probably where the minisplit tubes come in through the wall. The unit is not running yet there are long copper tubes running outside the house and into the house so there is some pretty good heat conduction plus I expect infiltration. The other big heat loses are framing losses. The R value of wood on a 6" thick wall is less than insulation so corners will be cold. The window on the left has a double cellular blind with side seals but no bottom seal. The wall on the left was redone with 1/2" of isoboard on the interior before drywall so the window header loss is reduced but you can definitely tell the header of the cellular blind (that is effectively hollow) is a heat loss point. Note the lower part of the window is cooler and I expect that is caused by convective flow between the inner surface of the window behind the blinds and the back of the blind. The gap is probably close to 5" so plenty of room for convection. The blinds also do not have a bottom seal track so cold air is spilling out the bottom. They still make a major difference in radiant loss.

One thing I have learned is that electrical conduits from outside to the inside tend to flow a lot of cold air as they rarely are plugged around the wires.

LR minisplit and corners.jpg

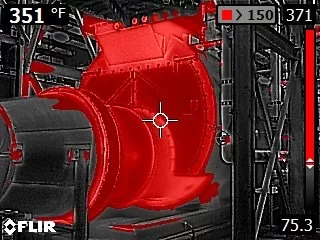
Now here is scan I took of a boiler at a job. OSHA requires that any accessible surfaces capable of burning someone must be protected with guards like wire mesh or insulated to a threshold that most regard as 140F (its not spelled out in the rules). In this case I just switched the scanner to only color areas in excess of 140 F. Some folks will argue that hot surfaces cannot be done but if you look at the piping and the transition duct (on the left), someone did a pretty good job but the boiler supplier cheaped out. That duct is carrying 700 F gases from a gas turbine. There is a heating system in that plant but the only time it is going to be used if its shut down for repairs or maintenance and I expect they leave the garage doors open much of the time. Notice the target temp of 351 F, someone had best not touch that or they will be seriously burned. Our part of the project was complete before they resolved the issue, but I think the contractor convinced the owner to just install handrails in front of the hot spots. FLIR0031.jpg
 
Last edited:
Regarding framing losses, it appears that my house has post and beam construction. You can see the posts and beams in this image:

FLIR_20240119_024359_313.jpg
 
A Flir E8, a tool purchased during my working days. I paid for it on the one job. Its a mid range unit and probably has already gone down in price and up in performance.
 
Looks like a very helpful camera tool.
 
With respect to framing losses, the Passive Home and Pretty Good House builders have learned that as they go for higher R values that framing is becoming a big issue. Most builders learn by doing and what they learn is if in doubt put in a stud and they overframe the buildings, the low energy builders have come up with modified framing techniques that reduce the amount of framing without sacrificing building strength while significant increasing R value. I am stuck with overframing at my place, I dont want to rip out the interior and even if I did the floor decks are not easy to access so the better alternative is to take off the siding and put in a couple of inches of insulation on the exterior and make sure that I get the vapor and air barriers right. Zip board also has panels with foam extruded onto them for the same purpose, to cover the high heat loss framing.

Double wall is making a comeback and some go with a 8" wide plates and stagger 2 by 4 studs at 12 centers and then the entire wall is pumped with cellulose. The downside is the siding and drywall see 24" on center and that typically telegraphs the spacing unless 5/8" is used on the inside. I did see one canadian system that consists of 2 by 6 studs that are made with a strip of 2" thick wood on the inside and outside with a foam strip bonded between.

The stress skin techniques do away with much of the framing but foam is costly and has negative connotations for some part of the population. They also got a bad rep for some issues with condensation inside the wall at seams (I think it was an installation issue rather than design fault). Most of the 3d printing concepts I have seen disregard R value and I expect they just spray on foam on the inside to get the R value and use the shell as thermal mass. The monolithic domes use a reverse approach, "rubber skin" outside with layer of foam sprayed onto it from the inside and gunite concrete on the inside, they can be thermally efficient and tornado resistant but kind of homely ;)
 
What IR camera are you using?
OP, could you share which model you are using? Sorry if I missed your mention of it.
I've been thinking of buying one.
 
OP, could you share which model you are using? Sorry if I missed your mention of it.
I've been thinking of buying one.
It is the FLIR One gen 3 camera that has a maximum range of 300F. It's great for thermal leak detection but not suitable for reading woodstove temperatures. The "pro" camera costs $441 and can read up to 780F.
 
Regarding framing losses, it appears that my house has post and beam construction. You can see the posts and beams in this image:

View attachment 323362
Homes were built with timber framing until the end of the 19th century. I have one. The first addition here is 1906 and is balloon framing. The style of your house is called, "2nd empire." This architecture originates from France. It's one of my favorites.
 
Homes were built with timber framing until the end of the 19th century. I have one. The first addition here is 1906 and is balloon framing. The style of your house is called, "2nd empire." This architecture originates from France. It's one of my favorites.
The architecture is 2nd Empire Italianate and yes, it is timber framed as well as the stables.

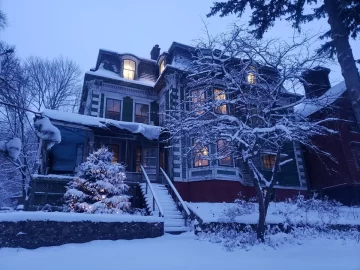
The house was in bad shape when I purchased it but we have since rebuilt the roof and have saved this amazing house from destruction. The person who built the home in 1858 owned several sawmills and a furniture factory. I would attribute its survival to being exceptionally well built. This house was designed to be heated by a wood or coal burning furnace. The original wood burning furnace is still functional but I don't use it because of low efficiency, possibly <10%. I installed a large wood burning stove in the basement having 110k btu output and 74% efficiency. It heats the whole house to a certain extent but additional localized heating is necessary. There were fireplaces in each bedroom that unfortunately were walled up. For the time being these rooms have electric heaters until the fireplaces have been restored.
20240107_164420.jpg
 
Very beautiful home. You have done, are doing, a remarkable job in preservation.
Mines a 1850, 4500sq ft Vicky. It's state of affair is what you described your home was.
 
  • Like
Reactions: Autonomous
The house was in bad shape when I purchased it but we have since rebuilt the roof and have saved this amazing house from destruction.
As a lover of old homes, thanks for saving tha house for future generations.
 
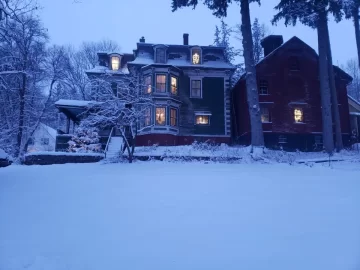
Thanks for the comments - I attached images that show the house and stables. Ironically when we purchased this home more than 5 years ago it sold at the very bottom range in this town or for that matter all of New England. It needed a lot of work and still does but it has been stabilized now. As a bit of incentive for encouraging restoration of these historic homes - according to the assessed value it is now one of the most expensive homes in town even in its current non-fully restored condition. This amounts to a 13x increase in value over the purchase price in 5 years and 5x over the total investment thus far. But I'm never going to sell it anyway.

Two modern wood stoves kept the 1st floor and basement warm during a recent cold snap of sub-zero temperatures. For a longer term heating solution I was thinking about installing an external wood pellet furnace that would provide steam to 15 radiators in the house. As another option, there's an old fashioned well in the basement that has a diameter of 2 1/2 feet and is lined with stone walls which could be used as a space for a thermal storage battery for a ground source heat pump system.


20240107_164334.jpg

Stables, with three horse feeding stalls and space to park carriages. The upper floor of the stables have openings for sending the feed down to the stalls.

horse2.jpg