Insert for small, Victorian fireplace

  • Active since 1995, Hearth.com is THE place on the internet for free information and advice about wood stoves, pellet stoves and other energy saving equipment.

    We strive to provide opinions, articles, discussions and history related to Hearth Products and in a more general sense, energy issues.

    We promote the EFFICIENT, RESPONSIBLE, CLEAN and SAFE use of all fuels, whether renewable or fossil.
Status
Not open for further replies.
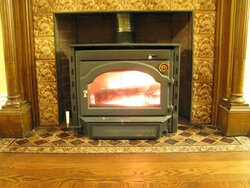
Looking at page 12 of the H-H manual, I don't think it would work, especially if you add in the incredible R-6.6 floor protection requirements I don't think you'd meet the clearance to the mantle among other things.

Also while the stove is pretty, I don't think it would go well with the existing FP - you'd have to many different materials, soapstone, then metal, then tile, then wood... It would look patched together. OTOH a plain steel front insert, or even something with cast decorations would look more like a uniform designed in from the start item instead of an afterthought add-in.

Gooserider
 
Thank you all for your responses and advise. Looks like given the clearance requirements to combustibles I will be going with the Dutchwest insert. I visited a local dealer and we together confirmed that this is the only way to go short of doing some horrible modifications to my wood mantle.

Now to my chimney. The flue is 8" x 8" square, unlined brick in questionable condition, 28' from hearth to chimney crown, located in interior of home. The mortar in the attic is soft and there are a couple of bricks missing that I need to replace.

1. Given the interior dimensions of the flue, I cannot fit an insulated 6" liner in that space (liner has 8" exterior dimension). If I put a 6" flexible liner in, should I look into pouring vermiculite or perlite into the airspace around the liner? Would trying to use a 5.5" insulated liner be a better option, assuming of course, I contacted VC and they approved of this size?

2. Chimney repairs: I plan to replace missing bricks, rebuild the crown, and have the chimney cleaned by a professional (he stated that I could simply parge the attic portion of the chimney with about 1/4" to 1/2" of material to seal it all up and re-point above trhe roofline).

What do you think of this plan? Any advise from chimney experts out there?
 
I do not think you will get a direct answer on the 5.5" liner from any manufacturer.

I installed a flex 5.5" liner in my existing chimney 8x8 clay tiled but actual inside demsion is more like 7X7 and was able to make two 45 deg turns but I have no insulation. My chimney is exterior and it drafts so good I had to install and dampner for the Mansfield to slow it down.

Hearthstone when I called them would not give me a direct answer as to wether it would work or not with a 5.5 liner and this stove is huge and it works like a champ.

Elk may advise if codes are an issue as even though it would look like it will work does not mean they will approve it code wise.
 
Struggle. I reckon VC probably won't say I can use a 5.5" liner for obvious liability reasons.
I guess it boils down to weighing the advantages/disadvantages of an uninsulated 6" liner (unless the vermiculite is deemed helpful) in an old unlined chimney vs. a 5.5" insulated that may or may not work with this stove. Assuming I can get a 5.5" flexible liner, I suspect the outside dimension with the insulation is going to be tight anyway.
 
I burn into 5.5 flex liners, not hard to find at all, with the little Jotul F100 and the 3.5 cubic foot firebox Englander NC 30 and both draft great. The Jotul is on a 35 foot pipe and the Englander is on a 22'.
 
struggle said:
I do not think you will get a direct answer on the 5.5" liner from any manufacturer.

I installed a flex 5.5" liner in my existing chimney 8x8 clay tiled but actual inside demsion is more like 7X7 and was able to make two 45 deg turns but I have no insulation. My chimney is exterior and it drafts so good I had to install and dampner for the Mansfield to slow it down.

Hearthstone when I called them would not give me a direct answer as to wether it would work or not with a 5.5 liner and this stove is huge and it works like a champ.

Elk may advise if codes are an issue as even though it would look like it will work does not mean they will approve it code wise.

Elk certainly can (and hopefully will) chime in on this one, but from what he has said in the past, this sort of question is a grey area in the codes. You TECHNICALLY aren't supposed to go into a liner smaller than the flue outlet, or the size spec'd by the stove maker, which ever is smaller. You are also TECHNICALLY required to have an insulated liner. Problem is that it sounds like it is not PHYSICALLY possible to satisfy both requirements. I'm guessing, but you may also be having to work w/in historic preservation standards? Sounds like the kind of place that might be, so aside from expense, you might not be allowed to rip the entire chimney out and build from scratch to modern specs (I'm not advocating it, just mentioning it as an option)

One option I have seen mentioned elsewhere, but I don't know if it would work in your case, is to do one of those permanent "poured in place" liners. However I don't know what they need for space to have adequate wall thickness.

From what Elk has said, this is one of those cases where the inspector has to use his judgement as to how best to "flex" the rules to allow a compromise that fits the reality of what the situation allows. He seems to think it is better to go with the 5.5 insulated liner, but that is just his opinion which really doesn't count in terms of keeping the local guys happy...

I would suggest that this is an excellent time to consult with your local AHJ / building inspector to explain the problem and ask what solution HE wants - really the only opinion that counts if you want the permit signed off...

Gooserider
 
Gooserider,

What about these liner insulation kits I see online (HomeGuard, HomeSaver) that are foil faced blankets available in 1/4" to 1/2" thicknesses? Would these satisfy insulation requirements? I suppose then the trick is fitting an insulated 7"-7.5" pipe down that 8" flue.
 
udris said:
Gooserider,

What about these liner insulation kits I see online (HomeGuard, HomeSaver) that are foil faced blankets available in 1/4" to 1/2" thicknesses? Would these satisfy insulation requirements? I suppose then the trick is fitting an insulated 7"-7.5" pipe down that 8" flue.

Elk is the expert, but I believe the code calls for 1/2" in the case of a chimney that needs the liner to be compliant. The kits are exactly the stuff that we are referring to when we say an insulated liner. Basically it is a blanket that wraps around the liner, gets secured with special spray adhesives and tape, and then covered with a metal mesh "sock" that is supposed to protect it on the trip down the chimney.

Gooserider
 
I guess the experiment would entail making a 7" outside diameter tube with PVC and guiding it down the flue to see if I can make it to the bottom, if so, then maybe the 6" liner with 1/2" insulation would work in this scenario. Are all of the foil-faced blankets that say they will bring the liner up to UL1777 pretty comparable? Any good sources people recommend? Thanks for guiding me through this process. It's getting colder here in Providence and I can't wait to see if this will all work.
 
Have you checked the OD on some of the RIGID liner (not the same as Class A, but an insulated rigid pipe intended for use as a liner? I think I've heard it has an OD around 7" and thus might be narrower than flex with an insulation blanket. Obviously it only works with a straight chimney, and its more expensive than flex, but it will satisfy UL 1777, and does offer the advantage of a smooth interior that is supposedly less prone to creosote buildup and extra easy cleaning. What I've heard of others doing (Including Hogwildz) is to use rigid for most of the chimney except for 5' or so of flex on the bottom to get past the damper / smoke shelf area.

However it certainly wouldn't hurt to try doing a mockup to see just what you can get down the existing flue. That will at least let you define what your options are.

Gooserider
 
I looked up the specs on the Simpson Duraliner (http://www.ventingpipe.com/specs/flex.html) and think that this will work in my case.
It's double wall insulated, UL 1777, and the outside diameter of the 6" flex is 6.5". Incidentally, a standard one gallon paint can is 6.5" so I think I just found my
guide to attach to a rope and lower down the flue to see if I get a clear shot to the damper.
 
Sounds like a good plan, though I'd probably use an empty can, or at least one with no paint in it, filled with something like sand. That way if something gets stuck you don't have to worry about the can coming open and spilling something on the inside of the chimney...

Gooserider
 
I just lined mine with Ventinox flex liner 8" round ovalized to 4" wide at the bottom 3' to slide through the damper area and capped the top. I don't think Ventinox has to be insulated. Check out Lindeman Chimney Supply online - Ventinox high flex - They will direct you to a supplier and custom cut and ovalize, also all the accessories needed (tees, caps damper seal, etc.). High quality and reasonable if you install yourself (my 20' chimney, cap, and oval to round T with cleanout $1000); I used 8" because I was connecting a 1981 VC Vigilant into the same style fireplace as yours. I did use a heat shield to get reduced clearance.
 
jodie said:
I just lined mine with Ventinox flex liner 8" round ovalized to 4" wide at the bottom 3' to slide through the damper area and capped the top. I don't think Ventinox has to be insulated. Check out Lindeman Chimney Supply online - Ventinox high flex - They will direct you to a supplier and custom cut and ovalize, also all the accessories needed (tees, caps damper seal, etc.). High quality and reasonable if you install yourself (my 20' chimney, cap, and oval to round T with cleanout $1000); I used 8" because I was connecting a 1981 VC Vigilant into the same style fireplace as yours. I did use a heat shield to get reduced clearance.

My understanding is that ALL the single wall flex liners are required by code to be insulated if they are being used to bring a substandard chimney up to NFPA 211 standards - they are worried about excess heat coming out of the liner and going through the masonry to cook nearby combustibles.

OTOH, if your chimney is already compliant with NFPA - essentially in good condition, built to modern standards with clay liners or equivalent, no significant cracks or other damage, etc. and you are installing the liner ONLY to bring the chimney into compliance with cross sectional area requirements, then the code is a bit unclear on whether the insulation is required or not, and most inspectors won't require it, although it's reccomended.

The other point to consider is that ovalizing a peice of liner can cause significant reductions in it's cross sectional area, which may or may not cause problems depending on the degree of reduction, it's length, the overall length of the flue, how much the stove being connected really NEEDS the nominal area, etc. The extreme case of this that proves the reduction is to imagine the ultimate ovalization - flatten the pipe - the circumference is unchanged, but you have zero cross sectional area. The discussion of this I've seen (my setup doesn't require ovalizing) is that if you ovalize more than about an inch, you are overly reducing the area, and potentially compromising the integrity of the flex. (Possibly less risk of the latter if the ovalizing is done by a vendor) The reccomended approach is to get a stub section of the correct area oval liner and attach it to the round main section with the appropriate adapters - this way even though the shape changes, you have preserved the cross section.

Gooserider
 
Thanks for the info. I quess I did't read the whole story! Ventinox does offer a insulation package for zero clearance (my chimney does have a tile liner so I didn't need it). They have a chart for ovalizing online and did do the ovalizing for me. The flex liner was 8" and only ovalized where it needed to go through the damper (10 1/2" x 4") and the draft is great. Much better than what our local stoveshop sold us. They had originally only offered us a 4' oval, round at the connection that didn't go all the way to the top with a cap, worked terrible and a big waste of money! I was very happy with the quality of Ventinox, the extras that made it all work and Lindemann was great offering techinal questions over the phone and finding a supplier that would sell directly to me. I had to find them myself and was hoping to save someone else the headache of too much trial and error! (and $$$) Still learning and trying to stay warm in the Northeast too!
 
Glad you found a setup that works for you. I just thought I should mention the other stuff to ensure that anyone reading the thread later would see some of the other relevant factors to consider.

Gooserider
 
With regards to the Dutchwest insert installation, is it necessary to install the faceplate? I plan on putting in a well insulated block off plate above the unit. Does the faceplate serve any purpose other than a nicer appearance for some? I actually prefer the way it looks without.
 
Some folks would say that it has to be installed the way it's listed, which would include the faceplate, but as far as I can tell, the faceplate doesn't actually DO anything as long as you have a blockoff, so I think you can run without it.

Gooserider
 
Finally finished the installation and have had fires every night for 2 weeks. Ended up putting in a 5.5 flex with blanket insulation kit, cap on top of chimney, and block off plate at the bottom. The blower on this insert does a great job sending the heat out to the room.

My question has to do with operating temps. I'm clearly getting secondary combustion, even getting the tubes to glow red. When I do this, however, the surface temp reads only 350-400F max (reading on the elbow coming out of the stove is ~200F). Problem is there's no good place for a thermometer on the insert because it's made to blow air around the sides and top. Dutchwest manual says nothing about how to monitor temps.

With tubes glowing, how hot is that getting?
Any suggestions on where I could read more accurate temps?
You can see from the attached pics that the spring thermometer is on the upper right of the door, but somehow I can't imagine that being very hot compared to other parts.

Many thanks for all your advice on getting this install done.
 

Attachments

  • insert 1.jpg
    insert 1.jpg
    65.6 KB · Views: 200
  • insert 2.jpg
    insert 2.jpg
    45.5 KB · Views: 213
Nice looking install overall, but how is your clearance between the front of the unit and those wooden floors? (It's supposed to be at least 18", looks like your closer to 12" but that may just be the photo...)

As to the temp, that is always a problem on inserts, as the way they are designed raises the problem you mention. Running without a surround the way you are, the pipe is probably your best bet, possibly using one of the probe type thermometers. Otherwise, you pretty much have to find the thinnest accessible spot you can, where there is minimal insulation, a single wall to the firebox, etc. and live with that.

Bear in mind that you don't really need to care about the "actual" temperature as such; what's more important is to learn the relative readings of what is "normal" vs. too hot or too cold... I have a cat stove rather than a tube unit, but my understanding is that a dull glow on the tubes is OK, though it is at the upper end of "normal" so that gives one end. The point where you aren't getting secondary combustion any more would be the lower end, etc.

Hope this helps, realize it's not real specific.

Gooserider
 
Status
Not open for further replies.