I've been plowing through this site to learn more about my insert that was in the home that we purchased a 1.5 years ago. You folks have created an excellent resource, I must say.
Some background:
Before we burned the first piece of wood, we had a chimney inspection, which went well. The exterior-walled chimney is 8x8 (maybe 10x10, I can't remember and it's too cold and dark to get on my roof tonight) terracotta and was built in 1967. According to the inspectors, the interior had very little creosote build-up and the tiles appeared to be in good condition. We burned wood for about a month last winter and we've been burning all winter this year and things have been wonderful. According to the meticulous records kept by the previous owners, it is a Buck stove (Regular Buck) that was purchased and installed in 1978. I have always been a bit nervous about the safety factors of the installation and tonight, an opportunity for me to check it out was forced upon me because the fan motor began squalling and I needed to pull the insert to get to it. Fortunately, after some internet research, I believe that I'll be able to find an exact replacement motor for the extraction fan.
Anyway, I am somewhat ignorant of what a good, safe install should look like, but I've been reading this site and am beginning to get a feel for it. The purpose of this post is to get your feedback on these interior pictures on how well the installation was performed. I am certain that I'll have some more questions, but here are the pictures with a few comments. Please let me know what you think...
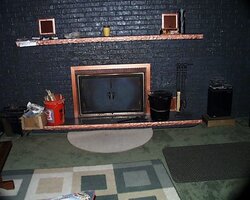
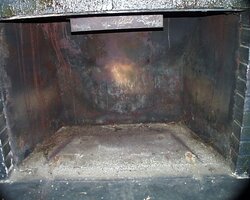
A shot from the front after I pulled the insert:

.
.
.
.
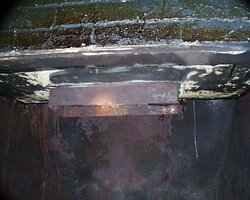
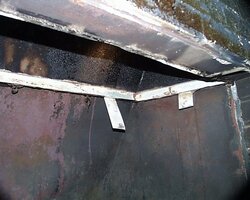
A picture of what I've come to learn from this site of the block off plate. It is made from galvanized steel and is quite heavy guage (~1/16"). Note that there is no liner in the chimney. The seal looks to have some amount of hot gas leakage as evidenced by the discoloration surrounding the opening. It was actually a pain to get the insert detached from the plate because it was clamped down to the top of the stove by the damper collar by a few bolts and also, if you look closely, you can see the bent tabs that wrapped around the top plate of the stove. It looked like it was quite a chore to install. This block off plate was a replacement of the original and it was installed in 2004 by the previous owners (I told you they had meticulous records") ).
).

.
.
.
.
You can see in this image that the block-off plate is very close to the top of the stove and I had to remove some high-temp sealant at the joint between the stove and the bent corner of the block-off.

.
.
.
.
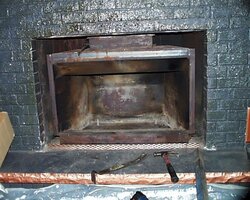
Here is the top of the stove, where the block off mates. Note the two cracks at two of the corners. One of them has been repaired with a 1/4" steel internal patch and the other is essentially a hairline crack on the inside. I would guess that the rust and discoloration comes from the leakage and high temperatures found between the top of the stove and the block-off plate.

.
.
.
.
I am going to order a motor for the circulation fan, but in the mean-time, if there is anything that is major-wrong with this installation, it seems that now might be a good time to correct it. Please let me know what you all think and thanks in advance!
Some background:
Before we burned the first piece of wood, we had a chimney inspection, which went well. The exterior-walled chimney is 8x8 (maybe 10x10, I can't remember and it's too cold and dark to get on my roof tonight) terracotta and was built in 1967. According to the inspectors, the interior had very little creosote build-up and the tiles appeared to be in good condition. We burned wood for about a month last winter and we've been burning all winter this year and things have been wonderful. According to the meticulous records kept by the previous owners, it is a Buck stove (Regular Buck) that was purchased and installed in 1978. I have always been a bit nervous about the safety factors of the installation and tonight, an opportunity for me to check it out was forced upon me because the fan motor began squalling and I needed to pull the insert to get to it. Fortunately, after some internet research, I believe that I'll be able to find an exact replacement motor for the extraction fan.
Anyway, I am somewhat ignorant of what a good, safe install should look like, but I've been reading this site and am beginning to get a feel for it. The purpose of this post is to get your feedback on these interior pictures on how well the installation was performed. I am certain that I'll have some more questions, but here are the pictures with a few comments. Please let me know what you think...
A shot from the front after I pulled the insert:
.
.
.
.
A picture of what I've come to learn from this site of the block off plate. It is made from galvanized steel and is quite heavy guage (~1/16"). Note that there is no liner in the chimney. The seal looks to have some amount of hot gas leakage as evidenced by the discoloration surrounding the opening. It was actually a pain to get the insert detached from the plate because it was clamped down to the top of the stove by the damper collar by a few bolts and also, if you look closely, you can see the bent tabs that wrapped around the top plate of the stove. It looked like it was quite a chore to install. This block off plate was a replacement of the original and it was installed in 2004 by the previous owners (I told you they had meticulous records
)..
.
.
.
You can see in this image that the block-off plate is very close to the top of the stove and I had to remove some high-temp sealant at the joint between the stove and the bent corner of the block-off.
.
.
.
.
Here is the top of the stove, where the block off mates. Note the two cracks at two of the corners. One of them has been repaired with a 1/4" steel internal patch and the other is essentially a hairline crack on the inside. I would guess that the rust and discoloration comes from the leakage and high temperatures found between the top of the stove and the block-off plate.
.
.
.
.
I am going to order a motor for the circulation fan, but in the mean-time, if there is anything that is major-wrong with this installation, it seems that now might be a good time to correct it. Please let me know what you all think and thanks in advance!