
Place: Santa Fe, NM (lots of sun!)
Time: now.
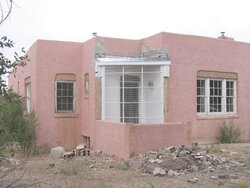
Subject: 1930-built single story home with full daylight basement under, massive (16" thick) uninsulated masonry walls (two layers of 'pentile', a hollow clay brick, stucco outside, plaster inside.) Equally massive interior construction.
Project: Convert south-facing masonry porch and into a passive solar sunspace.
Solar orientation: Front of house faces 16º east of true south. Porch and SW bedroom stepped back 5 feet each (dumb design, but that's what we have to work with.)
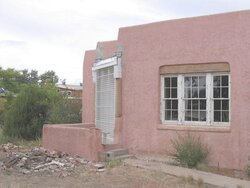
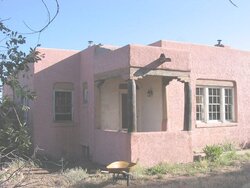
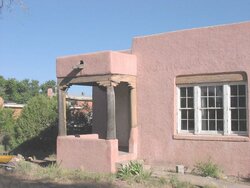
The porch was an eyesore, and always kept half of the house front in shade. So rather than enclose it, I decided to tear it out and install polycarb across the corners. This will allow me to do the same in the SW corner next year if this project works out.
See the attached pics before and after the major work was done.
Working with non-right angles made this project a real PITA. What I thought would take me a couple weekends turned into two months. I suspect most retrofits like this are full of compromise and tradeoffs.
So, the front windows face 16º E of S, and the new polycarb panel (8' wide x 9' tall) faces 15º W of S. Not perfect but not bad. NREL solar radiation data for this area says that the polycarb panel will give me about 110,000 btus per day to work with on an average December day. Again, not bad. Free heat.
In the beginning, the thought was to just to paint the inside walls black and open the front door when the sun is shining and close it when it's not - essentially the "mass behind glass" concept. But since then I've read about the advantages of low-mass sunspaces and am wondering if I can/should apply that concept.
So, the questions are: how best to finish the interior of the sunspace, and then get the heat into the house.
Sunspace dimensions:
north wall is 78" with 36" x 80" door
east wall is 60"
polycarb is 8' wide, 9' high
How would you deal with this? Is the door going to be sufficient venting? I'd like to avoid putting more holes in the wall if possible. Any input is welcomed.
Time: now.
Subject: 1930-built single story home with full daylight basement under, massive (16" thick) uninsulated masonry walls (two layers of 'pentile', a hollow clay brick, stucco outside, plaster inside.) Equally massive interior construction.
Project: Convert south-facing masonry porch and into a passive solar sunspace.
Solar orientation: Front of house faces 16º east of true south. Porch and SW bedroom stepped back 5 feet each (dumb design, but that's what we have to work with.)
The porch was an eyesore, and always kept half of the house front in shade. So rather than enclose it, I decided to tear it out and install polycarb across the corners. This will allow me to do the same in the SW corner next year if this project works out.
See the attached pics before and after the major work was done.
Working with non-right angles made this project a real PITA. What I thought would take me a couple weekends turned into two months. I suspect most retrofits like this are full of compromise and tradeoffs.
So, the front windows face 16º E of S, and the new polycarb panel (8' wide x 9' tall) faces 15º W of S. Not perfect but not bad. NREL solar radiation data for this area says that the polycarb panel will give me about 110,000 btus per day to work with on an average December day. Again, not bad. Free heat.
In the beginning, the thought was to just to paint the inside walls black and open the front door when the sun is shining and close it when it's not - essentially the "mass behind glass" concept. But since then I've read about the advantages of low-mass sunspaces and am wondering if I can/should apply that concept.
So, the questions are: how best to finish the interior of the sunspace, and then get the heat into the house.
Sunspace dimensions:
north wall is 78" with 36" x 80" door
east wall is 60"
polycarb is 8' wide, 9' high
How would you deal with this? Is the door going to be sufficient venting? I'd like to avoid putting more holes in the wall if possible. Any input is welcomed.
 !!
!!")