Installation opinions needed

  • Active since 1995, Hearth.com is THE place on the internet for free information and advice about wood stoves, pellet stoves and other energy saving equipment.

    We strive to provide opinions, articles, discussions and history related to Hearth Products and in a more general sense, energy issues.

    We promote the EFFICIENT, RESPONSIBLE, CLEAN and SAFE use of all fuels, whether renewable or fossil.
Status
Not open for further replies.

AddictiveStew

Burning Hunk
Mar 13, 2013
175
PA
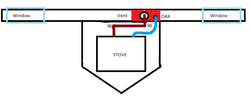
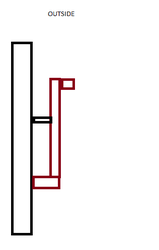
I have attached a very horrible picture of my current setup, drawn in wonderful MS Paint. I also attached a picture (also in horrible paint) of what the outisde will be with the rise. My previous installation had a cleanout T installed right behind the stove adapter (acting as the first 90), then a 2nd 90 to go out of the wall into a straight exhaust. Now with the Englander, they are requiring I have a 3 foot rise in the pipe. So my question is, would you:

A. Keep the cleanout T on the inside, then a 90 out, then a cleanout T on the outside leading up to a 3ft rise. This would be 4 90's total (including the cleanouts).
B. Use two 90's on the inside and put a cleanout T on just the outside.
C. Keep the cleanout T on the inside, and just use 90's on the outside. Purchase leaf blower. lol

I know the location of the install is awkward but the hole in the wall was from the previous homeowner's pellet stove, which I can only surmise is off center because of stud locations.

Option D would be to completely off center the stove between the two windows and vent directly out. This is probably a no go simply because it will look awkward as heck.

Thanks all!
 

Attachments

  • pellet.png
    pellet.png
    2.6 KB · Views: 139
  • pellet2.png
    pellet2.png
    650 bytes · Views: 124
Your original plan has too many 90's and will kill the performance of the stove. the 4 90's are 20 EVL alone. Try to keep the 90's or tee's to 2.
 
The best thing to do would be to patch the existing hole and put a cleanout tee on the inside behind the stove and then go up a minimum of 3 feet to a 90 and go through the wall to the outside and terminate horizontally. Keeps the flue inside (warmer) and gets the minimum rise required. Also, if you ever change stoves you won't have to struggle with matching the height of the hole in the wall if you were to go straight out....
 
The best thing to do would be to patch the existing hole and put a cleanout tee on the inside behind the stove and then go up a minimum of 3 feet to a 90 and go through the wall to the outside and terminate horizontally. Keeps the flue inside (warmer) and gets the minimum rise required. Also, if you ever change stoves you won't have to struggle with matching the height of the hole in the wall if you were to go straight out....


Considering that I just paid to have this put in less than a year ago, I think I'll stick with what I have. We should probably relocate the stove so that I can go straight out and then put a rise on it outside. I would love to move it but I really don't want to make another hole in my wall. Thanks for the feedback guys, you confirmed what I suspected. Luckily this will require fewer pieces for me to purchase!
 
I've ordered my stove adapter and a few other pieces I needed. What size screws do you all recommend for connecting the stove adapter to the stove? Thanks!
 
agreed, too many 90's. Interesting drawings though. what do you do for a living?
 
high temp silicone

I thought a "physical" connection was required (3 screws?). When the company came out to do my initial install on the last stove, they used a ton of high temp silicone and one screw.

agreed, too many 90's. Interesting drawings though. what do you do for a living?

HA! I support Mobile Devices for a large corporation. Which makes me a master MS Paint artist. lol
 
Status
Not open for further replies.