installed a block off plate, and I suck at this!

  • Active since 1995, Hearth.com is THE place on the internet for free information and advice about wood stoves, pellet stoves and other energy saving equipment.

    We strive to provide opinions, articles, discussions and history related to Hearth Products and in a more general sense, energy issues.

    We promote the EFFICIENT, RESPONSIBLE, CLEAN and SAFE use of all fuels, whether renewable or fossil.
Status
Not open for further replies.

ozarkjeep

New Member
Nov 6, 2006
407
so I got the plate in , and sealed a week or so ago.

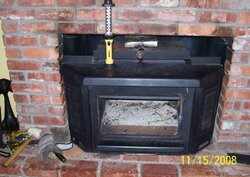
finally got a freind over to help me lift the insert back into place.

realized, the dang liner doesnt fit just right into the stove.

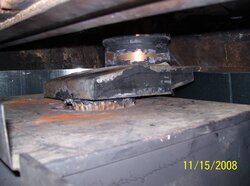
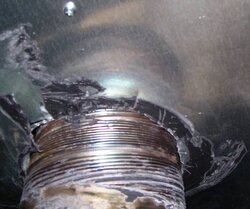
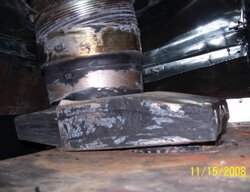
its shifted over th the left too far, so I have to break the liner loose where it goes THRU the block off plate, I had already put hi temp goop all over it ( that stuff is VERY strong once dried)

ive been contorted in there behind the insert to try and get it fit right, but cant get it with the lack of leverage and room in there.

Im thinking of pulling the insert BACK out, and ovalizing the hole the liner goes thru the block off plate, get it all lined up and RE-goop it.

there is nothing to hold the sliding adapter onto the top of the stove but gravity, I might weld some tabs to the top of the stove to ad screws or clamps or something for a more positive connection.

Ill post pics later.. its a mess, and im aggrevated and ready to burn..
 
sit back relax and chill post the pics and maybe we can help.....
take a deep breath..have a beer post pics first before you touch anything:)
 
Thanks Iceman.

I decided to do JUST that to save myself some grief.

here is an older pic of the offset adapter on the stove.

there is no flue collar on the top of the stove, no way to attach anything, simply a hole in the top of the stove this drops down into.

index.php
 
Is that 8"? I had a rough time attaching my liner to the stove collar. I (like a big duffus) cut the liner about 4" too short! It may say flexible liner, but flexible is somewhat up for interpretation. I finally got it worked down and around enough to get it in and put a little piece over where it was barely in the collar. I think you could get an adjustable elbow to get you over. They aren't very expensive at the box stores. I'm sure the safety people here will say that idea sucks, but it's what I would do. I really didn't have much room to play with front to back on my block off plate. I just centered the hole from left to right. What kind of goop did you use? I used some in a caulk tube and it sucks. It dries out and is brittle. I was looking for more silicone type, this said silicone, but was more like mortar.
 
Can't remember the post, but Iceman had a great post with block off plate install photos.
Hook up with Ice and his photos and you can get an idea of how to remedy the block off plate problems.

If you don't need the offset, and its merely there to have something to connect the liner to. Get rid of it, and go directly into the insert if you can.
The weight off the liner alone will keep it from coming out of the insert outlet. And on inserts like yours, the flange is usually on the inside.
If you pull the secondary baffle system out, it should have a flange insidethat you can drill thought it & the liner and secure with stainless steel screws.
Even if you can only maneuver around inside enough to get 1 or 2 screws in, that should be plenty. With the weight of the liner and it being secured up top of the chimney, it ain't going to go anywhere.

The elbow is also a great idea. MAke sure ya get stainless so it lasts & you don't have to keep replacing.
 
I used the little tub of rutland furnace cement from lowes.
EDIT- sorry it wasnt rutland it was this stuff

http://www.nothingbuthardware.com/401675.html


I had used the stuff you are talking about before, comes in a caulk tube, says FP 1126 rating or something.

its worthless, gets hot and brittle and comes out.

The offset is neccessary to line the flu up with the insert so it has to stay.

there is ZERO way to gain access inside the top of the stove to screw to the flange hawg, and its like 1/4 thick there, could be a beeyotch to drill.

IM thinking of welding some angles on top, and putting a metal strap across the top of the offset to "strap" it in place.

I was able to compress the line about 3/4" last night, but still not enough give to get it all lined up.

its a PITA

free beer for anyone that wants to come and help me!

haha


drdoct said:
Is that 8"? I had a rough time attaching my liner to the stove collar. I (like a big duffus) cut the liner about 4" too short! It may say flexible liner, but flexible is somewhat up for interpretation. I finally got it worked down and around enough to get it in and put a little piece over where it was barely in the collar. I think you could get an adjustable elbow to get you over. They aren't very expensive at the box stores. I'm sure the safety people here will say that idea sucks, but it's what I would do. I really didn't have much room to play with front to back on my block off plate. I just centered the hole from left to right. What kind of goop did you use? I used some in a caulk tube and it sucks. It dries out and is brittle. I was looking for more silicone type, this said silicone, but was more like mortar.
 

Attachments

  • goop.gif
    goop.gif
    10.1 KB · Views: 515
Some liner come with angle mounting brackets. "L" shaped brackets with a hole drilled in each tab. this way you can mount one part of the L to the stove top, the other to the liner.
Prolly your easiest solution if you can make some that mount to the stove, then to the offset box.
 
can you give us a pic of inside the fireplace? you might be able to turn a 45 or 30 elbow and pull the liner some more to make the connect
also i think if you could cut some of the block off away around the liner to let it move , then you will have to get a square piece just big enough to get the liner through and then attach it over you existing block off to make it easier...
https://www.hearth.com/econtent/index.php/forums/viewthread/11697/ here is the thread for mine... i was worried about what you ran into so check out how i have a separate for the actual liner.... i am sure with a 30 or 45 you can prolly get the liner to attach.. mine needed a 30
 
yes, "L" brackets would let me screw the offset box in place to the top of the stove.

that means carrying the stove outside so I can get a welder to it though, or borrowing a buddy's little 110v wirefeed and cobbling it together in place.

blah, now im aggrevated again.

hahaha

thanks for your advice guys, Ill post some pics of the block off plate and alinment issues when i get home from work ( the real reason im aggrevated!)


Hogwildz said:
Some liner come with angle mounting brackets. "L" shaped brackets with a hole drilled in each tab. this way you can mount one part of the L to the stove top, the other to the liner.
Prolly your easiest solution if you can make some that mount to the stove, then to the offset box.
 
The L brackets don't have to be welded. You will most likely have to slide the insert out to access the top with a drill, drill mounting holes thorough the top and screw the brackets in place with s.s. screws.
Same for the other end connecting to the offset or even elbow if you go that route. An elbow if feasible would offer easier cleaning.
 
Hogwildz said:
The L brackets don't have to be welded. You will most likely have to slide the insert out to access the top with a drill, drill mounting holes thorough the top and screw the brackets in place with s.s. screws.
Same for the other end connecting to the offset or even elbow if you go that route. An elbow if feasible would offer easier cleaning.

hog, lets get some beer and go over there and get it done!!!!
in and out and he has to provide the beer while we are there and for the return trip home!!! and dinner
 
iceman said:
Hogwildz said:
The L brackets don't have to be welded. You will most likely have to slide the insert out to access the top with a drill, drill mounting holes thorough the top and screw the brackets in place with s.s. screws.
Same for the other end connecting to the offset or even elbow if you go that route. An elbow if feasible would offer easier cleaning.

hog, lets get some beer and go over there and get it done!!!!
in and out and he has to provide the beer while we are there and for the return trip home!!! and dinner

Pepperoni pizza is required fro me to get off my ass and offer my services ;)

But some beer and pizza promises and I move like a cat. Ask Newtown, he got a nicer block off than I made for myself.
I did inspect mine this year, pulled off the dried up furnace cement that was falling off around the liner. And stuffed a nice pc of rope gasket around it.(Thank you Brother Bart).
Looks better already.
 
Hey guys,

if the proximity thing was better betwixt us, Id be posting pictures of beer, bbq, chili, and pizza to get yall over here.

Here are some pics.

I shoved the camera in from the side and took a pic, MAYBE I could get by with a 30 degree elbow instead of this offset box.

BUT. would that gain me anything really?

anyway.

here are pics, its UGLY..

ive been rushing it trying to get it done and ready, it is supposed to be 24F here tomorrow night.
 

Attachments

  • stove-pics1.jpg
    stove-pics1.jpg
    72.1 KB · Views: 463
  • stove-pics2.jpg
    stove-pics2.jpg
    71.2 KB · Views: 421
  • stove-pics3.jpg
    stove-pics3.jpg
    104.3 KB · Views: 425
  • stove-pics5.jpg
    stove-pics5.jpg
    74.5 KB · Views: 436
  • stove-pics4.jpg
    stove-pics4.jpg
    51.6 KB · Views: 419
ozarkjeep said:
Hey guys,

if the proximity thing was better betwixt us, Id be posting pictures of beer, bbq, chili, and pizza to get yall over here.

Here are some pics.

I shoved the camera in from the side and took a pic, MAYBE I could get by with a 30 degree elbow instead of this offset box.

BUT. would that gain me anything really?

anyway.

here are pics, its UGLY..

ive been rushing it trying to get it done and ready, it is supposed to be 24F here tomorrow night.

Pic didn't load.
The elbow would make easier for cleaning. As the junk would fall into the stove rather than into the offset box.
 
I had to resize, then resize, then resize, then resize some more.

apparently the 450K 1200x1200 picture limitations are not correct.

I can already get my hand and a vaccum hose up into the offset box to clean it out after I sweep the flue.


Hogwildz said:
ozarkjeep said:
Hey guys,

if the proximity thing was better betwixt us, Id be posting pictures of beer, bbq, chili, and pizza to get yall over here.

Here are some pics.

I shoved the camera in from the side and took a pic, MAYBE I could get by with a 30 degree elbow instead of this offset box.

BUT. would that gain me anything really?

anyway.

here are pics, its UGLY..

ive been rushing it trying to get it done and ready, it is supposed to be 24F here tomorrow night.

Pic didn't load.
The elbow would make easier for cleaning. As the junk would fall into the stove rather than into the offset box.
 
I'd say your good to go the way you are. If you have not hard time getting to the offset to clean it, why make more work.
I suggest roughing a cut in the block off plate enough to give you what you need to get liner to offset , offset to stove.
The set block off plate, trim as needed. And make a separate square or even round trim ring to cover the gap left between the liner & block off plate after liner is reattached.
Put trim ring snuggly around the liner, screw to main block off plate and seal. Done
 
yes,

I nibbled a bit of clearance with the tin snips last night.

Ive got a freind loaning me his 110V mig.

Ill buzz some bracketry up there to screw or clamp the box in place on top of the stove.
and maybe be burning tonight.

thanks for indulging my vent gentlemen!
 
Ugly but effective.

welded some grade 5 3/8 bolts on top of the stove.
scrounged up some 3/8 wingnuts, and a handful of washers.

scrap metal bar, hammer and welding table to bend some angles ( sort of)

and its clamped in place and burning.

used old door gasket material to seal between the offset box and stove top.

house was 71 degrees all night.

wooo hooo!
 

Attachments

  • flu-clamp.jpg
    flu-clamp.jpg
    81.2 KB · Views: 272
Status
Not open for further replies.