installing a chimney around this roof overhang?

  • Active since 1995, Hearth.com is THE place on the internet for free information and advice about wood stoves, pellet stoves and other energy saving equipment.

    We strive to provide opinions, articles, discussions and history related to Hearth Products and in a more general sense, energy issues.

    We promote the EFFICIENT, RESPONSIBLE, CLEAN and SAFE use of all fuels, whether renewable or fossil.
Status
Not open for further replies.

robertjp

Member
Oct 7, 2008
75
Western NY
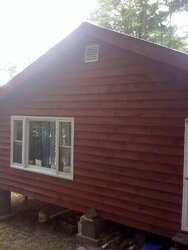
I need some help figuring out how to install a chimney for a new install on our cottage. We want to put a WB stove in this fall. Want to get the chimney ready for whatever stove we decide. I have this roof overhang as you can see in the pic. It is about a 12" or so overhang. the chimney can be flush to the building till you get to the overhang, then what? I know virtually nothing about woodstoves so go easy on me.Thanks in advance.

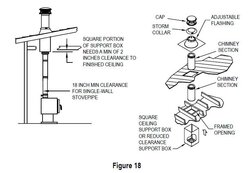
P S Is 6" double wall pipe a good choice?
 

Attachments

  • cottage roof overhang (2).jpg
    cottage roof overhang (2).jpg
    76.1 KB · Views: 3,066
Why put the flue on the exterior? It's already going to be a short chimney. An exterior flue with one or two 90's in it is going to further reduce draft. Looks like straight up the middle on the interior near the peak would be the best. It will probably cost less too. But even if it is not near the middle I would still try to go interior.

Download the flue installation guide from Simpson. It has some good diagrams illustrating the options. The pipe used to connect the stove is called the connector. It comes in double wall and single wall. This pipe is only used until there is a penetration of the room. From that point on it must be Class A pipe. Class A comes in double wall or in some cases triple wall. But for this application double-wall class A should be fine.

http://www.duravent.com/docs/instruct/L150_Apr10.pdf

Without seeing the actual interior layout and ceiling details, I'd be just guessing at what is needed, but this diagram from the instructions may give you an idea if the structure is similar.
 

Attachments

  • ceiling support.jpg
    ceiling support.jpg
    49.5 KB · Views: 4,122
A metal roof is not an obstacle. There are flashing kits for this.

I could be in error but I would think that a support box like in the illustration would just need aluminum angle irons attached to support the surrounding drop ceiling. The weight of the support box and flue pipe is supported by a flange you create on the roof by folding outward the trimmed section of the support box.
 
  • Like
Reactions: somelikeithot45
I would rather not involve the metal roof. It would be easier for me to go on the outside if I could figure out how to get around the overhang.
 
Would it be ugly, stupid, against the code (law) to use support brackets long enough to clear the sofit so its straight up?
 
robertjp said:
I would rather not involve the metal roof. It would be easier for me to go on the outside if I could figure out how to get around the overhang.

You'll just have to use 15 or 30 degree offsets.
Once you figure out whose Class A you're going to use, the offset charts
issued by that manufacturer will tell you how much length you'll
need between the offset & the return...
You'll also have to make sure you meet the minimum chimney height criteria for the stove you purchase.
Like BeGreen said, any offset - including the tee at the bottom of the chimney & the 90 inside
- unless you get a rear exit stove - will restrict the draft & you can only make up for
that restriction by increasing the overall chimney height.
If you don't mind paying for the extra footage, looking at an "unexploded scud missile",
adding the required chimney supports & brushing thru the offsets, I'd say you're good to go!
 
Well....thanks but you sorta lost me. Im a total newbie with this stuff. Is there a pic you can direct me to to show me what a 15 or 30 offset is?

Whoose class A ???

Our stove is rear exit, how high over the roof would I need to go approx.? This cabin is in the middle of nowhere or Id just have a dealer install it but looks like I'll have to do it.
 
As BeGreen stated there are flashing kits for the roof that look like it will be a breeze going through the metal roof, a couple of hundred bucks or so buys a nice one. Somebody posted the site a while back maybe I can find it.
 
Do a search for metal roof flashing and enjoy, maybe the way to go.
 
This is for the little Scandia right? If it were me, I would not come right out of the back of the stove and exit the bldg to the exterior tee. Do that and forever that is the flue exit height you are stuck with. In the least, if that is the plan, put the stove on a raised hearth so that if you want to change the stove later on, you may have the option of lowering the hearth to accommodate the new stove's flue height.

Avoiding a hole cut in the roof is going to cost a lot more. There are many more parts involved going exterior, especially with the offset elbows. Class A pipe is expensive. The offset alone will run about $300+ in parts. The offset table, with pictures is also covered in the Simpson installation guide mentioned earlier.

The code is: Chimneys shall extend at least three feet above the highest point where it passes through the roof of a building, and at least two feet higher than any portion of a building within ten feet.”

The stove will need at least 12' vertical rise in the chimney to draft properly. Each 90 deg turn in the smoke path is going to effectively remove about 3' of chimney height with reduced draft.
 
robertjp said:
Well....thanks but you sorta lost me. Im a total newbie with this stuff. Is there a pic you can direct me to to show me what a 15 or 30 offset is?

Whoose class A ???

Our stove is rear exit, how high over the roof would I need to go approx.? This cabin is in the middle of nowhere or Id just have a dealer install it but looks like I'll have to do it.

Here is an example of a 30 degree elbow: http://www.ventingpipe.com/metal-fa...ree-elbow-from-the-temp-guard-series/p1231055

Class A simply refers to the type of venting pipe you'll be using to vent your stove. There are many manufacturers who make it (Simpson, Selkirk, ICC, Hart & Cooley). It's also referred to as UL 103 HT pipe. UL is for Underwriters Laboratories, and 103, I believe, would be the standard which the pipe is certified against. In any event, going out the wall or up through the roof, a wood burning stove setup will involve: the stove of choice, connector pipe (or stove pipe; this is the black pipe you often see inside), a ceiling support box (square or round, depending on brand and your set up), and Class A/UL 103 HT venting pipe.

Class A will require a 2" CTC (Clearance To Combustibles). Take a look at the notching used in the thread BeGreen linked. I would personally go that route for appearance if nothing else.
 
Save yourself some grief, hire the job OUT!
 
Guys,

Thanks for the good info...really. The notching idea seems like my best best as I dont like the idea of having to cut through the metal roof and then worrying about leaks. Not too mention the fact that I really dont have a ceilng other than a drop ceiling with soft tiles on it (above that is the metal roof of the cabin). As long as the notching idea wouldnt affect the structure integrity, that may be the way to go for me. I noticed in the thread you sent with the photos of braces on wood being using to support the pipe to the house, is the wood so it stays 3" away from the house? Is 3" the code or manufaturers specs? Begreen you have a really good point I never thought of. If I install this pipe before I know what stove Im gonna use, Im stuck with the height. I was gonna install the pipe and have it ready to go once we decide on a stove so it was "wood stove ready" but it sounds like I should do it all at once. The only thing Im not sure of about the notching method is the eve is wood but the metal roof should come to the edge so I would have to notch the metal roof too? What would I use to seal it so it wouldnt leak? Thanks again.

P.S Im still not sure about using the Scandia, there seems a mixed reaction here wether its safe or not and if I could even find the oblong to round pipe I need from the back of it.
 
Good luck keeping a pipe through a notch from leaking on a fairly shallow roof in Western NY. One good heavy wet snow off Lake Erie and that seal will be done. I have 4 chimneys through notches at our family's camp. Well, now we have three as the snow took one of them out 2 years ago. The remaining 3 all leak periodically and have to be repaired every couple years. I can only imagine how rotted they are underneath.

If you don't want to go straight up through the ceiling, which is what I would do, I would consider building a chase around the pipe. You can then put some kind of diversion uphill of the chase to protect it from ice, snow and to a lesser extent rain.
 
I had the same problem when I was installing my stove a couple of years ago.
I ended up just running an exterior flue that goes straight up the side of the house until it reaches the overhang. I then used two elbows to go out around it and up a couple of additional feet. I couldn't afford to enclose the flue at the time of the install, and decided I would just set it up and not make any additional penetrations into my roof until I could afford to enclose the entire flue properly.
It turns out, that I don't think I will ever need to.
I do have a little trouble getting a draft started when there is a high pressure system above me or if the flue gets extremely cold relative to the house, but once the fire is lit it draws great and I don't seem to get very much additional creosote buildup at the corners (I do get some, and its a little tough to pull a brush through the elbows, but all in all it works fine for me).
I still plan on insulating my flue at some point, but its gotten moved way down the list at this time.
 
It seems to me through the roof would be easier and cost effective.

You can use a rafter support kit to take the weight of the chimney and still use the ceiling trim kit in the drop ceiling so everything looks nice and is safe.

http://www.bellfiresusa.com/images/roof_support_package.jpg

It is easier than you think to go through a metal roof, and with the right flashing it will be weather tight. You don't need much more than a sawsall, utility knife and hammer to do the job.
 
would it be safe running a pipe through a soft drop ceiling tile? Doesnt sound too safe too me unless there is a special tile. Just when I get comfortable with a method, someone shoots it down. Whats a newbie to believe? I dont know which way to go now.
 
I can’t over state it enough, go get yourself a pro! And let them do it correctly and permitted. You have a nice place keep it safe. Go do what you do make the money and just make sure the person you hire is the right person. You’ll sleep better at night and your insurance will be cheaper!
 
oldspark said:
When I was looking at roof flashings for my shop I thought this one looked like the ticket, have not installed the wood burner in shop yet so cant tell yu first hand how good it is.
http://www.bestmaterials.com/detail.aspx?ID=16058

Wow that is a pretty neat unit...is this intended for metal roofs only or any roof? I think I might pick this up for my chimney where it goes through the roof (if it works for traditional tar shingle roofs).

Nate
 
Jonsered said:
oldspark said:
When I was looking at roof flashings for my shop I thought this one looked like the ticket, have not installed the wood burner in shop yet so cant tell yu first hand how good it is.
http://www.bestmaterials.com/detail.aspx?ID=16058

Wow that is a pretty neat unit...is this intended for metal roofs only or any roof? I think I might pick this up for my chimney where it goes through the roof (if it works for traditional tar shingle roofs).

Nate
It says it will work on any kind of roof and it has a 20 year waranty, seems like the answer for many instalations.
 
oldspark said:
Jonsered said:
oldspark said:
When I was looking at roof flashings for my shop I thought this one looked like the ticket, have not installed the wood burner in shop yet so cant tell yu first hand how good it is.
http://www.bestmaterials.com/detail.aspx?ID=16058

Wow that is a pretty neat unit...is this intended for metal roofs only or any roof? I think I might pick this up for my chimney where it goes through the roof (if it works for traditional tar shingle roofs).

Nate
It says it will work on any kind of roof and it has a 20 year waranty, seems like the answer for many instalations.

Affordable answer at that!

Is that available in different colors? I would prefer black so it would not stick out quite as much.
 
robertjp said:
would it be safe running a pipe through a soft drop ceiling tile? Doesnt sound too safe too me unless there is a special tile. Just when I get comfortable with a method, someone shoots it down. Whats a newbie to believe? I dont know which way to go now.

I don't see why not -- as long as the required clearances are met, though I'm no expert. I would still use the ceiling support kit (with the roof support) so that the chimney doesn't move and everything is trimmed out. But the weight of the chimney would be hanging from the rafters.

If you are worried about the drop tiles you cold always replace the one with the chimney through it with 5/8" sheetrock.
 
Status
Not open for further replies.