Installing A Stove In A Room With SIPs Roofing

  • Active since 1995, Hearth.com is THE place on the internet for free information and advice about wood stoves, pellet stoves and other energy saving equipment.

    We strive to provide opinions, articles, discussions and history related to Hearth Products and in a more general sense, energy issues.

    We promote the EFFICIENT, RESPONSIBLE, CLEAN and SAFE use of all fuels, whether renewable or fossil.
Status
Not open for further replies.

BigCountryNY

Burning Hunk
Sep 16, 2014
233
Putnam Valley, NY
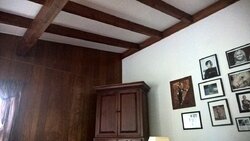
Has anyone ever installed a new stove with these types of roofing panels? I am going to add another stove upstairs this year and our living room was an addition to the original floor plan. Instead building the attic out, they just extended the roof and used an older type of Structural Insulated Panel as they wanted to have the roofing beams exposed. The panel is a pre-fabricated panel that is sheathing, insulation, and interior surface covering all in one.

I'm installing in the corner, so I can go through the exterior wall and up with Class A or I can install on the interior wall via thimble and then go up with Class A. Of course the interior wall would be better for draft if I have to go that route, but going through the ceiling I can avoid the 90 and tee which would also improve draft.

I'd appreciate any thoughts that you all might have on this one and thanks in advance!
 
SIP should be the same as conventional as far as clearances from the chimney are concerned.

I'm not visualizing the interior wall install option. An interior install is usually straight up through the interior ceiling.

How tall will the entire flue system be?
 
Great, thanks! The interior wall is the original exterior wall essentially. On the other side of that wall, there is a closet and space where I could build a chase and go up through the attic and out the roof that way. This is near the masonry chimney for the oil-fired boiler however. Going through the interior wall would still require a thimble to get to the other side to go up.

But if I can go straight up through a SIPs panel, that makes it much easier.

Floor to ceiling is 12 ft, and if I go with the Englander 13NC it needs 15 ft minimum so I'd go up as high as I needed. But my better half is thinking she may want a "prettier" stove, so that may change things a bit. Being able to go straight up will save me on cost for the Class A however.
 
Current sips use two sheets of wood separated by a 6+" layer of eps insulation. Looks like a big ice cream sandwich. To bore a hole thorough that would require some talent since the bore will be oval in shape and not square to the panel. It can be done and is surely done regularly by sips installers with other vent pipes. I would call a sips guy, not a chimney guy, to bore the hole and use his experience.
 
Here's a photo of the corner that the new stove is going in. We ended up deciding on the Englander 30NC, as once my wife found out the price of the PE Alderlea T5 all of a sudden the "pretty" stove wasn't so important. I assured her that we would make it look nice.

These SIPs are older, so slightly different that the current SIPs. You make a good point Highbeam, I might be better off calling over a roofer to make the hole, then I can take care of the rest.

WP_20150723_19_15_35_Pro.jpg
 
Big Country - looks like you got yourself a good project, good choice on stove selection, that NC30 will cook. How much of an area are you planning on heating? Also even though the stove manual says you can use single wall pipe from the collar to ceiling support box, please consider using double wall black pipe, its a little more cost upfront, but it keeps the flu warmer so you have less of a chance (under prime conditions) of creosote build up. Also make sure you have a good supply of *dry wood. Also the NC30 like a little taller flue, greater than 15ft. If its less than that, she gets a little sluggish on start ups during milder weather (temps in the 40's and 50's)
Keep us posted with pictures!
 
Thanks KennyP. I'm heating about 1000 sq ft of upstairs area - in total I'm about 2200 sq ft. The insert that I put in last winter did a great job of helping out, as it kept downstairs quiet warm and with the heat that traveled upstairs we only used about 350ish gallons of oil from 1 Sept to mid-March. The people we bought the house from said they used to go through 900-1100 gallons per year. By putting in the 30NC, I won't need to use the baseboard heaters at all and I'm going a little bigger with the stove as the living room (pictured above) has three walls of windows and I lose a lot of heat there. So on those really cold days, I know the 30NC will keep up.

This winter's wood is comprised of 4 cords of standing dead birch, silver maple, and red oak that was CSS'd last November. I'm already working on my 16/17 stash with a cord of red and white oak cut and split and I've got a log load being delivered tonight. Last winter was our first winter in this house, so it was a lot tougher but I'm feeling much better about the winters ahead now. I'll absolutely post pics when I'm finished.

Thanks for the insight regarding the flue. I was planning on going with double wall pipe, and it's no problem to take the Class A a little higher to get above 15'. Would you suggest maybe 18 or 20'?
 
Total height from stove top to chimney cap of 20ft +- would be perfect, my best friend has a nc30 and she's a beast, you won't have any regrets with your setup
 
  • Like
Reactions: BigCountryNY
Current sips use two sheets of wood separated by a 6+" layer of eps insulation. Looks like a big ice cream sandwich. To bore a hole thorough that would require some talent since the bore will be oval in shape and not square to the panel. It can be done and is surely done regularly by sips installers with other vent pipes. I would call a sips guy, not a chimney guy, to bore the hole and use his experience.

I was thinking about this some more, and since this would need to be a roof-supported install of the Class A pipe then I could potentially use something like the DuraPlus mobile home support kit which comes with a square support box in which you would cut and bend the edges of the support box and nail to the roof for support. The square hole would certainly be easier to cut than the oval hole.

Thoughts?
 
It will still be a tricky cut. The support box must be square to the ground so that the chimney is vertical. The sip panel is tilted. So the hole will be cut at an angle through the panel. The expert will probably chop it out with a sawzall, experience is valuable here.
 
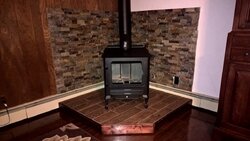
Update - completed the install today. Picture is poor due to dim lighting (and was taken before I put the firebricks back in and the door on). Made the cut in the Insulite panel with no problems and was able to attach the support box to the rafter as well as cut & bent the top of the box for a roof supported install. Everything came together nicely I think, including the new hearth area that I built for the stove. Going to make a mantel out of black cherry for the top of the ledge stone and going to make some quarter round out of another stick that I have laying around to trim the sides of the stone. Lastly, I'll install a spotlight from the ceiling to highlight that area and it will be all set.

Break-in burns once we have a cooler day or evening and then she'll be ready for the season.

A couple of thoughts from the install that could be done better with regard to the 30NC:

1. Removing the pedestal is a real hassle. The manual is incorrect and says to tip the stove on it's back, were you cannot access the nuts to be removed from the carriage bolts. It is better to tip it on it's side in this case.

2. It would have been really nice if England's would have included a cardboard template of the stove footprint w/ flue collar location for purposes of placing the stove and ensuring that the pipe location is plumb. The lack of this means you have to use the stove which is also a hassle.

Overall, I couldn't be happier. I'll post some more pics tomorrow in better light and once the mantel and trim is up.

WP_20150902_19_28_16_Pro.jpg
 
Wow - that looks great !!!
 
  • Like
Reactions: BigCountryNY
Thanks KP! Looking forward to getting it all wrapped up, but at least she's ready for winter now.
 
Status
Not open for further replies.