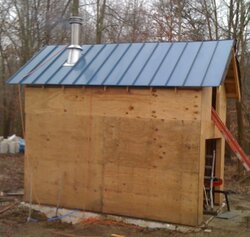
Installing chimney flue through metal barn roof

  • Active since 1995, Hearth.com is THE place on the internet for free information and advice about wood stoves, pellet stoves and other energy saving equipment.

    We strive to provide opinions, articles, discussions and history related to Hearth Products and in a more general sense, energy issues.

    We promote the EFFICIENT, RESPONSIBLE, CLEAN and SAFE use of all fuels, whether renewable or fossil.
Status
Not open for further replies.

horrocksd

Member
Mar 2, 2010
42
Finger lakes, NY
I plan to install my Econoburn 150 in my modern steel construction barn and run my heating line about 60' underground to my house. I got a good buy locally on a bunch of used 8 inch stainless steel double-insulated Selkirk Metalbestos pipe. My first thought is to run my flue pipe through the wall and up the out side of the barn, but the braces, bands, and tee will cost me about $400. I think it would be cheaper for me to just go straight up through the metal roof, but the roof is the modern "corrugated" sheet metal type and i'm wondering what I would use for a roof flashing/collar. Has anyone ever seen one made for a roof other than the standard shingle type flashing?

Also, Ace Hardware online seems to have cheapest prices on the Selkirk Metalbestos piping and accessories. This includes the vendors on eBay. Does anyone know any other vendors who might be a good source for these materials? As always, thanks for your help and ideas!
 
I've done a few of these. I cut the hole for the pipe as close as I can in the roof and seal it with a good silicone caulk. I also lay several beads on the upper and the side edges then screw the edges down as tight as I can get it to form to the roof. I haven't had one leak yet. I had heard that some company makes a flashing piece but I haven't found it yet.
 
I ran my Paxo pipe, right up thru my shed roof also. 8 inch. I alsohave corrugated metal roofing . I bought a Universal rubber boot flashing kit. Worked prefect on the metal. It has soft aluminum around the perimeter of the rubber base . you put your metal roofing screws right thru that. completely molds itself to the ribs. I just put a bead of silicone , underneath the top and sides. Then your storm collar for your pipe covers the boot. Comes with an insulation shield and mounting brackets that go inside to support the chimney , just under the roof. Worked great. Not cheap, but no headache, no leaks. www.lindemannchimney.com. Item#200101....877-722-7230,,,,,ask for Chuck, great people! Hope this helps.
 
I read about and pondered using the rubber boot that xclimber is talking about. I was fairly expensive if remember correctly. Nobody carried it locally and none of the pros around here had used it before. They did all think like me and doubted whether the black rubber would last more than a few years without weather checking and cracking from the sun so for xclimber's sake I hope we are all wrong. Of course not even Morton Buildings had any good suggestions for me other than to use the standard collar over the top of a hole and "seal it up with caulk" (lots of it). I would think the metal building companies would sell a silicone molding formed to the contour of their metal sheets that could be laid under a standard "cone" shaped roof collar with flat metal base. But unfortunately nobody makes anything like that.

I ended up cutting a hole in the roof just big enough to insert the standard collar "cone" with flat metal base from the inside (rather than outside) of the building so only the "cone" part would show out the top of the roof. This made it easy to secure the flat metal base of the "cone" to a 2x4 frame on the inside. Also I only had to caulk a 1/8" to at most a 1/4" gap around where the cone protruded through the roof. I used red hi-temp caulk initially but later re-caulked it with black neoprene roof compound which was much suitable after realizing the that the hi-temp characteristic was not needed on double wall pipe. No leaks and looks pretty professional actually.

I used Menard's Supervent which I believe is actually made by Selkirk. They had a great brochure that detailed all the possible configurations and adapters available. The attic insulation shield and ceiling adapter worked great on my metal flat ceiling. I also just used plain black single wall from the ceiling down to the boiler because I could not find any double wall black fittings that would adapt to the unique size collar (metric i guess) on the EKO.
 
The correct way to flash a corrugated roof is by inserting the flashing through the roof from underneath. Cut your hole in the roof(it will be oblong and take some serious measuring to get it plumb) then with a second person holding it up from in the building screw through the roof into the flashing. Caulk with a good grade silicone, $6-8 a tube, NOT latex based, and you're good to go. It won't ever leak.
 
I used an orange rubber boot, not the black kind, orange ones are designed to take the higher temps. It had a soft metal rim that you could conform to the roofing, plus good quality caulk. Not cheap but easily found around here.
 
easternbob said:
I used an orange rubber boot, not the black kind, orange ones are designed to take the higher temps. It had a soft metal rim that you could conform to the roofing, plus good quality caulk. Not cheap but easily found around here.

asumming that by corragated you mean ribed usually 6" on center. (true corragated is rarly used any more and heatermans way work better on a true corragated roof)
I'm a roofer and this is the way to do it. The boot is made of high temp silicone. You may have to special order or get at plumbing supply store. Use 100% silicone or betteer to seal it. place a bead of silicone on bottom
slip over pipe and screw metal rim every 1-1/2".
 
Thanks for your replies everyone. The high-temp boot sold by Slekirk is $185 plus shipping and when I add everything up to go through the roof it only costs slightly more to go through the wall instead. I've always tried to avoid penetrating a roof when I don't have to, so I think I'm going to go the conservative route and just go through the wall. Thanks again!
 
http://www.bestmaterials.com/detail.aspx?ID=16058

Another source of high temp silicone flashing boots. I just installed one and I'm pretty happy with it.

Woodmaster:
Do you have an idea of real world life expectancy of these?
I'm thinking of installing an over sized storm collar to provide a little more protection from the sun. Is this worth it or is it a non issue?

Thanks,
Noah
 
I was able to install my flashing while I installed the roof. I used two overlapping roof panels in the chimney panel area with a standard galvanized flashing. The flashng goes below the upper panel and over the lower panel. This should work with corregated also if you can add an overlapping upper panel. My roof panels are 16" wide. Boiler placement was alinged to have the flue come out in the middle of the panel.
 

Attachments

  • Shed.jpg
    Shed.jpg
    133.1 KB · Views: 56,511
Floydian said:
http://www.bestmaterials.com/detail.aspx?ID=16058

Another source of high temp silicone flashing boots. I just installed one and I'm pretty happy with it.

Woodmaster:
Do you have an idea of real world life expectancy of these?
I'm thinking of installing an over sized storm collar to provide a little more protection from the sun. Is this worth it or is it a non issue?

Thanks,
Noah

Noah, dont Know the life expectacy but I would think a long time. A storm collar shouldn't be needed with this type of boot but couldn't hurt any thing. Its basically the same or better silicone that bakers use in there ovens, only not food grade.
 
Red silicone, metal roof boots are the safest bet, they could handle the higher temperature you would experience in a chimney fire for example. If you use a square base one, turn it so the corner faces straight up the roof and water sheds either way from the "point" Or a round base one. All the metal building suppliers and plumbing wholesalers sell them around here. I would not depend on gobs of silicone or any product to seal the opening.

www.eternabond.com sells a great double sided tape for flashing installation cleaner and neater than silicone. It is rated for asphalt, metal, epdm, TPO and about all roofing materials.

hr
 
My roof kit came with four pieces of steel, that run parallel to the stove pipe, and exit just to the top of the rubber boot. It creates an air space between the pipe and the boot. The storm collar then keeps out any water. There is no direct contact between the rubber boot and the heat of the insulated chimney pipe.
 
Sorry to dig up an old thread.

I have a question about an unorthodox remedy.

I have corrugated metal roofing and I currently have standard adjustable flashing with gobs of caulk. (It's a bit ugly, but it can only be seen from the roof). Due to expansion and contraction the caulk is giving way and I've developed a leak. I could continue to pack in the caulk, but I'm wondering if I can use the Selkirk rubber boot over my existing flashing?

It would seem by looking at the pics that the rubber boot's opening is cut-to-fit. Couldn't I just cut it larger to accomodate my current flashing (which is over 6" class A)? With this method, it would seem that all I'd need to do is cut the boot opening to size, remove the rain cap and storm collar, slide the boot down into place, lay down a bead of silicone, screw it down, and replace storm collar.

I'm sure most will say tear out the caulk and remove the previously placed flashing and install boot fresh, but I'm trying to avoid that. I'm questioning if the aforementioned remedy is even feasible, or is there some safety or logistical reason I should avoid this?
 
Status
Not open for further replies.