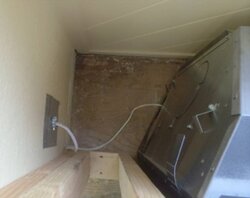
Installing fireplace, hearth, hard wood floor....

  • Active since 1995, Hearth.com is THE place on the internet for free information and advice about wood stoves, pellet stoves and other energy saving equipment.

    We strive to provide opinions, articles, discussions and history related to Hearth Products and in a more general sense, energy issues.

    We promote the EFFICIENT, RESPONSIBLE, CLEAN and SAFE use of all fuels, whether renewable or fossil.

Jelly

New Member
Jan 2, 2017
11
NJ
We are starting a remodel soon which involves a new fireplace, floors, hearth and built in cabinets. Wondering if this sounds sounds right to you...

1. Fireplace is installed on 1/2" backer board which is secured to the sub floor. Bottom of my novus nxt has 3/4" rim to accept flooring. But since I want a hearth, fireplace needs to be raised another 1/2"
2. Hearth stone is cut around fireplace and on top of backer board.
3. Hardwood floor is installed around hearth
4. Built in cabinets are installed around fireplace and on top of hard wood floors.

Thanks for any tips or recommendations you may have.
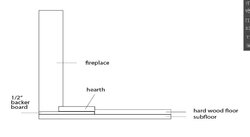
15941053_10158066498440173_1210049460920171261_n.jpg
 
I would forgo the hard wood floor and use either tile or stone. Just my opinion. You'll have hot coal roll outs and will want a surface impervious to that.
 
We are starting a remodel soon which involves a new fireplace, floors, hearth and built in cabinets. Wondering if this sounds sounds right to you...

1. Fireplace is installed on 1/2" backer board which is secured to the sub floor. Bottom of my novus nxt has 3/4" rim to accept flooring. But since I want a hearth, fireplace needs to be raised another 1/2"
2. Hearth stone is cut around fireplace and on top of backer board.
3. Hardwood floor is installed around hearth
4. Built in cabinets are installed around fireplace and on top of hard wood floors.

Thanks for any tips or recommendations you may have.

View attachment 192438

If you use a 3/4" hearth, you won't need the backer board under the unit, & you will have smooth transition from the hardwood (also 3/4") to your hearth.
Marble & granite hearths are available in 3/4" thicknesses for exactly this reason. They normally come in 20" widths & 72" lengths but can be cut to specific sizes. Mine is cut to 12" wide & the width is the same as the outer dimensions of the mantel legs.
 
  • Like
Reactions: Jelly
Thank you! I actually decided today that I am going to run my hardwood floors under the fireplace.

1) Hardwood floors installed
2) Fireplace over floors
3) Hearth under the 3/4 flange on fireplace and on top of hard wood.

This makes more sense to me. Not sure why the fireplace store said the fireplace is installed on sub floor and not finished floor.

For just the reason I said. Smooth transition (i.e. NO tripping hazard). Plus not sharp stone edges for children to fall against.
 
  • Like
Reactions: Jelly
Good point DAKSY. I do prefer the smooth transition.
I am confused about the order of install if this is the case.

Is this the order would you install?
1- Floor
2- Hearth
3- Fireplace
4- Mantle w/ built in cabinets
 
Good point DAKSY. I do prefer the smooth transition.
I am confused about the order of install if this is the case.

Is this the order would you install?
1- Floor
2- Hearth
3- Fireplace
4- Mantle w/ built in cabinets

1. Fireplace
2. Hardwood - as long as your flooring installer knows the EXACT dimensions of the hearth, he will "picture frame" the opening for the hearth installers.
Marble & granite hearths are cut as perfectly square as they can be, so the picture frame must be near perfect as well.
3. Hearth
4. Mantel
 
  • Like
Reactions: Jelly
Question about the fireplace installation. Wife was told that it will cost $850 to install our direct vent novus nxt fireplace which will vent directly out the back and not angles out the top. I already ran the gas and pulled the electric. I've installed oven range vents so know how easy that is. What exactly am I paying $850 for? What does a typical vent kit cost?

Thanks
 
The install should go something like this:
1. At the dealer, the fire place will be prepped. A short piece of CSS gas line with a sediment
trap is installed in the unit & a short section of 14/2 Romex is installed. (Yours won't need to use that.
Then we covered all the seams & holes in the box with aluminum tape.
While you don't consider the prep as part of the install, that takes time & the materials have costs.
2. The truck will be loaded with all the materials for YOUR particular install - fire place, venting, cap -
PLUS standard materials like caulk, sheet rock, framing lumber, pipe fittings, Vinyl siding components & tools.
The truck & installers head to the job site.
3. Drop cloths are laid through your home from the front door to the install location to protect your property &
the fireplace is brought in & set in position.
4. One installer will determine where the venting will go & drill a pilot hole on the center line through to the outside.
One will prep the outside, cutting the siding adequately enough to install the cap & also determine what J-channel
is needed to seal after install. The other will cut the opening in the sheet rock & install any framing members to
support the wall thimble & cut through the outer sheathing. Insulation & sheet rock will be installed to weather
proof the inside wall. The fire stop is installed. The wallswitch or remote location is determined.
The electrcal box & wiring (if needed) are installed.
5. The horizontal venting sections are installed & sealed with aluminum tape. & the unit is slid into position, with
the venting passing through the wall to the outside.
6. The cap is positioned, leveled & secured. Then the J-channel is installed & caulked in position.
7. The fire place is secured to the floor or wall.
8. The gas line & electrical connections are made.
9. The fireplace is set up. Glowing embers, charcoal rocks or glass beads are placed on the burner & the log set is installed.
10.The fireplace is fired up: Gas line is bled to the valve. A leak check is performed. Front glass re-installed.
Gas pressure & millivolt readings (if necessary) are taken & adjusted. The blower operation is confirmed.
11. On-site training for using the unit & controls is performed.
12. Work site cleanup is performed & questions answered. Signatures of completion/approval obtained.

The prep at the dealer is about a half-hour. The trip to your home is an unknown. The install should take 2 - 3 hours.
All of those hours require paying the installers. The hourly rate - PLUS install materials - that's where your money is going.
Hope this helps.
 
  • Like
Reactions: Jelly
State codes can vary. New Jersey's may be what you were told.
In New York we can run flex thru the floor if it is enclosed in solid pipe...
 
All good with the gas line. What I discovered is that the hard pipe must run into the box- not allowed to flex into it.

1. As for the electric, does it need to be a dedicated line from the panel? I have an outlet in the are but theres a couple lamps and that line already.
2. BX wire?
3. Plastic junction box okay?
4.Okay to put the junction box in the void area that is created where the fireplace box tapers in the back?
5. The unit comes with a remote, is it recommended that I install a switch as well?

Thanks
 
Last edited:
That'll be fine in my book. Your inspector may not like it, just because he's the inspector.
You could have even used a plug on the end of the wire coming out of the fireplace &
just plugged it into the receptacle.
As far as a remote of switch, will there be children around that may move the remote?
If so, you want to be able to turn it on. You could always add a rocker switch in the valve cavity,
although many gas fire places come with a "Tech Switch" down there...
 
Pound a few electric wire staples to secure the wire from pulling out. You and I and the rest of the world know that wire isn't going anywhere, but inspectors love stapled electrical wire; the neater and straighter the better.