
Is this Jotul 118B worth fixing?
- Thread starter neverrude
- Start date
-
Active since 1995, Hearth.com is THE place on the internet for free information and advice about wood stoves, pellet stoves and other energy saving equipment.
We strive to provide opinions, articles, discussions and history related to Hearth Products and in a more general sense, energy issues.
We promote the EFFICIENT, RESPONSIBLE, CLEAN and SAFE use of all fuels, whether renewable or fossil.
You are using an out of date browser. It may not display this or other websites correctly.
You should upgrade or use an alternative browser.
You should upgrade or use an alternative browser.
- Status
- Not open for further replies.
webbie
Seasoned Moderator
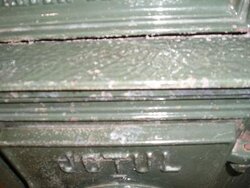
In general that stove would be worth repairing.
And it seems as though all you might need is a little furnace cement. Parts are available for that model (if anything is cracked) at Woodmans:
https://www.hearth.com/partsplace.html
And it seems as though all you might need is a little furnace cement. Parts are available for that model (if anything is cracked) at Woodmans:
https://www.hearth.com/partsplace.html
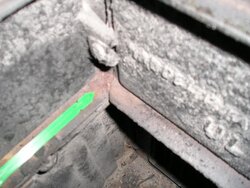
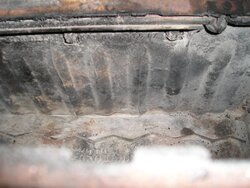
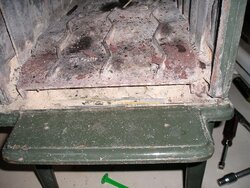
Yes, it's probably the least critical of the burn plates. Is the right side one also warped? It looks like it is toeing in at the back.
BeGreen said:Yes, it's probably the least critical of the burn plates. Is the right side one also warped? It looks like it is toeing in at the back.
.
Both the right and left are cracked. Your right about the toeing in the back.
I'm going to see what the 3 burn plates are going to run.
I was surprised how easy the top baffle came out
I wish there was a repair manual for this. This is my first time working on a stove.
Thanks for all the information gentleman
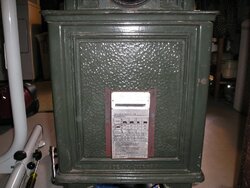
Attachments
Your stove is degrading gracefully from many years of service. The side cracks aren't that bad yet. It will take a few hundred to make it work well again, but then it would be good for many more years.
I rebuilt the 602 without a manual. All I had was a blowup parts diagram. These are really simple stoves and easy to rebuild. I had mine done in about 2 hours.
How does the back, exterior of the stove look? Are there any cracks showing?
I rebuilt the 602 without a manual. All I had was a blowup parts diagram. These are really simple stoves and easy to rebuild. I had mine done in about 2 hours.
How does the back, exterior of the stove look? Are there any cracks showing?
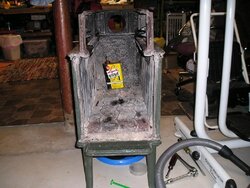
The back looks ok it’s the front that has the damage. The burn plates which should be easy to replace.
I’m giving the bottom burn plate blot and the others a shot of Liquid Wrench every day in hopes I won’t snap them. I’m open for any suggestions gentleman.
I’m giving the bottom burn plate blot and the others a shot of Liquid Wrench every day in hopes I won’t snap them. I’m open for any suggestions gentleman.
Attachments

The back looks great, so it's just the front that will need repair. It's no big deal if you snap some bolts. Assume you will and be prepared with the appropriately sized drill bits, tap and bolts. I broke 3 or 4 and it didn't take more than 15 minutes to have them drilled out and retapped. If you replace the bolts with stainless steel ones, they'll come out easier the next time.
neverrude said:The back looks ok it’s the front that has the damage. The burn plates which should be easy to replace. I’m giving the bottom burn plate blot and the others a shot of Liquid Wrench every day in hopes I won’t snap them. I’m open for any suggestions gentleman.
I'm not sure I'd be terribly concerned about trying to salvage the threaded fasteners (unless they're studs, with one end anchored somehow in the stove structure)...seems you'd want to replace them anyway. Sometimes if you just give 'em a good pull in the clockwise (or even anti-) direction, they just snap. There's also a tool, commonly called a "nut buster", that will break the nut in two, if you can get a good grip on it. And, despite your moniker, for gosh sakes, stop calling us "gentlemen"...we hardly know each other. :lol: Rick
webbie
Seasoned Moderator
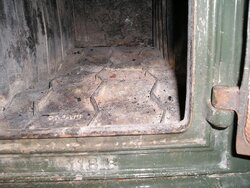
I don't think there is a bottom burn plate - you may be looking at the bottom of the stove - also, it may be intentionally warped and ribbed to hold ash, etc. - you should be able to tell by how it mates with other pieces.
Come to think of it, this looks like the later UL model, which has various other plates. You can definitely dig up a parts list if nothing else - any older Jotul dealer should have one of those.
The side burn plates can be cracked....fine, leave 'em. They are doing their job, taking the heat.
Many other cracks can be fixed temporarily by using furnace cement...that is, if they are not truly structural (like making the stove actually fall in pieces).
If this is like our stove, there is a bottom plate. It looks like this is part 10443192 on the new F118CB. Ours had mineral fiber insulation underneath it and was a separate piece. But I think this is the less critical of the burn plates as far as burning goes. Keep a nice ash bed on top of it or some sand and you should be ok.
Agreed that the cracking on the side burn plates looks minor so far. Ours were much worse. But when side plates start twisting and warping badly, (like the right rear plate in the picture appears to be doing), the mating joint to the upper burn plate to fits poorly. If that happens the flame path can be altered and head up through the gaps caused by the bad join. That makes the stove inefficient and hotter than it should be at the wrong places, often at the back. That's why I asked how the back looked. So far, this doesn't appear to be the issue, but another season or two of burning with warped plates can make it so.
I know only because I did this :red:. The good news is that after the rebuild it was like a completely different stove. Burned great again!
There is a bottom burn plate with insulation under it.
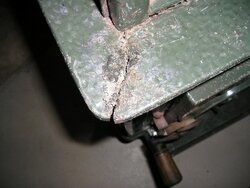
I removed the upper plate yesterday and the rest of the front came off because the top plate was broken in both corners. . Spraying with Liquid Wrench and waiting a few a few days paid off.") The 2 bolts came right. I’ll take the upper plate to work with me tomorrow. We have some excellent welders at work.
The 2 bolts came right. I’ll take the upper plate to work with me tomorrow. We have some excellent welders at work.
I noticed all the joints I’ve seen in the front have what appears to be clear flexible silicone caulking.
I’m undecided if I should break down more too remove the top plate or have a friend come over and weld it in place, what do think GUY’s .:D
I removed the upper plate yesterday and the rest of the front came off because the top plate was broken in both corners. . Spraying with Liquid Wrench and waiting a few a few days paid off.
The 2 bolts came right. I’ll take the upper plate to work with me tomorrow. We have some excellent welders at work. I noticed all the joints I’ve seen in the front have what appears to be clear flexible silicone caulking.
I’m undecided if I should break down more too remove the top plate or have a friend come over and weld it in place, what do think GUY’s .:D
Attachments
Bummer that the top faceplate cracked. I wonder how this happened? Maybe a cold water spill on the front of the stove while hot?
I'm not a welder, so you'll have to ask them, but they may want the front assembled like it is now and in their shop so that they can tack weld the faceplate pieces and check alignment with the main body? I'd ask them what they think.
After the pieces are welded, take the rest of the stove apart. You're 3/4's of the way there now. That way you can do a thorough inspection and properly caulk every joint. Then you'll know the stove is completely rebuilt and ready to go.
webbie
Seasoned Moderator
Do the side burn plates really need replaced? They are just "extra" lining and you could use them till really bad.
Also, I think I saw some Jotul parts on another site - maybe stove parts plus......They may have the parts listed wrong (under black bear), but check with them - the bottom is $160 - so it's 20 bucks less if the right part.
An enameled stove like that would be $1500 up these days, so it's up to you how fully you want to restore. I'd probably patch and use the inside side liners if I could.

The liners keep the fire hotter and sides cooler and are integral to the flame path. Once they get cracks like that they will start to warp, usually at the point of the crack. The iron tries to curl like a leaf.
I agree, it looks like there may be another season or two in them depending on how much you burn. So far they look much better off than when I replaced mine. The good news is that the top edge, where they meet the top plate still looks pretty true. That's the critical area. But if the stove will be used 24/7 for many more seasons, I would get replacements now while they are still available and maybe keep the old ones as backups.
I agree, it looks like there may be another season or two in them depending on how much you burn. So far they look much better off than when I replaced mine. The good news is that the top edge, where they meet the top plate still looks pretty true. That's the critical area. But if the stove will be used 24/7 for many more seasons, I would get replacements now while they are still available and maybe keep the old ones as backups.
After I called a few Jotul dealers and got prices on a new 118 CB (all over $1600. ) I decided to go with the rebuild you guys suggested.
I’ve read about the back wall cracking sometimes and I see there’s no burn plate to protect it.
I was thinking about lining the back wall with 1" firebrick. What do you think about that?
I’ve read about the back wall cracking sometimes and I see there’s no burn plate to protect it.
I was thinking about lining the back wall with 1" firebrick. What do you think about that?
- Status
- Not open for further replies.
Similar threads
- Replies
- 11
- Views
- 1K
- Replies
- 10
- Views
- 586
- Replies
- 13
- Views
- 748
- Replies
- 16
- Views
- 809