It's........ FANTASTIC!!!

  • Active since 1995, Hearth.com is THE place on the internet for free information and advice about wood stoves, pellet stoves and other energy saving equipment.

    We strive to provide opinions, articles, discussions and history related to Hearth Products and in a more general sense, energy issues.

    We promote the EFFICIENT, RESPONSIBLE, CLEAN and SAFE use of all fuels, whether renewable or fossil.
Status
Not open for further replies.

Starter

New Member
Jan 31, 2007
79
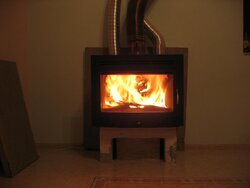
Our installation, which I posted about here https://www.hearth.com/econtent/index.php/forums/viewthread/6287/ , was complete on the 26th. Just the basics: insert, flue, chimney and ducts. Boy aren't we happy. I have taken photos of the installation as it went along, and I intended to post that first but I was too busy with the insert. We're very satisfied. That thing gives out unimaginable heat (and has an unimaginable appetite as well).

I wasn't so sure that the ducting into the rooms would be working as we wanted, however when there's a fire you can't bear to keep your hand within 14 inches of the ducting outlets, the air coming out is so hot. A slight problem we had was that the heat sort of 'pours' out of the ducts and settles at the top of the rooms. However we solved that by running the air conditioner on fan only. The result was perfect. Yesterday we slept with light pygamas. Not even a duvet!

The first day we weren't prepared to the flue's reaction to the heat. The part above the insert turned gold, then copper. Then the whole thing started becoming smokey and there was the smell of something similar to burning oil. This happened only with the first part of the flue, the flexible part. We had to open all the windows! Thankfully that happened only the first time. Yesterday the first part of the flue turned a bluish colour, and didn't 'smoke'.

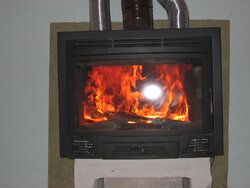
We burned some pallet pieces, and a couple of old chairs (no paint) which we wanted to get rid of. This weekend we will go to my dad's place, he's got some trees which have been dead for a couple of years. I think they're carob trees. And we got to buy a chainsaw first.....

It's very hot in the open room where the insert is. We'll be putting a fan near the opening in order to get better distribution throughout the house.

That's all that I can think about saying right now. I'll attach some pictures of the fire here.
 

Attachments

  • IMG_2430.jpg
    IMG_2430.jpg
    45 KB · Views: 1,075
  • IMG_2434.jpg
    IMG_2434.jpg
    55.3 KB · Views: 1,112
How does the air get drawn through the ductwork? are they just acctached to the top of the stove, or is there some sort of jacket and the ducts are connected to the outlets?
 
The insert's got a blower. It draws in air from the bottom vents on each side of the ash drawer, and blows it out from the top ductings and top front vents.

I'll attach a better picture with more light so you can see the stove.

The stove is 'double-skinned'. I don't know if I'm using the correct terminology, but the air which feeds the ducts (and which goes in and out of the blower vents) comes from a separate compartment, obviously separate from the area where there is fire and smoke. I hope I explained myself well (english is not my first language). :)
 

Attachments

  • IMG_2433.jpg
    IMG_2433.jpg
    85.3 KB · Views: 1,024
Congratulations. I thought the unit would really cook. That's why I was concerned about clearance to combustibles. What is the wall material behind the stove and how far is the flue from this surface? For some reason I thought they were going to use insulated pipe starting right at the stove. Do you have a long shot (right up to the ceiling) of the installation? Can we assume that this is going to get a fireplace built around it?

As to heat distribution, consider a ceiling fan in the room that has the stove. You can run it in reverse (blowing up toward the ceiling) to get circulation going without feeling a draft. Also, try building smaller fires unless it's really cold. After all, it looks like your temps are only going down into the mid 50's (12C) at night.


PS: now you see what we meant by palette wood really taking off. If it's dry be careful and keep the fires smaller or mix with large chunks of split firewood to slow it down.
 
BeGreen, the wall material behind the stove (and of which the whole house is built) is quarried globigerina limestone.

The back of the stove is 3 inches away from the wall. And the flue is 9 inches away from it. So far there is insulation between the back of the stove and the wall, but no insulation on ground floor and second storey between the 9" distance of the flue and wall.

Till now there is nothing in the vicinity of the stove, nor in the vicinity of the flue for its total length till the roof.
The flue is uncovered (for now) near the insert, and in the washroom. In our daughter's bedroom it is encased in those concrete pots (my dealer calls them lava chimney pots). These pots have a vent at the top and another at the bottom. At the bottom you feel no heat, air gets sucked in. At the top it's too high to check for heat unless I stand on a chair but heat is supposed to come out. The temperature in our daughter's bedroom is great and the 'lava pots' just feel very slightly warm to the touch.

Yes we are planning to build a fireplace around it. We're just still deciding on the appropriate cosmetic design. And my husband was of the idea that we let stuff work the way it is for now, so that we can immediately spot out defects, if any. And I agree to that.

I worry a tad about the sealing of the flue connections, since the vents in my daughter's bedroom take the air directly from the air surrounding the same flue. They showed no trouble or leakages so far, and I'm comforted by the fact that our daughter's currently sleeping in our bedroom as well.

Hopefully if weeks pass and there's no flue leakages then I could rest my mind?

I think it's time to start working on my promised thread with photos of the installation. Now I'm glad I took photos of all the stuff before and after it was installed.

Thank you all for your invaluable advice and help!
 
Very interesting setup, Congratulations. Looking forward to the installation pictures. will all of the ductwork be encased at some point when the rest of the fireplace is built around the insert?

I think on the earlier thread no one was able to find the wesite to the manufacturer of your insert.

Just kind of thinking out loud.... are there any stoves/inserts sold in the US that have the ability to connect ductwork like this?
 
A lot of the ZC units like the Brentwood/BIS line have so-called "gravity" vents on the top just like those pictured, they work passively also. Some also have side connections for forced-air distribution.
 
Harley said:
Very interesting setup, Congratulations. Looking forward to the installation pictures. will all of the ductwork be encased at some point when the rest of the fireplace is built around the insert?

I think on the earlier thread no one was able to find the wesite to the manufacturer of your insert.

Just kind of thinking out loud.... are there any stoves/inserts sold in the US that have the ability to connect ductwork like this?

Ultimately yes, the whole ductwork etc will be enclosed and out of view. After all ductwork isn't pretty... lol only guys like you who understand can appreciate that stuff.

I did find the website of my manufacturer. I had got the spelling wrong initially. This is the site: http://www.bronpi.com/english.htm The manufacturer is spanish. You could get to my insert if you click 'products' and 'inserts' and finding out the Madrid model on their page 6. I can't give the link because it's flash player.
 
None that I'm aware of Harley, not inserts anyway as they're for retrofitting so 99.99% of the time there isn't the ability to add those channels. However, there are fireplaces with exactly this setup, with 2 "openings" on the top you put in ducting to transfer the heat to other parts of your house. Take for example the Regency Warm Hearth http://www.regency-fire.com/Wood/Fireplace/Z2510/index.php which is almost exactly like the setup here and there's blowers and tubing you can connect to it and it will blow the heat through ducting into the basement or other rooms. The rocks of the fireplace you see in the pictures are just for show, you can fasten different material to the face of it. Although not mentioned, the Warmhearth Plus appears to have the same setup, with 2 places to attach ducting to the top. You can see it if you look at the specs.
 
Dear Starter,

I am glad you got your Bronpi working! I know it's been over a year now (from the date of your posts) however, I am hoping that you may be of help.

My dad purchased a Bronpi Madrid and misplaced the manual. I have had a team of men at the house everyday for the past week just trying to figure it out. I went online, but unfortunately I couldn't find anything. I did get to your thread though. So, I registered and I am writing this hoping that someone could send me the manual via email or something.

I emailed Bronpi requesting a copy of the manual but never heard back. :eek:(

If someone could help, it would be highly appreciated as we are anxious to get it installed and working properly.

Thank you and regards,

Laura
 
Starter said:
. . .
We burned some pallet pieces, and a couple of old chairs (no paint) . . .

Hmm . . . usually folks burn the chairs at the end of the heating season . . . right after they've run out of firewood, but right before the dining room table and well before the living room coffee table and TV stand. :) ;)
 
firefighterjake said:
Hmm . . . usually folks burn the chairs at the end of the heating season . . . right after they've run out of firewood, but right before the dining room table and well before the living room coffee table and TV stand. :) ;)

"Where is the coffee table?"

"In the stove burning."

"Gosh. Is it April already?"
 
Status
Not open for further replies.