
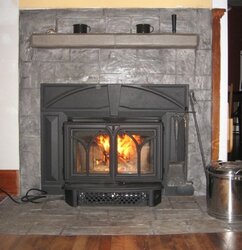
We now have it done.
We picked the C450 specifically because of how it can be mounted partially exposed into the room. We only have 600 sqft on main floor and 600 up for bedrooms/bath, so we couldn't go with a stove, too much room, but didn't want a fully recessed insert. That is also why we removed the brick facing of the old fireplace, to allow us to expose more top/sides of the insert without sticking it further into the room and losing floorspace.
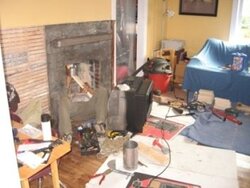
There was a lot of work as the pics will show.
Stage 1 - Removed original mantle and brick facing that protruded into the room and was UGLY!
Stage 2 - Removed adjacent bookshelf and nasty plaster, cut back lathe to meet clearances, and removed old colored concrete hearth to cut out hardwood floor and extend hearth further. Thanks to my little guy and mom for their help getting the bookshelf and plaster off.
Stage 3 - Had textured concrete hearth and surround installed, as well as concrete mantle.
Note here - at this point I was really unhappy as I was certain the end result was going to look like a cardboard fireplace prop at the elementary school Christmas play. As the pics show, the colour is not done until it is finally sealed and cured. Even today, it looks better than it did the day it was finished, just because the concrete is now cured, as well as the sealer.
Stage 4 - install day -
Note here - read the manual over and over again, and measure things over and over again. I had a processional installer do the job, and all of is missed the 29" measurement on the Kennebec that allows the firebox sleeve lip to fit inside the fireplace, as we were all focused on the fireplace width at the back. In the end we had to cut 1/2" off each side of the sleeve lip to get it to fit back far enough to get the surround to meet the wall flush. I also missed the fact that we needed to insulate the liner to meet code requirements - still working on getting that fixed.
Stage 5 - My wife called me at work and said she had some work to do that night, and wondered if I had recorded my favorite show the other night, so she wouldn't feel bad about ignoring me that evening. The TV is 3 feet left of the stove, and my chair is prime real estate for a good view of both. I love her alot!!
The textured concrete, while explained by the fellow who did it as though it was some sort of lost black art, was nothing more than installing steel wire lathe to the wall, and applying the mix, and working it to get the desired texture, then applying a coloured releasing powder to the mix, and tooling it with a mason's pointing trowel to give it the desired look. After it dried, it was washed down, and a sealer applied. Again, my fellow described the sealer as some space age technology, and was nice enough to give me a pint for touch ups of any chips. When I checked the WHMIS sheet on it, it's just regular concrete floor sealer you can buy at the local supplier. The concrete was the same cost as having a tile shop come in and place tile on the wall and floor, and was much better at coping with the crooked walls and floor in our house.
We picked the C450 specifically because of how it can be mounted partially exposed into the room. We only have 600 sqft on main floor and 600 up for bedrooms/bath, so we couldn't go with a stove, too much room, but didn't want a fully recessed insert. That is also why we removed the brick facing of the old fireplace, to allow us to expose more top/sides of the insert without sticking it further into the room and losing floorspace.
There was a lot of work as the pics will show.
Stage 1 - Removed original mantle and brick facing that protruded into the room and was UGLY!
Stage 2 - Removed adjacent bookshelf and nasty plaster, cut back lathe to meet clearances, and removed old colored concrete hearth to cut out hardwood floor and extend hearth further. Thanks to my little guy and mom for their help getting the bookshelf and plaster off.
Stage 3 - Had textured concrete hearth and surround installed, as well as concrete mantle.
Note here - at this point I was really unhappy as I was certain the end result was going to look like a cardboard fireplace prop at the elementary school Christmas play. As the pics show, the colour is not done until it is finally sealed and cured. Even today, it looks better than it did the day it was finished, just because the concrete is now cured, as well as the sealer.
Stage 4 - install day -
Note here - read the manual over and over again, and measure things over and over again. I had a processional installer do the job, and all of is missed the 29" measurement on the Kennebec that allows the firebox sleeve lip to fit inside the fireplace, as we were all focused on the fireplace width at the back. In the end we had to cut 1/2" off each side of the sleeve lip to get it to fit back far enough to get the surround to meet the wall flush. I also missed the fact that we needed to insulate the liner to meet code requirements - still working on getting that fixed.
Stage 5 - My wife called me at work and said she had some work to do that night, and wondered if I had recorded my favorite show the other night, so she wouldn't feel bad about ignoring me that evening. The TV is 3 feet left of the stove, and my chair is prime real estate for a good view of both. I love her alot!!
The textured concrete, while explained by the fellow who did it as though it was some sort of lost black art, was nothing more than installing steel wire lathe to the wall, and applying the mix, and working it to get the desired texture, then applying a coloured releasing powder to the mix, and tooling it with a mason's pointing trowel to give it the desired look. After it dried, it was washed down, and a sealer applied. Again, my fellow described the sealer as some space age technology, and was nice enough to give me a pint for touch ups of any chips. When I checked the WHMIS sheet on it, it's just regular concrete floor sealer you can buy at the local supplier. The concrete was the same cost as having a tile shop come in and place tile on the wall and floor, and was much better at coping with the crooked walls and floor in our house.
Attachments
-
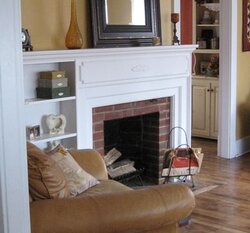 Stage 0 - Original fireplace.JPG23.3 KB · Views: 3,124
 -
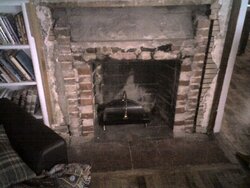 Stage 1 mantel removed.jpg62.3 KB · Views: 3,194
 -
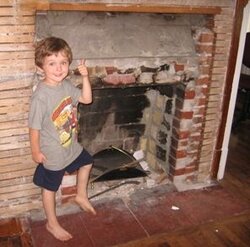 Stage 2 plaster and combustibles removed.JPG19.8 KB · Views: 3,116
 -
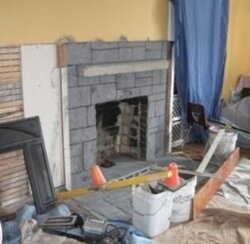 Stage 3 Concrete installed and coloured.JPG15.8 KB · Views: 3,120
 -
 Stage 4 - Installation Day.JPG18.7 KB · Views: 3,149
 -
 Stage 5 - Watching the fire.JPG48.7 KB · Views: 3,432