Jotul F3CB doesn't heat? Check the top lid's level.

  • Active since 1995, Hearth.com is THE place on the internet for free information and advice about wood stoves, pellet stoves and other energy saving equipment.

    We strive to provide opinions, articles, discussions and history related to Hearth Products and in a more general sense, energy issues.

    We promote the EFFICIENT, RESPONSIBLE, CLEAN and SAFE use of all fuels, whether renewable or fossil.
Status
Not open for further replies.

begreen

Mooderator
Staff member
Nov 18, 2005
104,656
South Puget Sound, WA
This is a recent tale of a new Jotul F3CB we got in August, that I posted to the other forum. Enough folks had a similar experience, so I'm posting it here to help others. I installed the stove myself and take full credit for my errors. It replaced a Jotul 602 that did an admirable job of putting out heat, especially for its size. After the break-in period, we fired up the F3CB for real. In spite of it being only 50 outside, the stove could barely heat the house. The stovetop thermometer would rarely reach 450 degrees. The stove was fussy to start too. I contacted our dealer and Jotul tech support. We tried many things including reinstalling the draft damper, various air settings, different wood, etc. Nothing seemed to work. With winter approaching, this was very disheartening. I was beginning to think I made a big mistake. Night after night I would observe the stove to try to figure out what was wrong.

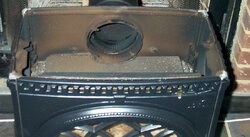
Eventually, I saw that it seemed to be burning more on the right side than on the left. A creature of habit, I had always kept the thermometer on the left side. I moved the thermometer to the right-side and voila!, the temp was reading 150 degrees hotter. The next day, when the stove was cool, I removed the top to examine the soot patterns to see if I could figure out what was happening. There was black soot on the front left edge of the top’s gasket and a corresponding blacker area on the stove body lip. It became apparent that the gasket was not sealing well and that incoming cool air was suppressing secondary burn on the left side of the stove. This stove has a top that is removed in order to setup the flue outlet. If the top is not seated exactly, the top gasket will not seal correctly with the top edge of the stove body. This can result in poor burning behavior. The symptoms are asymmetric burning and inadequate heat output. If this is happening to your 3CB, closely examine the fit of the top. The top should be exactly centered on the top lip. The top’s edge should be perfectly parallel to the denturing on the sides. (See image) Once I had the top correctly installed, the difference was amazing. Suddenly we had a stove with a totally new personality. It started easier and sprang to life. Within 30 minutes the top temp was about 550 deg, side to side. The heat output also increased dramatically. We are now very happy campers and enjoying the warmth of a really fine little stove.
jotul_side.jpg
 
Last edited:
That sounds like one stove you wouldn't want to overheat and risk warping the top plate. But it looks like a beauty, B-G.
 
Yes, we run the stove no hotter than 600. So far it's burning like a champ. There are 2 diagonally opposite anchor screws that hold the top in place. The stove has been out for quite awhile, so I guess this design has proven itself.
 
BG, what kind of burn times are you getting out of the F3? Mine is pretty much done for in a couple of hours or so.
 
I'll still have a nice coal bed after about 3 hrs. if I burn madrona, 2 if I burn fir. At that point stove top temp will start to drop to around 400-450. You may be burning hotter than I am. We're still in the low 40's, so after a couple hours I usually am throttling it down to about 50% intake air and have the stack damper all the way closed. The stove will burn at about 500-550 at this setting. I am going about 4-6 hrs between reloads, but not pushing it too hard.
 
Son of a groan, my lid is crooked. I did notice a propensity to burn on the right side but thought it was just the wood or loading. It was varied but I thought there was a general pattern.

Was yours tilted a particular way? On mine the leading (front) edge is just slightly lower than the back. Will have to check it out tomorrow after she cools down.
 
Awesome, sounds like you have found the problem. My stove top was high on the front edge. If the top is not on right, it can ride up on the side allen screws instead of that screw threading into the top. I used an awl and a bright light to make sure the screw hole was in alignment when I redid it. When you pull the top off, look for a soot trail as an indicator of the air leak. Great that you've located this. You won't believe how much better the stove behaves after getting the top aligned correctly and fully sealed. Since I got it straightened out, the stove has worked like a charm.
 
Mine was lower on the leading edge. I removed it but found no tell-tale soot trails or anything to suggest leakage. I wish I had so i could feel more confident I fixed something. The top wanted to go back the same way - the leading edge slightly lower - so I spun it around 180 degrees (it fits either way). This allowed it to sit flush. My next burn really warmed the stove up fast, but I also had lots of good, dry stuff in there (portions of my Jotul crate). It was just a single load burn so I will have to continue to observe to see if things have really improved.

On a side note - the allen set screws were very hard to remove. I thought one was going to sieze up and require major surgery. Eventually both came out and I cleaned the holes up and put a dab of WD-40 on it to smooth up the reassembly. I ran them in quite easily. I think a more substantial set screw or even a bolt is called for there.
 
Just wondering if you ever need to remove it again, would you be better off
replacing the set screws with S/steel ones? As soon as you fire the stove wd 40 burned off.
I wonder if never seize would hold up under that heat and allow for easier removal in the future?


If I understand this situation right, Jotul is installing the tops 180 degrees backwards?
 
Elk,

The WD-40 was intended to facilitate smooth reassembly and to flush out any debris. I know it isn't a long term lubricant. I figured no lubricant would be useful - I just wanted to make sure the threads went back together as easy as possible, which they did. Very smooth in fact. I must had had some casting debris in there.

I think the Jotul 3CB tops go on either way. I inspected it to make sure there wa sno mechanical or functional difference and saw none. It was very symmetric in terms of how it goes. In fact, if I had gotten confused there was nothing to suggest one way or another was correct.

I did see a smallish color difference in the soot- didn't mention it earlier as I wanted to see the picture first. I see just a bit more brown on the left side and a bit more black ont he right side. I think this slight difference could come from log and burn orientation from the last loading and not from any leak. I could be wrong but it looks slight.

Oh, and good point about the SS ones. I will check on some.
 

Attachments

  • insidetop_sm.jpg
    insidetop_sm.jpg
    50.9 KB · Views: 1,230
Interesting. I also rotated mine 180 degrees when I put the top back on. I didn't think of it at the time, there are no directional arrows or anything, but I wanted to expose a different edge to the gasket. Could it be that the top really only wants to go on in one direction? If yes, it would be really nice for Jotul to document this and maybe paint alignment marks on the underside of the lid. I think I'll contact their tech support to see what progress they have made.

You'll know the stove is buring better by how quickly it warms up, how easily it reaches operating temps and by checking with the thermometer for side to side eveness of heat. Before the fix, the stove was balky and a poor heater. Now it works just like I would expect it to, a real champ. Did you happen to take a pic of the underside of the lid before you put it back together. That was where my most obvious soot trail was.

I am wondering if the hard to remove screw was a result of it being misaligned. My stove is hot right now, but I will see how tight the allen screws are when cool.
 
I did not photograph the underside of my lid but it was uniform with whatever soot I might have seen. I was looking for uneveness and saw none.

The lid does not have a threaded boss for the set screw to thread into. Instead all the threads are in the side of the stove and the set screw eventually protrudes into a 'receiver' on the lid. So I assume any difficulty in removing the set screw came from issues between the set screw threads and the threads in the side of the unit. Flushing mine with WD-40 and running a q-tip through it cleaned up some observable debris.

I wish there was a stove-specific forum or group as tidbits like this thread that pertain to just one stove can be immensely valuable.
 
BeGreen said:
I am wondering if the hard to remove screw was a result of it being misaligned. My stove is hot right now, but I will see how tight the allen screws are when cool.

The more frequent your stove has heated/cooled the harder the screw will be to get out. Sort of like the bolts on a furnace & muffler, I can't remove them now without some breaking after the constant heating/cooling. My guess Begreen since your stove has been around and heated/cooled a bit it will be extremely difficult or impossible without breaking at this point. But can't hurt to try anyhow.
 
Update: The screws are mostly for shipping. They can be left out and the heavy gasketed lid will still seal.
 
Status
Not open for further replies.