
I am getting ready to reassemble our Jotul firelight 12 stove. During the disassembly I noticed that there was cement on the sides of the inner backplate (that holds the cat chamber secure to the stove back with 4 bolts) as well as the gasket. The cement was in the area between the back and the back plate (a space of about 3/8" inch - the sides of the back and the 5/8" fin on the inner back plate are slightly angled and parallel). I just don't see the function of the cement. Photos I took during disassembly don't show anything. I just have the existing inner back plate that has a couple spots of cement left on it. I don't see any residue on the stove back.
jotul firelight 12 inner back plate installation
- Thread starter cadman95682
- Start date
-
Active since 1995, Hearth.com is THE place on the internet for free information and advice about wood stoves, pellet stoves and other energy saving equipment.
We strive to provide opinions, articles, discussions and history related to Hearth Products and in a more general sense, energy issues.
We promote the EFFICIENT, RESPONSIBLE, CLEAN and SAFE use of all fuels, whether renewable or fossil.
You are using an out of date browser. It may not display this or other websites correctly.
You should upgrade or use an alternative browser.
You should upgrade or use an alternative browser.
Lake Girl
Moderator
Welcome to the forum. Are you concerned that the cement is required or the remaining spots will effect performance? Hopefully one of the wood burners will chime in...
I was just wondering if I needed to caulk it with some cement in that space. I was also wondering when I reassemble the stove, do I set the back assembly (back, cat chamber, inner back plat) in a line of cement (in the cleaned out groove of the bottom baseplate) or do I set the back assembly in the groove and then caulk it? Never disassembled or tried to reassemble a stove before, thus the reason for all the questions.Welcome to the forum. Are you concerned that the cement is required or the remaining spots will effect performance? Hopefully one of the wood burners will chime in...
I haven't rebuilt this stove but with the Jotul I did rebuild I put cement in the bottom groove before dropping in the sides, back and front and also cemented the side seams. I don't believe the side shields and rear back get cemented in but verify this with someone like @Ashful or maybe @stovelark so that you get it right.
Hi Cadman and BG- I know the outer back panel of the stove sits into a groove on the bottom and gets furnace cemented in. Fill the groove and the excess will squeeze out. That's the outer shell of the stove, its definitely sealed. The cat chamber and innerback panel I thought was just gasketed in, cause its on the inner side of the outside shell of the stove. Its hard to remember- haven't done a 12 cat in a while...
Ashful
Minister of Fire
Inner back panel is installed with dry 3/16" braided rope, held in with masking tape. No cement.
If you don't have 3/16" rope, you can try 1/4", but I did have trouble getting those four bolts snugged in enough to clear the inner side plates, on the one stove where I used 1/4" rope.
If you don't have 3/16" rope, you can try 1/4", but I did have trouble getting those four bolts snugged in enough to clear the inner side plates, on the one stove where I used 1/4" rope.
How fortunate to find this recent thread. I can't get my inner back plate out. Just a hair short on clearance to lift out of the groove.
Do I have to disassemble the entire stove?
Any solution for the wife nagging that it is not done yet?
I had the total stove apart. My inner back plate (I am ashamed to say) was broken (by the heat), so I was able to take it out early in the disassembly process. When I took the top off, the sides fell apart like the a wine barrel with the rings removed. I believe you should be able to take it out if you remove the top and the side burner plates. The top is held in place with two hex bolts 8x25mm. The top plate gasket is a 1/4" LD gasket (I was told that LD stands for low density). When I reassembled the stove I put the inner back plate on the back panel first (with the new cat chamber installed). I had to assemble the 4 sides at the same time (approximately) because the sides have to slide under the back panel assembly. The sides, back and front panels are set in cement, so the bottom of the inner back plate was probably set in cement. But, back to your question. I just looked at the inside of the stove and it appears that you should be able to tilt the inner back panel forward and remove it from the top. The inner back plate goes over the damper frame and only has a gasket and is not cemented to the back panel. I hope my reply is not too confusing (since I am in no way an expert) and you have success with your project.

Thank you. And thanks for the warning about the sides. I'm going to try to put a strap around it just above the doors and see it I can hold it together. My inner back plate is warped and the screw holding the burn plate broke off.
I'll have to find the hex nuts to get the top off. Rookie that I am. I notice the the frame of the damper protrudes over the top of the inner plate. So there will probably be a little more to take apart.
It's getting cold here in the NE. Better get it done soon.
Thanks for the help. I'm sure it will post some more.
Thank you. And thanks for the warning about the sides. I'm going to try to put a strap around it just above the doors and see it I can hold it together. My inner back plate is warped and the screw holding the burn plate broke off.
I'll have to find the hex nuts to get the top off. Rookie that I am. I notice the the frame of the damper protrudes over the top of the inner plate. So there will probably be a little more to take apart.
It's getting cold here in the NE. Better get it done soon.
Thanks for the help. I'm sure it will post some more.
Look again at the back plate / damper frame interface. There is a recess in the back panel (item 15 on the blow up drawing in the manual). The damper frame gets installed first to the back panel and then the inner back panel has a gasket (item 21) at the top that seals to the damper frame. The inner back plate should be installed over the damper frame. As for the top load door panel hex bolts that are centered on the sides, they are 8x25mm (item 38). The information I have is off the drawings. I installed the inner back plate over the damper frame because the castings fit that way. You can see the little recess in the manual blow up drawing. Again, good luck.
Ashful
Minister of Fire
You're getting good advice from cadman. The only thing I'll add is to be careful when removing the top. If you let that top-load door flip back (eg. if you tip the top vertically), it will likely snap off the hinges. Jotul no longer stocks those parts, so you'll be scrapping your stove, if you do that. Good news, the top is not very heavy. Set a blanket on the floor, so you can be ready to set it down somewhere when you lift it off.
Ashful
Minister of Fire
You will have to take off the top to get the new one in. Trust me, you don't want to go thru that difficult gasketing process with the top in place, anyway.
Ashful
Minister of Fire
Nothing wrong with that. Post a pic of the damper frame, if you want an opinion, but you will need it to seal well if you want good control over your fire. These stoves pull draft like a freight train with that damper open, completely uncontrollable.


Ashful
Minister of Fire
Cool. You breathed new life into that old girl. Let's hope you have better luck with combustor life, than I.
Must've been fun getting that inner back plate in with the lid on. You do know the lid comes off in about 3 minutes flat?
Must've been fun getting that inner back plate in with the lid on. You do know the lid comes off in about 3 minutes flat?
meland
New Member
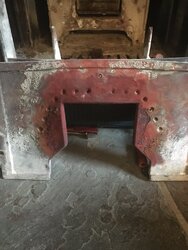
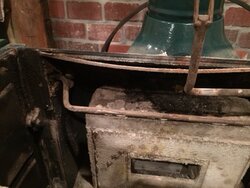
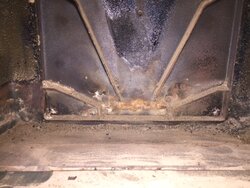
Hey. Does anybody still look at this thread? I just ripped out my Inner back plate (Firelight 12) but had to also remove the damper chamber that is above it. there is a gasket between it and the back of stove as well. Is it the same gasket behind inner back plate and damper chamber that runs up one side, across the top, and down other side of back? Also seems to go across bottom...

Ashful
Minister of Fire
If I recall, it is all 1/4" braided. Hold the gasket in place with masking tape, while you re-assemble. If you're buying gasket, you may want to also pick up some 3/16" braided, as it's used a few places on that stove (eg. glass). Also, I found I needed to go to 3/16" braided on the back plate on one of my stoves, since it wouldn't draw in tight enough to get the inner side plates back in, with 1/4" braided in there.Hey. Does anybody still look at this thread? I just ripped out my Inner back plate (Firelight 12) but had to also remove the damper chamber that is above it. there is a gasket between it and the back of stove as well. Is it the same gasket behind inner back plate and damper chamber that runs up one side, across the top, and down other side of back? Also seems to go across bottom...
View attachment 202156
You will have to get things sort of clean, for the aforementioned masking tape to hold.
meland
New Member
Thank you. Cleaning now... Do you remember how top gasket sat? I don't see any cement on it, maybe just gravity? One more question if you don't mind- I took out the catalyst and noticed 3 opening in the far back near the bottom. They look perfectly formed and are hidden from the outside by a raised information panel. Some surface rust above it by holes look intentional? Any Ideas?If I recall, it is all 1/4" braided. Hold the gasket in place with masking tape, while you re-assemble. If you're buying gasket, you may want to also pick up some 3/16" braided, as it's used a few places on that stove (eg. glass). Also, I found I needed to go to 3/16" braided on the back plate on one of my stoves, since it wouldn't draw in tight enough to get the inner side plates back in, with 1/4" braided in there.
You will have to get things sort of clean, for the aforementioned masking tape to hold.
Attachments
Last edited by a moderator:
meland
New Member
Similar threads
- Replies
- 3
- Views
- 3K
- Replies
- 4
- Views
- 344