just picked up a used wood master 434.now.....?

  • Active since 1995, Hearth.com is THE place on the internet for free information and advice about wood stoves, pellet stoves and other energy saving equipment.

    We strive to provide opinions, articles, discussions and history related to Hearth Products and in a more general sense, energy issues.

    We promote the EFFICIENT, RESPONSIBLE, CLEAN and SAFE use of all fuels, whether renewable or fossil.
Status
Not open for further replies.

burrman

Member
Feb 17, 2009
224
michigan
im in the process of putting it all together and looking for pipe..i know the best is the best but i cant afford the best..lol...ive been looking on ebay and found this
http://www.ebay.com/itm/150-TRIPLE-...180?pt=LH_DefaultDomain_0&hash=item2c515984a4
..for my run to the house its going to be about 50 ft and about 100 to the barn..i know its not the best but would it work....better then my plan to make my own ins. pex..
 
There's some posts on here where people spray foamed their own pipe in ground.. I'd look into that or maybe someone will chime in .. I bought that cheap pipe and wound up heating the ground , it wound up getting a hole in the pipe... You'll be shocked at how much wood your burn using that cheap pipe.. I found out the hard way,, major heat loss.. I wound up getting the better stuff down the road,, let me tell ya, it sucks doing it twice.. Also if you just get pipe and spray foam,,, I'd go with bigger pipe for better flow, less pressure on the pump as well. Also believe you can run a slower pump speed with the bigger pipe.. Good luck...
 
  • Like
Reactions: ScotO and BoilerMan
Don't do it! Either foam in the trench or buy a product like thermopex. Losing heat to the ground you'll never keep up.

Tim
 
  • Like
Reactions: charly
Read the sticky: Underground lines not the place to skimp

It's right at the top of all the threads for a reason. A lot of folk have tried to save some $$$ by buying that type of underground line, and found out the hard way. This forum is so great because it is REAL people's experience and there many really smart guys on here. Listen to the real world data.

TS
 
What's the saying..

there's always enough money to do it right.. the SECOND time.

JP
 
  • Like
Reactions: BoilerMan
DSCN2373.JPGDSCN2374.JPGDSCN2375.JPGDSCN2379.JPGDSCN2380.JPG
 
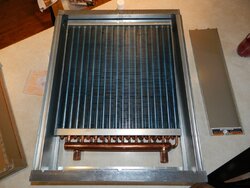
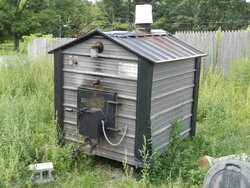
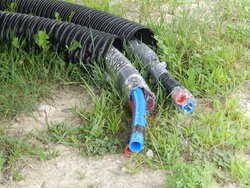
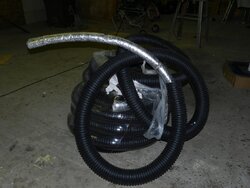
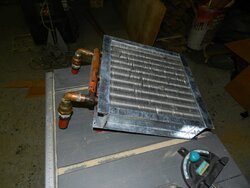
well its been a couple weeks but ive got everything coming together here real soon here are a few pics...ive got a backhoe coming this week to dig trench and my hvac guy is coming this week to raise my furnace and add a exchanger...i got better pipe to go to the house and i put together some pipe for the barn..i know its not the "way" but i gotta cut corners somewhere....first pic is the cabinet and the exchanger for the house..2 is stove of course 3rd is the pipe i put together for barn and forths is house pipe off ebay and th is the exchanger for the barn i just need a fan for it..... any suggesting?
 
I agree,,, I had the exact same stove years ago... and that pipe... You'll be shocked and disappointed when you see your stove cycling like every 45 minutes and see how fast the full box of wood is gone.. You'll be digging that back up... And I had radiant heat with mine .. Forced hot air your going to be using more heat.. Buy the good stuff and do it once or search on here about spray foaming the pipe in your ditch.. Best is to run 2 feeds and 2 returns in two separate pipes. Then the cool return water is not pulling heat from your hot feed.. You'll cut your wood useage down big time.. Your in ground pipe work will determine your yearly wood usage and how much you fill the stove.. Remember,, once you've made a decision on the quality of your pipe install,,, you can change nothing about your wood usage unless you dig everything back up.. You might fill your stove twice a day verses three times depending on your pipe to ground heat loss... If your heating the ground, running that stove is going to get old quick... I had a hole get in the same outer pipe that you have and moisture from the ground got inside my pipe.. , when it was like 10 degrees out , I could watch my boiler water temp drop like 10 minutes after it had just shut down from topping the water temp off... That's when I knew things had to be dug all back up.. Be smart,, do the pipe right...you'll be glad you did...plus your wood burning efforts will be worth that much more.. Good luck..
 
Make sure as your filling your stove that the red low water bulb is not burned out,, should be on as your filling your stove....I'd rinse that stove out good before you hook up anything...Maybe insert a pressure washer into the pipe fitting areas and also the top fill pipe.. Installed a PVC cap over my fill vent with a 3/8ths hole so I didn't loose as much water through evaporation.. I just set the cap on there as you don't want to create a pressurized boiler. I plumbed my inside line so I could fill the stove from inside my basement.. Then I would watch out my basement window for the first signs of the water coming out the fill cap...
 
Thanks for the advice....
I had my 434 for 7 years, never any problems.. One thing I did for the door seal... Instead of the 1 inch rope,,, I used 3/4's.. First took the door off, laying on a 33 gallon metal trash can I used for my ashes..I put a piece of plywood down over the trash can for a flat working area. This was so you can leave the power cable hooked to the fan motor working right next to the boiler.. Pull out the old gasket when it got hard ,,, wire wheeled the groove with a cordless drill.. Brake Clean the groove. Next put a few spots of high temp RTV around the door gasket groove.. Next start the gasket, don't stretch it out, keep it kind of bunched going around,, I started in the middle of the hinge side. Once the gasket is all around, it should sit about a 1/4 to 3/8ths low in the door channel .. Next use high temp RTV that's in a caulk gun style tube and just go around and fill the whole groove on top of the gasket.. After you do that take a putty knife and smooth it even with the top edge of the door.. Let it dry for 24 hours, bolt the door back on and you now have a nice non hardening silicone gasket .. I will tell you it might make the door hard to get shut, but it will keep compressing as you let the door sit closed. You'll have a nice flexible seal that will not get hard , don't worry if you see the silicone tearing away from the edges of the door channel, it's still now part of the rope gasket.. That sealed great for years.. I dealt with "Boiler Solutions" for testing my boiler water an chemicals... They are great people... They even sent me a free water test kit and then sent me back a free report of the condition of my boiler water and any chemical I needed...
 
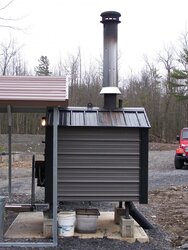
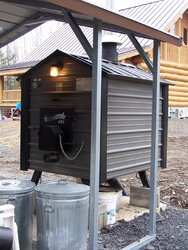
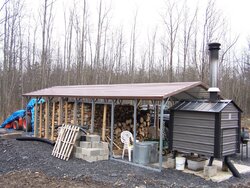
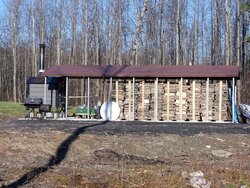
You can see I added a chimney and a simple storm collar .. That storm collar kept the water from getting down along side the pipe as it went into the stove... Problem, the silicone seal would tear away from the metal roofing and pipe on the stove top,, allowing rain to go down and soak the insulation...now your losing heat.. Storm collar was cheap for the pipe, just ran a bead a silicone where it met the pipe, put a bead on the area it will seal before the collar goes on and then a bead on the collar after it's on.. This was my set up for my wood and stove... Never had to stand out in the weather.. That shed held about 10 cords... Give ya some ideas! By the way you can see the good pipe laying on the foundation blocks, what was left... Then I slid corrugated pipe over that for UV protection where it came out of the ground..Think that Logstor pipe was like 15 dollars a foot..

100_1165.jpg100_1162.jpg100_1166.jpg100_1149.jpg
 
i got better pipe to go to the house and i put together some pipe for the barn..i know its not the "way" but i gotta cut corners somewhere....

Same here, but I like to cut corners in my wood processing and consumption.

I built my own house and pretty much everywhere I cut corners I ended up spending twice the time and money to do it right a couple of years later. Don't take everything you hear (or read) at face value, but when someone or several people have done the same thing and were not happy with the results............well to each their own I guess.

FWIW: Next house I build will be BRICK!

TS
 
All i can share is that i know i did it right the first time. I am very pleased and now dont second guess with coulda shoulda thoughts. Ended up being $9/ft for 6" foam all around lines and its way better than any prefab stuff you can buy.
 
thanks all..so ive gt the pipe al in the ground..just waiting on hvac guy...
 
ive got this years i think..if not ill be burning anything i can get my hands on ...lol
 
house is all hooked up..now i just gotta rig up something for the barn ..ill post pics soon
 
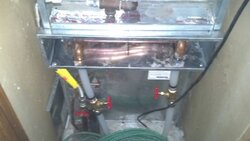
Heat exchanger all hooked up
 

Attachments

  • uploadfromtaptalk1377042231055.jpg
    uploadfromtaptalk1377042231055.jpg
    34.8 KB · Views: 543
Status
Not open for further replies.