Leaking power washer gas tank permanently installed??!!

  • Active since 1995, Hearth.com is THE place on the internet for free information and advice about wood stoves, pellet stoves and other energy saving equipment.

    We strive to provide opinions, articles, discussions and history related to Hearth Products and in a more general sense, energy issues.

    We promote the EFFICIENT, RESPONSIBLE, CLEAN and SAFE use of all fuels, whether renewable or fossil.
Status
Not open for further replies.

Soundchasm

Minister of Fire
Sep 27, 2011
1,305
Dayton, OH
www.soundchasm.com
Howdy,
This has been a busy summer. I bought a Craftsman 3kpsi/2.7gpm power washer for some pretty serious use about four times a year. Build code says 2009.

Late last year I thought I was smelling gas but couldn't pin it down. This year it became clear to me that it was leaking at the seam between the bottom and top half of the tank. Of course the tank is plastic. I thought I'd get a close look at it today and find a replacement tank. I had seen a replacement tank selling for around $70!! Shocking. Maybe this is a $300 unit...

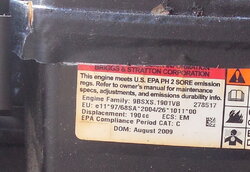
To add insult to injury, I could not get the B&S engine to show up online anywhere. No matter what numbers I key in, I don't get a definitive return.

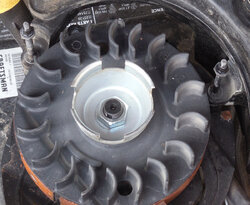
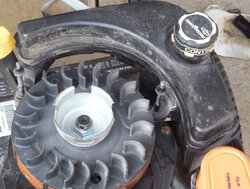
Back to our story, after I get enough stuff apart to get to the tank, for the life of me, it doesn't look like it's ever supposed to come off. What the Sam Hill is going on?

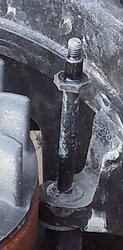
Have I correctly surmised that this tank is inextricably wedded to this engine? I don't see any way that any of the support posts further disassemble. Here are some shots.
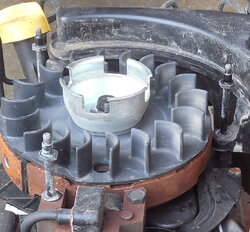
DSCN1195.JPG DSCN1198.JPG DSCN1199.JPG DSCN1200.JPG

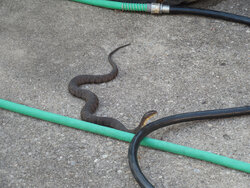
Just because you took the time to read, here are a few shots of our snakes. They seem to be working just fine...

DSCN1147.JPG DSCN1150.JPG DSCN1149.JPG DSCN1148.JPG

Thanks,
Greg
 
Did the snakes get confused and think the hose was their cousin or some other relative?
;)
 
Can you not unscrew those posts by putting a wrench or socket on the hex-shaped part near the top? It sure looks like they're supposed to work that way.
 
If you can get at the outlet you can buy some tank liner that motorcyclists have used for years. Of course its a lot easier to spin a bike gas tank around to get an even coat than a power washer.
 
Did the snakes get confused and think the hose was their cousin or some other relative?
;)

I think that's a male snake who's pretty sure he's a "playa"...
 
Can you not unscrew those posts by putting a wrench or socket on the hex-shaped part near the top? It sure looks like they're supposed to work that way.

The nut at the top didn't budge when I tried to turn all three. The post was beginning to twist to an alarming degree. It's hard to see but there's shiny stuff on the threads and that "sheath(?)" right above the nut. It resembles a nice powder-coating.

I also could not create any daylight of any sort at the bottom where the tank mount is squeezed between the two washers.

I guess I'll call B&S and see if I can find the one guy who didn't get the memo to deny everything that legal sent out...
 
If you can get at the outlet you can buy some tank liner that motorcyclists have used for years. Of course its a lot easier to spin a bike gas tank around to get an even coat than a power washer.

I'll look into that. What I've been reading about these leaks is that they need to be plastic-welded. The problem is that these tanks may as well be made out of Teflon when it comes to getting something to stick to them.

If I can't get the tank off, I can't even consider hitting it with a soldering iron!
 
I used several coats of a product called "seal-all" on my B&S lawnmower gas tank a few months ago and it seems to be still intact. the leak was a tear in the plastic near the seam in the tank, but the seam itself wasnt split open.
 
Those posts certainly look like they are made to unscrew. They must be corroded in place ??

Have you tried heating them up with a small torch ( make sure all gas is drained obviously then put gas cap back on ) and when they are good and hot put an impact driver with socket on the nuts, give em a few good swings with a hammer on the impact driver


Uh, not so sure you can apply enough heat there without melting the tank mounting flanges...
 
Uh, not so sure you can apply enough heat there without melting the tank mounting flanges...

Maybe just a little heat, and some WD40.
 
I may be way out in left field but if my memory serves
me correctly the studs are left hand thread !
 
I used several coats of a product called "seal-all" on my B&S lawnmower gas tank a few months ago and it seems to be still intact. the leak was a tear in the plastic near the seam in the tank, but the seam itself wasnt split open.

Just did some reading on Seal-All. The package states "not recommended for use on polystyrene, polyethylene, polypropylene". Apparently it's a bit of a crap shoot if these seals hold, and that includes the JB Weld stuff, too. I'd be happy to give them all a try if I could get that tank off!
 
Maybe scuff the tank with sand paper and then slobber it up with two part epoxy?

That's kind of what I imagined, but it will be a little tight getting around the two standoffs and oil fill. Saw one video on the net where the guy was fixing his tank "in place" with JB Weld, and it looked identical to mine.

One insight this guy had was to tilt the machine so whatever surface you were working on is "up", and that would make your hard work less likely to drip off.
 
I may be way out in left field but if my memory serves
me correctly the studs are left hand thread !

Forgive me for being dense, but are you saying those standoffs might be a left-handed thread into the engine? So if I try to "tighten" those nuts, I might be able to get the entire post to come out?? Can't wait to try!!!
 
Those posts certainly look like they are made to unscrew. They must be corroded in place ??

Have you tried heating them up with a small torch ( make sure all gas is drained obviously then put gas cap back on ) and when they are good and hot put an impact driver with socket on the nuts, give em a few good swings with a hammer on the impact driver

There's a top-hat looking thingy above the nut that is quite shiny and some of that shine goes up a few threads. It looks like they wanted that thing to go on once and stay there. Here's a crop.
stand-off.jpg

The tank is bone dry, so no worries there. I wish I'd cleaned the thing before I took the photos, but to me it looks like that "top hat" looking thing above the nut is glued in place. I also couldn't find any play at the bottom of the standoff, so I'm still stumped.
 
I wouldn't expect that post to come apart in multiple pieces; that looks like one part all the way down. It pretty much has to be screwed into the boss on the engine, under the tank flange. The question is, why can't you unscrew it? It doesn't look seriously corroded, and a left-hand thread here would make no sense. What would make sense, though, is that they used Loctite to keep those standoffs from loosening due to engine vibration. I'd go back to Woodhog's heat idea, but not the high temperature that you'd need to deal with rust; I'd use an electric heat gun on the boss below the flange, checking frequently to make sure you're not getting it so hot that the tank softens. Maybe use a few layers of tinfoil to deflect heat from the side of the tank. Heat, apply torque, check plastic for softness; lather, rinse, repeat...
 
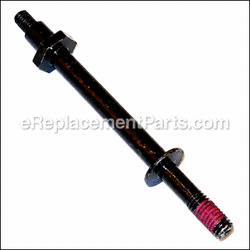
OK, after a call to B&S, I made some progress. I found where the engine code *really* was on the engine, and then I made some progress as to the part. I snagged a photo of one standoff, and the issue is indeed Loctite. One standoff is green, another blue, and the third red.

Loctite themselves suggest heat >550F to break the red. Without that, the stud will probably break. One self-proclaimed GM Master Mechanic said the trick with screws and red Loctite is to put the proper sized screwdriver in, and tap with a hammer. If that doesn't work, try a harder tap. He says it works every time.

So I think Jon1270 likely nailed it. I'll try tapping first. Then I'll probably go right to REALLY TAPPING...
part_793479.gif

Then I might try some heat down at the fire pit!! :p Can you believe the gas tank for this thing is $71?? That's 25% of the purchase price!! I see it for a few bucks less here and there, but still....
 
Last edited:
  • Like
Reactions: Lone_Gun
There is probably another bolt on the bottom of the tank going to the engine block.
 
There is probably another bolt on the bottom of the tank going to the engine block.

Right, and that one came loose easily. It's the two vertical stand-off/bolt/stud things that are the problem. Thanks.
 
You have my sympathy. An overpriced part that's difficult to replace and prone to premature failure... not good, B&S.
 
You have my sympathy. An overpriced part that's difficult to replace and prone to premature failure... not good, B&S.

Planed obsolescence perhaps. Who knows. Cheaper way to make something without thinking of the consumer . They were probably thinking most people would just get rid of the thing and buy a new one. Eitherway I agree not very good at all on the company's part
 
Red is supposed to be more or less permanent, but loctite breaks down if you heat it. A hairdryer might be hot enough. I've used a heat gun to remove red loctited fasteners before. A torch would definitely do it, but obviously you need to be careful around the plastic. I can't quite tell from the pictures how close you are to plastic.
 
As soon as I saw those snakes, I could hear my 12 guage loading. LOL

There are many products to fix a plastic gas tank. Just google and see what shows up. Read some amazon reviews.
 
Status
Not open for further replies.