Liner questions. Drolet escape 1800i install.

  • Active since 1995, Hearth.com is THE place on the internet for free information and advice about wood stoves, pellet stoves and other energy saving equipment.

    We strive to provide opinions, articles, discussions and history related to Hearth Products and in a more general sense, energy issues.

    We promote the EFFICIENT, RESPONSIBLE, CLEAN and SAFE use of all fuels, whether renewable or fossil.
Status
Not open for further replies.
I do not use any silicone or cement on the appliance adaptor. Silicon would just melt and cement is unnecessary. Just snug them up and screw/rivet them in. I used silicon under the top plate to keep rain out. I also use a full cover cap to completely cover my clay liner.

The single wall liner is good. Not sure about your particular brand but mine (Olympia) was real nice. I installed a Easy Flex and a Heavy Flex in the last two weeks and the Easy Flex was much easier to install but if you don't mind the extra work and if you value extreme durability then the Heavy Flex is what I'd recommend.
 
Agreed, though silicone doesn't melt at flue outlet temps. In my experience it bakes and as it bakes it smolders badly. It is not meant for this temperature range. If the flue collar is vertical and the adapter drops in with some play, furnace cement may stay in place. If the gap is larger than 1/8" use some stove gasket material to fill the gap.
 
thanks guys. where the block off plate contacts the masonry should see less heat so silicone will work there? roxul above block off.

thought about doing 3 piece block off. 2 part upper with extra large hole to get nice fit to masonry then lower plate to get nice fit to liner OD would be sealed(silicone) to upper. hole in lower part to liner OD Cement or silicone? prolly cement.

any harm in putting roxul behind insert on wall. it says its good to 2150° so direct contact with heat jacket seems like it'd be fine. anticipation is killin me to get this thing in. come on Friday.

thanks again
 
it is vertical. if the elbow coming fits like the appliance adapter does then ill cement it. fingers crossed as I don't have any extra gasket. maybe rural king carries it.
 
Yes, regular silicone is fine around the perimeter of the blockoff plate. Make a template for the blockoff plate out of cardboard. That way you can eliminate a lot of slop.
 
thanks guys. where the block off plate contacts the masonry should see less heat so silicone will work there? roxul above block off.

thought about doing 3 piece block off. 2 part upper with extra large hole to get nice fit to masonry then lower plate to get nice fit to liner OD would be sealed(silicone) to upper. hole in lower part to liner OD Cement or silicone? prolly cement.

any harm in putting roxul behind insert on wall. it says its good to 2150° so direct contact with heat jacket seems like it'd be fine. anticipation is killin me to get this thing in. come on Friday.

thanks again
Put the roxul behind the insert on wall, and on the sides if you have the clearance. The chimney will want to soak up heat, and that's heat you want in your house, not the masonry where it is not doing anything for you. I did this, and painted the roxul w/high temp stove paint to secure the fibers. I like your idea for the block off plate, plan on doing something similar to improve on my initial effort which involved stuffing roxul around the liner and wedging a couple of peices of sheet metal in the smoke shelf to hold the roxul up there. If I get everything done just the way I want, the insert will be almost completely isolated from the hole in the chimney and the bricks lining the fire box of the original fireplace. I think you are getting about as well prepared for Friday as you can be.
 
got her put in Saturday. made a custom surround. I didn't like the way the SBI one attached right in the middle of the the heat jacket. my insert sits with the door about flush to the masonry face. that's as far forward as it can be for liner alignment even with the 30° elbow. I'm so glad I ordered that. I don't think I would have got it done without it. attaching the liner to the stove collar was probably the worst part. I ended up getting it set in but not full seated then went up top and was able to push the liner down enough to get full seat. I reached up through the baffles and tubes to feel that the liner was fully seated. self tappers were cake. adapted 1/4 square drive to drill then extensions then 6pt socket then taped self tappers to socket so it wouldn't fall off. it was a good elbow to stove collar fit but cemented anyway. I put in a layer of cement before I set the insert in so when the liner came down it should have filled any voids. as difficult as it was to get in there I don't want to pull it out again. I probably had it in and out 8 times messing with my block off to get a decent alignment with the liner and have the insert centered.

I would have liked to seal around the liner to block off better but needed to be able to push the liner from up top. had I bought the pull down appliance connector I wouldn't have this problem but also wouldn't have my elbow unless theres a combo one. I ended up with a satisfactory connection in the end. the liner I ordered was .006 thick which seems to be standard. seemed kind of thin considering the heat going through it, but I have no concerns with my installation.

onto my surround. I made a sheet metal base plate to sit the insert on and painted it "barbeque black" flat black high temp paint. good for like 1000° or something. looks nice. then I made a 3 piece surround. 2 sides and a top. set it into place so it holds itself sprung on the outside against the brick. since my insert sits kind of in the hole. if it stuck out I would have made some sprung tabs to rivet on to hold against the hole. the outside tabs were 1" bent shy of 90 to spring. the inside tabs were 3" long to butt up against the heat jacket like an extension to get as much air into the room as possible. I held the sides and top tight to spring my shy of 90° bends against the masonry then drilled and riveted. I can take a pic if it'll help somebody.

all in all it turned out well. we're gonna have 80° weather here the next 2 days now so I'm thinking this would be a good time to get the windows open and cure the stove coating as I've heard its not the most pleasant smell.

If anyone has a way to run the appliance connector installation thing mentioned in the manual with an elbow that may be good info for the next guy reading this. (Its an SBI product. can be found on their website or menards can get them.)

Question: with the pull down type appliance connector. My understanding is that the baffle plate and tubes would have to come out to use this. I'm not sure mine are removable. I looked at the insert and the manual and there seems to be a discrepancy. I could push my plate out of the way enough to make one work probably, but I'm not sure how I would ever get these tubes out to replace them. ideas?

Thanks again for all the help and advice. great site.
Awesome, nicely done. You are correct, the tubes and baffle come out, and there is no question that they do, as both are consumables and will need to be replaced as routine maintenance from time to time. You'll need to remove them when sweeping the liner as well. Really easy to do, you just grasp the tubes with a "wise grip" (that's the way they describe vice grip in the manual), twist forward about a quarter turn, and push left. The baffle just rests on top of the four tubes. Make sure to keep track of the tubes order, the are not the same and the order is specifically engineered. If you use the optional appliance connector, you just remove the tubes and baffle and reach up, grab what is essentially a handle, and pull the liner down. I don't think it replaces the 30 degree elbow, I think it attaches to the bottom of it. And the baffle and tubes go right back in, the connector won't be in the way.

I did exactly what you did with the cement, but was warned by the experts here that the heat would dry it out and it would fall out, and they were of course correct.

Nice job. Even though it's hot the next few days, you are now ready for the cold. She really likes dry wood, in the event you somehow missed this elsewhere.

I will have a few more questions, but this about all I can handle with one thumb typing for now.
 
Last edited:
Awesome, nicely done. You are correct, the tubes and baffle come out, and there is no question that they do, as both are consumables and will need to be replaced as routine maintenance from time to time. You'll need to remove them when sweeping the liner as well. Really easy to do, you just grasp the tubes with a "wise grip" (that's the way they describe vice grip in the manual), twist forward about a quarter turn, and push left. The baffle just rests on top of the four tubes. Make sure to keep track of the tubes order, the are not the same and the order is specifically engineered. If you use the optional appliance connector, you just remove the tubes and baffle and reach up, grab what is essentially a handle, and pull the liner down. I don't think it replaces the 30 degree elbow, I think it attaches to the bottom of it.

I did exactly what you did with the cement, but was warned by the experts here that the heat would dry it out and it would fall out, and they were of course correct.

Nice job. Even though it's hot the next few days, you are now ready for the cold. She really likes dry wood, in the event you somehow missed this elsewhere.

I will have a few more questions, but this about all I can handle with one thumb typing for now.
Oh, I forgot, you offered pictures of the block off and surround. Would love to see them, please!
 
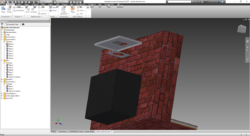
block off is gonna be a bit difficult at this point but ill put up a cad model of how I did mine. surround ill take a pic of tonight. I felt that the tubes were loose by hand. must have to actually use the pliers to get em popped loose. no worries now tho. and I did notice they have different holes patterns and sizes.
 
upload_2016-10-17_13-28-22.png
 
Last edited by a moderator:
^ the lower is silicone/sheet metal screwed to upper. ended up notching center of upper to allow it to bend then straightened it into place. self tappered into old heatilator. roxul stuffed above. the big hole allowed me to get plate in to hold roxul up and move pipe around a bit. then when correct position was figured out the lower could be put in place. had to make the hole on the lower a little bigger than I wanted so I could shove the liner from up top without the corrugated surface getting caught. if I were to do again I would cut the circle out like a pie and bend the tabs down or up so instead of the liner contacting just a thin sheet metal thickness it would be against more of a collar type thing.
 
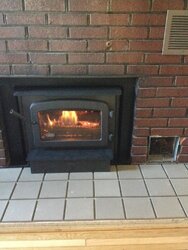
got her fired up. I'm a bit late on the pic. been busy on the hearth. this pic was on Saturday morning. its grouted and trimmed now.

IMG_1153.JPG
 
Last edited by a moderator:
  • Like
Reactions: Easy Livin’ 3000
got her fired up. I'm a bit late on the pic. been busy on the hearth. this pic was on Saturday morning. its grouted and trimmed now.

View attachment 186499
Well done. You blew by me, and I had almost a year's head start on what I think was a very similar beginning setup with the fireplace and chimney and stove. I still need my final block off plate, finish my hearth, and your surround looks great. I think I'm going to skip the surround, even though I bought it believing I needed it for some reason.
 
Status
Not open for further replies.