
After measuring for a liner, the length is 31' from the top of the chimney to the thimble opening. The original tile is 8x12, or 7x11. Not sure because the liner is weathered at the top being over 50 years old. I couldn't get a paint can down the liner, so I figure I will need a 5.5" liner. With the length of the chimney I think that will be okay. Theres one thing I'm not sure about. The length from the center of the chimney to the front of the thimble is 32". I don't think a tee will work there. On top of that I have ductwork about 2' in front of the opening of the chimney. Any ideas on what to do? I was going to go with a flex liner, but the local amish sell rigid stainless liners that are 22 gauge if I remember right that are very reasonable. If I went rigid I think 6" would fit okay. Any ideas on what to do? I don't have room for an insulation blanket, so I was going to pour thermix, or vermiculite down to insulate the liner. I really don't want to bust out the old liner.
Liner questions
- Thread starter laynes69
- Start date
-
Active since 1995, Hearth.com is THE place on the internet for free information and advice about wood stoves, pellet stoves and other energy saving equipment.
We strive to provide opinions, articles, discussions and history related to Hearth Products and in a more general sense, energy issues.
We promote the EFFICIENT, RESPONSIBLE, CLEAN and SAFE use of all fuels, whether renewable or fossil.
You are using an out of date browser. It may not display this or other websites correctly.
You should upgrade or use an alternative browser.
You should upgrade or use an alternative browser.
- Status
- Not open for further replies.
If you do use a tee are you going to be able to get to it from the bottom to take the cap off and clean it out?
If the cap can't be removed from the inside of the tee then no. Even after burning wood last winter that wasn't fully seasoned we had little buildup. So the plan was to eliminate the cleanout below and clean the chimney at the tee. Was it you BB that turned your liner 90 to enter the thimble instead of a tee? Thats what I was wondering if I should do that or install a tee. Its a ways in there. I just planned on removing the flue pipe from the furnace to clean the chimney.
Yep. That was me. Making the turn is a really tedious process because you risk tearing the flex liner. I did it because I could not any way, any how get the tee body down the flue..
Thats what I figured. The standard snout is 10" I believe. How would I make that happen? To go from the tee to the entry of the chimney. I've been too busy and I have a baby due here within 2 months so I need to get this chimney out of the way. Its one of my 1000000 things to get done before old man winter hits again. I've heard of them making telescopic snouts, maybe that would be the way to go. I just want to do this right. The 5.5" liner would be okay right? I'm thinking of eliminating the barometric damper and using a manual damper despite what the manufacturer says. In case of overdraft.
With that tall of a pipe it should draft like a vacuum cleaner. I swear that both of my 5.5 inch liners draft better than a six. I think they run hotter. There isn't anything to keep ya from pop riveting a piece of stainless stove pipe to that tee snout. Reaching in through the piece of pipe and the snout to attach the snout will be some fun. I don't know about you but my arms are only about two feet long. And you are working one handed. The snouts coming off of any 5.5 tee I have seen are six inch.
I didn't think about ordering a small piece of rigid to rivet to the snout. Thats a good idea and would be much easier. Even then it will be tight. I can reach 28" but 24" with a closed hand. I probably could get creative with some extensions to get in there to connect the tee to the snout. So if I need 31' of liner, then order 35' that way I have room to work with? Basically the thimble is solid masonary. I thought about wrapping the snout with a blanket so it would stay warmer. I'm not worried about the chimney for it will be insulated. I'm still fearfull about the baro on the furnace. While it does work it introduced too much cold air and caused some glazing. But I'm not sure that all that was caused from the new furnace because over 75% of the chimney was clean as a whistle. Just where the flue entered the main chimney was where it was seen. There still is some there and I am trying to remove it before the new liner. I'm going to mix sodium hydroxide and coat the area let it sit and then remove it. The buildup is less than an 1/8th of an inch, maybe 2 feet up from the entry. I also figured the insulation will also help stop from anything igniting if I miss a little. I want to be safe.
Todd
Minister of Fire
How big is your crock or through wall thimble? I installed BB's old tee on my 5.5 liner by pulling the liner through the crock, installed the tee, and pushed it back through, then attached the snout with a home made extension. My clean out is about 2' below the tee and I attached a 6" rod to the cap so I can reach it.
Its 6" stove pipe that was cemented in place. I don't know if there ever was a crock there. I want to remove the stove pipe and cement a new crock in place. I would like to go a little larger than 6" so I could wrap the snout to keep it warm where it goes into the chimney, or would a small 1/4" or 1/2" gap around the snout be okay instead of wrapping it? Theres no combustibles around it so thats not a concern. I was thinking the tee was installed before lowering it down. Then the snout would be added when the liner was in place.
I am trying to figure out why the flue center line is that far out there. How thick are the basement walls in that place? Two feet?
If there isn't a crock then you won't know how big of an area you have to work in until you get that pipe out of there. How big is the hole in the inside foundation wall?
We are rapidly approaching needing some pics time here.
If there isn't a crock then you won't know how big of an area you have to work in until you get that pipe out of there. How big is the hole in the inside foundation wall?
We are rapidly approaching needing some pics time here.
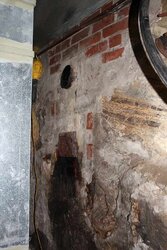
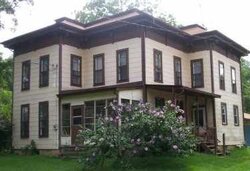
Yeah probably 2 feet thick maybe a little thicker. I think at one time there was an 8" crock in place, but over the years it was changed. Right now its just a 6" opening surrounded by mortar. I guess the chimney was built sometime in the early 60's. Originally had a huge coal stoker furnace in the basement. Here is a picture, which the cold air return ducting is in the top of the pic and in front of the opening of the chimney. You can see from the cleanout the reason to line the chimney, on top of an exterior chimney thats too big. I know some of the creosote was caused from less than seasoned wood, but I quickly realized how important seasoned wood is to a EPA unit. The floor joists are 18" above the opening of the chimney. I'll also post a pic of the house, which was taken 5 years ago. We never had condensation problems until we upgraded furnaces. The flue temps are much lower.
Attachments
Todd
Minister of Fire
What size of crock should I use? Creosote collects in that area that connects to the chimney because the mortar never gets warm acting as a heat sink. Does a crock insulate where I won't have to worry about that? Whats the best approach for replacement?
I have an eight inch crock through a concrete block wall. I stuffed Rockwool all the way around the liner all the way back and have never had accumulation problems in four seasons with the setup.
Dry wood, fast start-ups, burning hot.
Dry wood, fast start-ups, burning hot.
Todd
Minister of Fire
I would go back to an 8" stainless pipe and when you install your 6" snout to your tee wrap ceramic wool around it to keep it warm.
Okay, so I was on the right track. I'll put a 8" thimble back in place and run the 6" snout through it and insulate. Its going to be tricky getting the new crock mortared in place with it being so deep, but I'll feel alot safer when its done and installed. I'll stuff insulation in the cleanout and caulk it shut. I'm sure besides safety, I will see better performance this winter. I just have to get the liner ordered now that I know whats going on. So then on the outside where the flue pipe enters the thimble, the entry can be mortared just to stop the air flow around it.
Todd
Minister of Fire
If your not going to use the clean out you could skip the tee and bring that 5.5" liner right through the new crock or bring it through before you install the new 8" crock after you remove the old one then just slide the new 8" crock over the liner after you wrap insulation around it and shove the whole thing back in and mortar in place.
Any pros or cons from one way or the other? Its 31' from the center of the opening to the top of the chimney. I will be ordering a 35' liner, but I don't think it would be long enough without a tee. I wonder how much length the 90 degree bend takes? Also if theres a cost difference between the two scenarios.
Fsappo
Minister of Fire
Back in the day when I was an installers helper, the guy I worked with had a 24" long flat headed screw driver that he would use to connect the two parts of the clean out tee (snout to fish mouth) in those deeper thimbles. As far draft goes, that 5.5" should draw just fine. In regards to cleaning out the chimney, you could disconnect the pipe inside and shove a vacuum hose in there.
I spoke with the local amish today. I can get a rigid 22 gauge stainless liner for 9.50 a foot. Total for the job with a snout, cap, chimney top, tee, liner new crock and insulation will come in around 500.00 Which is a little more than the flex I was quoted for. I tried to put a paint can down the chimney and it was a no go. I don't think a 6" flex liner will fit, but probably a rigid liner would work? I put a small piece of 6" stove pipe down a little ways to see if it would fit and it did so maybe that would work? I can get the course vermiculite to insulate with to pour around the liner once in place. Rigid sounds like the way to go. Any thoughts?
Todd
Minister of Fire
I doubt the 6" rigid will go down, your going to run into mortar joints and maybe offset tiles. I just bought a Flex King liner, they look like a good product and are a little cheaper since you purchase straight from the factory and free shipping.
http://www.chimneylinerdepot.com/st...ng-Chimney-Liner-5.5X35-316ti-Insert-Kit.html
http://www.chimneylinerdepot.com/st...ng-Chimney-Liner-5.5X35-316ti-Insert-Kit.html
Todd said:I doubt the 6" rigid will go down, your going to run into mortar joints and maybe offset tiles. I just bought a Flex King liner, they look like a good product and are a little cheaper since you purchase straight from the factory and free shipping.
http://www.chimneylinerdepot.com/st...ng-Chimney-Liner-5.5X35-316ti-Insert-Kit.html
Did ya spring for the terra cotta top plate? Those things are great. The deluxe one is even greater but Glen appears to be a little pricey for the deluxe.
Todd
Minister of Fire
BrotherBart said:Todd said:I doubt the 6" rigid will go down, your going to run into mortar joints and maybe offset tiles. I just bought a Flex King liner, they look like a good product and are a little cheaper since you purchase straight from the factory and free shipping.
http://www.chimneylinerdepot.com/st...ng-Chimney-Liner-5.5X35-316ti-Insert-Kit.html
Did ya spring for the terra cotta top plate? Those things are great. The deluxe one is even greater but Glen appears to be a little pricey for the deluxe.
Nope, I went with the standard cap cuz it matched my other one.
Todd said:BrotherBart said:Todd said:I doubt the 6" rigid will go down, your going to run into mortar joints and maybe offset tiles. I just bought a Flex King liner, they look like a good product and are a little cheaper since you purchase straight from the factory and free shipping.
http://www.chimneylinerdepot.com/st...ng-Chimney-Liner-5.5X35-316ti-Insert-Kit.html
Did ya spring for the terra cotta top plate? Those things are great. The deluxe one is even greater but Glen appears to be a little pricey for the deluxe.
Nope, I went with the standard cap cuz it matched my other one.
I was talking about the top plate. Not the cap. The forty bucks extra is worth it for something that just fits over the flue tile and not having to trim and silicone the thing. Especially if you ever have to take it off. Cutting that silicone and bending up the flat plate is a PITA.
Todd
Minister of Fire
BrotherBart said:Todd said:BrotherBart said:Todd said:I doubt the 6" rigid will go down, your going to run into mortar joints and maybe offset tiles. I just bought a Flex King liner, they look like a good product and are a little cheaper since you purchase straight from the factory and free shipping.
http://www.chimneylinerdepot.com/st...ng-Chimney-Liner-5.5X35-316ti-Insert-Kit.html
Did ya spring for the terra cotta top plate? Those things are great. The deluxe one is even greater but Glen appears to be a little pricey for the deluxe.
Nope, I went with the standard cap cuz it matched my other one.
I was talking about the top plate. Not the cap. The forty bucks extra is worth it for something that just fits over the flue tile and not having to trim and silicone the thing. Especially if you ever have to take it off. Cutting that silicone and bending up the flat plate is a PITA.
Ohh, I see what your talking about and no I didn't, I went the cheap route.
- Status
- Not open for further replies.
Similar threads
- Replies
- 1
- Views
- 303
- Replies
- 3
- Views
- 574
- Replies
- 17
- Views
- 1K
- Replies
- 4
- Views
- 522