
Hello. This is day one as a member and my first post. I found this site doing research for my wood stove hearth extension project, but would like to begin from square one with how this came about. Here goes.
My Fiance and I purchase our home in Aug '07. The original section of the home is dated 1825 and had a fireplace in the (root) cellar that had been converted to gas logs. At issue was that in the living room directly above was an imitation Franklin wood stove being serviced by the same flue. Upon inspection, the hired company made note and also said that the Franklin stove was not up to code because of single wall piping and the horizontal section of piping after the 90 elbow being only 16" from the ceiling.
In a nutshell, he failed "both" and also failed the fireplace in the dining room (addition in the 70's) and identical imitation Franklin wood stove in the master bedroom for the same reason as the one in the living room. Obviously we we very upset, but I felt glad that we had them inspected prior to using. I asked if there was a solution/option and he mentioned that if the flue was large enough, he might be able to pass a (2) flexible liners, but they'd need to be for a pellet and wood stove. He mentioned that the pellet stove required the smallest diameter of the three (pellet, wood, gas). After various measurements and repeat visits, the project proceded.
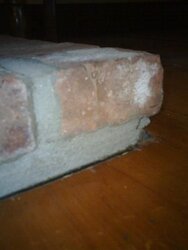
Fast forward...a Regency pellet stove installed fine as was a Hampton H200 wood burning stove. My concern is that the area where the hearth is located is brick & mortar 54.5"w x 32"d with a brick back wall of the same width up to the ceiling. I believe the brick back wall covers the stack as it passes from the (root) cellar through the living room. Being 54.5" wide, the wall most likely extends beyond each side of the stack approximately 15-20" (see pic). My concern is that, based on a drill test through the brick back wall, they located the wood stove 3" from it and utilized double wall pipe. The Hampton owner's manual states that the stove back should be 10" form any combustible material, so not truly knowing everything that is behind the wall (to the left and right of the stack), I would like to move my stove forward another 7". The problem that I run into is that the hearth pad is only 32"d. I am now researching how to extend it and was thinking of using (2) layers 1/2" Durock (yield R=.52), 1/2" Thinbrick (yield R=.1) and Flexbond mortar (yield R<= .1) for a total R= .62. The stove requirement is .84K @ 1/2", so 1/K x T = .595 = .6
If anyone has an information, 2 cents, concerns, etc., information would be much appreciated.
My Fiance and I purchase our home in Aug '07. The original section of the home is dated 1825 and had a fireplace in the (root) cellar that had been converted to gas logs. At issue was that in the living room directly above was an imitation Franklin wood stove being serviced by the same flue. Upon inspection, the hired company made note and also said that the Franklin stove was not up to code because of single wall piping and the horizontal section of piping after the 90 elbow being only 16" from the ceiling.
In a nutshell, he failed "both" and also failed the fireplace in the dining room (addition in the 70's) and identical imitation Franklin wood stove in the master bedroom for the same reason as the one in the living room. Obviously we we very upset, but I felt glad that we had them inspected prior to using. I asked if there was a solution/option and he mentioned that if the flue was large enough, he might be able to pass a (2) flexible liners, but they'd need to be for a pellet and wood stove. He mentioned that the pellet stove required the smallest diameter of the three (pellet, wood, gas). After various measurements and repeat visits, the project proceded.
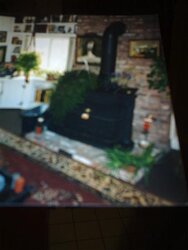
Fast forward...a Regency pellet stove installed fine as was a Hampton H200 wood burning stove. My concern is that the area where the hearth is located is brick & mortar 54.5"w x 32"d with a brick back wall of the same width up to the ceiling. I believe the brick back wall covers the stack as it passes from the (root) cellar through the living room. Being 54.5" wide, the wall most likely extends beyond each side of the stack approximately 15-20" (see pic). My concern is that, based on a drill test through the brick back wall, they located the wood stove 3" from it and utilized double wall pipe. The Hampton owner's manual states that the stove back should be 10" form any combustible material, so not truly knowing everything that is behind the wall (to the left and right of the stack), I would like to move my stove forward another 7". The problem that I run into is that the hearth pad is only 32"d. I am now researching how to extend it and was thinking of using (2) layers 1/2" Durock (yield R=.52), 1/2" Thinbrick (yield R=.1) and Flexbond mortar (yield R<= .1) for a total R= .62. The stove requirement is .84K @ 1/2", so 1/K x T = .595 = .6
If anyone has an information, 2 cents, concerns, etc., information would be much appreciated.

") Looks like you just wanna know how to go about extending the hearth in the photo by some as-yet-unannounced dimension? I ask you - what's the construction / R-value of the existing surface? The extension in front of the stove may only be mildly interesting compared to the materials directly underneath it. Are you planning on building out AND up? Or just trying to build out while somehow matching / blending in with the original brick (veneer?) surface you have there. If you know the existing hearth is built the same way you propose the extension (2 layers Durock mortared/screwed + 1/2" thinbrick) then yeah - your idea should be just fine. You'll just need to replace the 1/4-round trim at the floor.
Looks like you just wanna know how to go about extending the hearth in the photo by some as-yet-unannounced dimension? I ask you - what's the construction / R-value of the existing surface? The extension in front of the stove may only be mildly interesting compared to the materials directly underneath it. Are you planning on building out AND up? Or just trying to build out while somehow matching / blending in with the original brick (veneer?) surface you have there. If you know the existing hearth is built the same way you propose the extension (2 layers Durock mortared/screwed + 1/2" thinbrick) then yeah - your idea should be just fine. You'll just need to replace the 1/4-round trim at the floor.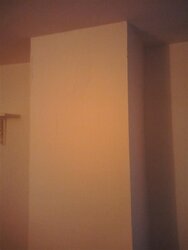