Looking for a large woodburning insert - Decided on Large Flush Arch by FireplaceX

  • Active since 1995, Hearth.com is THE place on the internet for free information and advice about wood stoves, pellet stoves and other energy saving equipment.

    We strive to provide opinions, articles, discussions and history related to Hearth Products and in a more general sense, energy issues.

    We promote the EFFICIENT, RESPONSIBLE, CLEAN and SAFE use of all fuels, whether renewable or fossil.
Status
Not open for further replies.
You avoided the VC trap, so, well done. Keep us posted on your FPX.

Thanks sir.

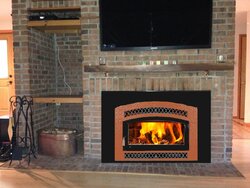
I almost got that stove too. But my dealer told me it would be an over kill for me. Please post pic. And a review of the stove as soon as you will start burning.

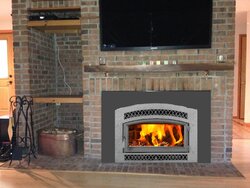
I was concerned about it throwing too much heat. But the room we are putting it in is 36'x22' and high ceilings open to the floor above so the dealer thought it would be ok. Will do...

Good going. Take pics before, during and after the install if possible. What's happening with the wood supply? This stove is going to want fully seasoned wood to burn well.

Will do on the pics.

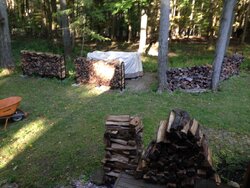
Ahh the wood... new house has 6 acres, of which 5 or so have trees, but there is a nasty ravine separating the land, that's nice to look at but my gator utv can't cross. I have started to stockpile some logs from dead standers, but that is only about a cord or 2 so far. We just moved in about a year ago and just got married this summer so I tell myself its an excuse when I have a million projects to work on...

So I'm in the boat of buying and/or bartering until I can get a stockpile going of wood that I'm sitting on to burn in future years. . I have spoken to my dealer and was educated on these forums just through reading posts of how important it is to get wood that is dry, at least less than 20% MC. So I grabbed my moisture meter (I'm a hobby workworker and I already had one). Here's what I currently have:

***1.75 cords of Cherry with an MC off a fresh middle split of 4 random pieces 18,16,21,20 %. Purchased in 2013 off Craigslist for $120 a cord delivered

***5 cords of Shagbark Hickory with an MC off a fresh middle split of 4 random pieces at 26, 28, 31, 27%. Purchased off Craigslist for $90 a cord, I picked it up

***1 Cord of Oak (no idea on species) with an MC off a middle split of 4 random pieces at 14,13,13,12%. Came from a tree I took at my dads

***0.5 cord of Ash with an MC off a middle split of 4 random pieces at 16,15,18,19%. Came from a tree I took at my dads

I bought wood last year (that I burned) from a guy off Craigslist a couple towns away. He has mixed hardwoods (Oak, Ash, Maple, Elm Beech) for $100 a face cord (4'x8' in 18" pieces) delivered in a dump trailer. He's a real nice guy, I just swung by his house today after work and I'm going to buy another 5 cords or so off of him, so I can let all 5 cords of the Shagbark Hickory I have sit another year, and hopefully find some time to cut some of my own as well. I tested a few random pieces off a fresh split of his wood and it was between 16%-18%...

Boy it's easy when a guy drops off that much wood in a dump trailer, I just sit back,watch him dump it out, and toss it in back of my gator and stack. Easy peasy.
 

Attachments

  • IMG_1292.JPG
    IMG_1292.JPG
    280 KB · Views: 354
Last edited:
That is a good start, but be prepared for your famous snows. Put some covers on the top of the stacks.
 
That is a good start, but be prepared for your famous snows. Put some covers on the top of the stacks.

Will do on the covers.

The local stove shop uses a paint called "Stove Bright" to paint - at no extra cost, the insert face and surround plate if you desire. They have a copper type color the wife is keen on, and I made some rough "previews" in photoshop.. I'd like to avoid painting the hinges as I'm concerned about long term durability.

Here are the "previews", pardon my lack of Photoshop skills. Copper is a funny color to try to "get" as one shade, because its really a variation of a bunch of shades as a metal. But as a paint its going to be one shade with some metallic flakes. The options as I see them:

-Paint the surround
-paint the front face plate
-paint the door

We're thinking something now like: surround the typical dark grey/black, the front face plate copper, the door in the typical grey/black.
 

Attachments

  • IDEA C.jpg
    IDEA C.jpg
    228.1 KB · Views: 538
  • IDEA M.jpg
    IDEA M.jpg
    230.3 KB · Views: 472
Last edited:
Every time I read one of these threads it reinforces the value of my decision to stay single.
 
That is a good start, but be prepared for your famous snows. Put some covers on the top of the stacks.

As far as the covers, I have some full cord covers, does covering just the very top allow the wood to dry better than covering the entire cord? Has anyone done an experiment on this?
 
Every time I read one of these threads it reinforces the value of my decision to stay single.

Fewer toys married that's for sure, and eventually some compromises in decisions, but she keeps me from getting in all the trouble that I got in single , and it is nice having home cooked meals to eat while I look at our shared agreement stove ;) but mostly, I think everyone should do what's best for them , and if you're someone that always need to get their way and can't comprise, save yourself from Marriage that's for sure my Opinion.
 
  • Like
Reactions: firefighterjake
As far as the covers, I have some full cord covers, does covering just the very top allow the wood to dry better than covering the entire cord? Has anyone done an experiment on this?

If the wood is dry you can cover it completely to make sure it stays dry but be aware of ground moisture. If the wood still needs to dry, top-cover only. Same principle as clothes on a drying rack. Wrapped in plastic they certainly would not dry.
 
Others can chime in but I'd recommend moving the TV.

It's an LCD not a plasma so I was hoping to leave it there. Last year, although not much heat was thrown, it never really got hot.
 
I'm watching this thread intently as I plan to get the Hybrid Fire also, the arch model from Lodi. I'm in the process of putting out for quotes and am interested in how you did, did you insist on insulated liners, installing roxul or a blocking plate? If so what was the up charge? I'm in the Boston area. ...
 
I'm watching this thread intently as I plan to get the Hybrid Fire also, the arch model from Lodi. I'm in the process of putting out for quotes and am interested in how you did, did you insist on insulated liners, installing roxul or a blocking plate? If so what was the up charge? I'm in the Boston area. ...

At the moment here is my quote. I looked at 2 local stove shop dealers that sell Travis (basically the only 2) and they were both close in price. I went with the much more local one, that has been in business far longer.

I have a center of the house chimney. It stick out about 4' above the roof. I wasn't going to get an insulated liner for my install because from my understanding - insulated liners are almost required for side of house chimneys, but not so much for central home chimneys.

1 - FPX Large Flush Arch ($4550)
-with large Custom surround fabricated
-Artisan Hand Hammered Face
-Painted face "Copper" Stove Bright Paint

2-Hardwire kit with plug ($63)

3-SS Liner kit for 35' uninsulated in 6" ($806)

4-Roxol Insulation for "wool blanket" ($45) - I'm going to ask them about this and getting a block off plate instead.

So that comes to $5464. They gave me $294 off because of a "sale" they had running, and I printed out a $100 off coupon from the FPX website (expired 9/30). That took it down to $5070. Their install fee is $675, and if they isntall, there is no tax as their is "proof" of a capital improvement. My total was $5745. Keep in mind the Hammered artisan face is like a $400 option, and they had to custom fab a plate for my surround too, and paint it (which they threw in for "free"). I had another quote with just the large surrond, no artisan and all black for like $4100 from the other local dealer. My dealer claims in the off season they go about 15% less which would be for me about $675 so $3875 for my insert. They you factor in saving some on your heating bill this winter... Sure wasn't cheap and I'm not entirely convinced I got a great deal at all, but I'm thinking I wasn't totally ripped off either....
 
Thanks for all the details, I am just outside of Boston so have 3 local dealers, I will meet with the first today. I'll let you know how I do so get some closure on your last sentence :)

Also, Damn you for mentioning the hammered face, If I show that to SWMBO its going to cost me 400 more too....maybe I have a ball hammer around ......

Oh don't worry she'll probably see it in a brochure or walking the showroom. My sister and brother in law are moving back my way after living in Bridgewater, MA which is south of Boston as I recall.

Maybe you can fanangle this coupon to work for you, it's expired by a few days, but get your best price and say "the other dealer took this coupon while it was valid - will you?"

At least the Hammered face only is costing you $300 now, SWMBO will be pleased :)
 

Attachments

  • Untitled-1.jpg
    Untitled-1.jpg
    33 KB · Views: 192
Get any quotes? My install is 10-23 so no action here..
 
I did mine 2 years ago for about $4500. Get the green start. I installed with no issues but two things. I ended up pulling it out and putting it on 1" bricks to raise it off the floor a bit- so the fan didn't suck in the ash. Also the blower densor location from the factory is off. Have them adjust that for you right away.

Great stove with great heat. Came home tonight from vacation to a 60' house. Room was up to 80' in an hour.

Should this say "The blower sensor location from the factory is off" Can you elaborate on this or post a link to a thread I want to be informed if the installers don't know about this. Thank you!!!
 
Should this say "The blower sensor location from the factory is off" Can you elaborate on this or post a link to a thread I want to be informed if the installers don't know about this. Thank you!!!

Yes, this was before I joined the threads here so I have no link. And its an easy fix if you know what to look for.

Basically, the issue is this. The green start blower would mount on the left. The heat sensor is on the right. However, its a bit too far to the right- causing the blower to take too long to kick on- and for some fires- would do something it shouldn't- waffle on and then off. They moved and replaced the sensor at the same time- as it was obviously defective.. (It should kick on and stay on until it cools down to a much lower temp).

By moving it about two inches to the left, the blower comes on at a much more appropriate time. Again they may have already fixed the issue.. To move it, all he did was remove the right side blower fan, and unclip the sensor and relocate it. I don't have any pictures to share- but the tech said it was a known issue- and when I bought the stove, the "Service call" was free- even though I installed it. They normally do this themselves when they install so that they don't have to come back.

hope this helps.
 
So the big install was today, but there was a big problem and as of now the stove shop is going to refund my deposit. There is a bunch of these concrete blocks in the smoke chamber at the top of the firebox. These concrete blocks (kind of like a cinder block?) are staggered and go upwards for 58". Thats the problem. The shop said they've seen this before - but the blocks don't usually go anywhere near that high. It also makes cleaning a bear - as crestole has built up on them as commented by another stove shop that did the sweep. The picture I attached is laying on your back in the fireplace's firebox and looking up.

So as of now they are going to refund my deposit. I'm really bummed out. They usually use a concrete demo hammer and the longest bit they have for it is 18". He measured the amount we need to demo at 58". In the middle of all these blocks is what the installer called a "lineman's damper". Which makes it a bit trickier but not a deal breaker.But still no real way to make a 6" round hole. and I don't want to do a bunch of demo and still have no insert and a messed up fireplace....

Anyone know of a really long demo hammer bit anywhere? The openings in the blocks are maybe 3"x7" as they taper up, too narrow to ovalize the liner. The install guy said "hey you could just slide the insert in without a liner an 2' of pipe, but you'll draft terribly, it's not code and illegal, its extremely dangerous and we won't do the install. Thats about your only option".

Any thoughts? Or am I burning a plain fireplace this year?
 

Attachments

  • photo 2.JPG
    photo 2.JPG
    119.1 KB · Views: 398
Last edited:
I newly own the same FPX, can't help you with the flue issues, but I can tell you now that TV has to move! Mine is slightly different, plain front. I am very happy with it.

But the heat generated will melt the TV.

Good luck with the install.

image.jpg
 

Attachments

  • image.jpg
    image.jpg
    87.6 KB · Views: 272
I have the exact same one as Spletz. I did not have your issue, but had a heck of a time a year later when I moved the green start compressor underneath in the basement and had to hammer drill the 1.5 inch hold through the firebox floor to run the hose.

My only thought would be to remove the bricks on the outside to access those blocks- remove them and rebuild. I think it may be quicker, cheaper and a better job than trying to do what you are looking for.
 
Alan, I didn't get the green start option. How do you like it? Does it live up to its marketing? We did consider it briefly, but figured it overkill.
 
I have not used a match, kindling or paper in that fireplace for two years. Do I like it, yes- especially for that room. It is a bit noisy, which is why I relocated the compressor. Its not bad- just their was no place to hide it anyway. You also have to get use to stacking the wood properly for a cold start. However, with a reload- its brainless. Open flue- dump in wood. close flue. push button and walk away for 10 hours.
My other stove, I was considering another one- which I would have moved the green start into a cabinet that is next to the fireplace and that would have been fine. But decided on a different style all together - and save some money.

but overall, I do give it two thumbs up! My only regret is not thinking of and patenting it first. I expect a lot of copy cats when that paperwork runs out.
 
So the big install was today, but there was a big problem and as of now the stove shop is going to refund my deposit. There is a bunch of these concrete blocks in the smoke chamber at the top of the firebox. These concrete blocks (kind of like a cinder block?) are staggered and go upwards for 58". Thats the problem. The shop said they've seen this before - but the blocks don't usually go anywhere near that high. It also makes cleaning a bear - as crestole has built up on them as commented by another stove shop that did the sweep. The picture I attached is laying on your back in the fireplace's firebox and looking up.

So as of now they are going to refund my deposit. I'm really bummed out. They usually use a concrete demo hammer and the longest bit they have for it is 18". He measured the amount we need to demo at 58". In the middle of all these blocks is what the installer called a "lineman's damper". Which makes it a bit trickier but not a deal breaker.But still no real way to make a ^" round hole. and I don't want to do a bunch of demo and still have no insert and a messed up fireplace....

Anyone know of a really long demo hammer bit anywhere? The openings in the blocks are maybe 3"x7" as they taper up, too narrow to ovalize the liner. The install guy said "hey you could just slide the insert in without a liner an 2' of pipe, but you'll draft terribly, it's not code and illegal, its extremely dangerous and we won't do the install. Thats about your only option".

Any thoughts? Or am I burning a plain fireplace this year?

Try to find a mason or certified sweep who also does a lot of masonry work to take a look at it. Maybe it can be cut out with the right equipment and knowledge.
 
Try to find a mason or certified sweep who also does a lot of masonry work to take a look at it. Maybe it can be cut out with the right equipment and knowledge.

I had a union mason (who is a former neighbor) re-point the chimney this summer and re-cap it. He has seen my setup and although he doesn't specialize in chimneys per-say, he is qualified in my eyes. I showed him the pictures and explained the issue, and he said - no go he couldn't do it. I will continue to look around for another sweep or mason that might be more knowledgeable in this.
 
Sorry you busted out on this. We have the large insert new this year and really like it so far. Hope you can fix the chimney issue. Maybe a tile breaker from the top down?
 
Status
Not open for further replies.