Lurker turned Poster - new stove & hearthpad

  • Active since 1995, Hearth.com is THE place on the internet for free information and advice about wood stoves, pellet stoves and other energy saving equipment.

    We strive to provide opinions, articles, discussions and history related to Hearth Products and in a more general sense, energy issues.

    We promote the EFFICIENT, RESPONSIBLE, CLEAN and SAFE use of all fuels, whether renewable or fossil.
Status
Not open for further replies.

popeyed05

New Member
Sep 8, 2013
12
Maine
I've been lurking for almost a year now and finally registered today, with impending mountain of questions.

Just Acquired
- Alderlea T5, to be delivered and installed on the 23rd (thanks to ~50 posts that swayed us in this direction)
- Seasoned hardwood, 2 cord, sitting on the asphalt driveway, just delivered (2 more in the next couple weeks with next year's wood soon after)

Items in progress:
hearth pad build

Work to do:
wood stacking method
remove baseboard heater
decide on mantle locations

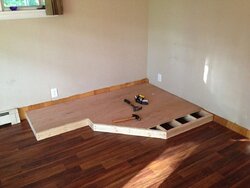
We had the pad designed (1.5" tall) and while at the store to buy supplies we started to doubt our height decision and left to rethink. We've now decided to raise the hearth up on 2x4's, for aesthetic reasons. Finished height will be 5 1/8".

Our stove only requires ember protection, with a nice 4" clearance to the back wall, so most of this is purely to make the stove look like a more permanent feature in the house.
Here's our build plan, with photos below.
2x4 frame
3/4" plywood
1/8" white thinset
1/4" hardibacker
1/8" white thinset
3/8" tumbled travertine tile
- mix of large/small squares and rectangles on 12x12 mesh
- sealed before and after grouting
polyblend fawn colored grout
- we're not sure what we're going to use for the sides of the frame, recommendations welcome.


Questions:
1) Plan is to space 2x4's 16" on center, running perp to the floor joists below - sound reasonable? Anything special needed under the feet of the stove?
2) Any recommendations for the sides? We looked at molding but didn't see any tall enough, so current thinking is to rip a 1x6 to 1x5.25" and router the outside edge
3) we're resolved to removing a section of the baseboard heater, which will cost over $350 to have done. Any creative solutions to this issue?
4) we're debating on the electrical outlets. pros/cons to keeping/removing them?
5) anyone install lighting in the stone work above the stove? would want to do wiring prior if it makes sense

I can't wait to get the stove in and even enjoyed throwing the firewood around today. Having grown up in northern MN, this feels like home. :)

Wish me luck and feel free to comment/question on anything I've written. Most decisions made so far came from reading posts on this forum. Thank you.

IMG_20130906_102635_720[1].jpg IMG_20130907_115848_495[1].jpg IMG_20130908_184002_366[1].jpg IMG_20130908_185903_625[1].jpg
 
Welcome. I think you will be happy with the T5, it's a great stove. I like the choice of hearth stone. That's going to look sharp. Personally I like a little beefier hearth to avoid any flexing and possible grout cracking so I recommend 12" on center studs and prefer 1/2" backerboard. A stronger hearth will also handle a heavier stove if you ever decide to change. Leave the electric outlets in case you decide to add a blower later. They're also handy for running a shop vac and a work light when cleaning up ash and the flue. Speaking of which, how tall is the chimney going to be for the stove? Watch clearances to the box beam unless this will be connected with double-wall pipe. even with double wall, the shelf above it will have to be at least 9" higher than the pipe.

Why remove the baseboard heater? The wall veneer is only cosmetic and removing it will cut back a lot on the room heat when running on the boiler. If you do, I would just install a shorter length on the wall that ends earlier.

How does the wood look? Do you know what species it is? Have you resplit any of the wood to check for moisture?
 
Last edited:
We'll go 12" on the studs, thanks. The hardibacker thickness decision was left over from when we were just going to put it on the floor. The hardi install pamphlet says, "We recommend 1/4” HardieBacker board for floor applications, unless 1/2”thickness is needed for transition."

Is there a downside to using the thicker 1/2" backer? If not, we'll up it.

It will be connected with double-wall pipe, but you bring up a good point. Do the beams above the stove have to meet the 4" back wall clearance? any other clearance?

The baseboard....this has been a point of argument the past couple days: bottom line, he's worried if we leave it and go through all this work and it's visible we'll regret not having just taken out the eyesore. We will just shorten it, leaving the length outside of the hearth.

We have not yet resplit to check moisture. My gut feel from throwing it around is that it's partially seasoned. Can I be certain if it's good to burn without a moisture meter (only semi-accurate anyway)?
 
No downside to the thicker backerboard that I know of. It will make the base more rigid. 1/2" Hardibacker will do, or you can use Durock NexGen for a higher insulation value.

One thing you might consider is replacing the baseboard with a high efficiency radiator that has the same btu output as the length being removed. Of course this add more expense.

Visually the shelves don't quite make it for me. They seem too busy. Maybe just put one shelf on the long wall and cap the other sidewall with the slate at right angle to create a ledge? Play with that one a bit before committing.

You can test the wood by weight, visual check for checking on the ends, bang it together to see if it goes thud or rings musically, and resplit it, then press the fresh face against your cheek to feel for moisture.
 
  • Like
Reactions: webby3650
The wood is a mix of oak, maple, ash, and a little birch. I expressed concern with the birch when I went to see it stacked and he threw in extra wood and reduced the price. I think I've still got 2 cd of good hardwood, plus the random birch, but won't know for sure until later this week when I stack it. We're prepared to have to spend big if we should end up needing kiln dried this season until we get a rotation going for following years. We'll split a few pieces tomorrow to see how wet they are.

Two different heating contractors said we'd be fine with the shorter baseboard - we do have quite a few feet of it on the first floor.

The shelves aren't set in stone yet; they're all a little dependent on where they end up going out the side of the house with the chimney pipe. I'll play with a few different combinations.
 
All great suggestions above!
There is no drawback with using 1/2" backer. It's just not needed on most floors if installed properly. But in this raised hearth situation, it would be a good idea.
Judging the MC of wood is very difficult without a meter. I think the best way is to split it and then feel the newly exposed surface, if its near or under 20% MC it won't feel cold or damp to your skin. 30% will feel cold and damp.
 
If you go with 12" centers on your 2x4 hearth framing perhaps you should consider running the 2x4s perpendicular to your current floor joists so that you don't end up with a hearth 2x4 falling in the middle between two floor joists. That's how I would do it.
 
exactly what we've planned, perpendicular to the floor joists, for the same reason you mentioned. thanks!

Any need to put cross supports in the opposite direction? Is getting a beam directly under the foot of concern? I think the T5 is a heavy stove <500lb, but I don't know where exactly the feet are in reference to the corners of the stove that are dimensioned in the manual. I'll be guessing to try get beams as close to under the feet as possible.
 
There's no need for special beams under the stove. The weight will be spread out by the big raised hearth you are building. The psi on the floor will be minimal the way you are doing it. Is there any special reinforcement under your refrigerator or deep freeze?
 
The wood is a mix of oak, maple, ash, and a little birch. I expressed concern with the birch when I went to see it stacked and he threw in extra wood and reduced the price. I think I've still got 2 cd of good hardwood, plus the random birch, but won't know for sure until later this week when I stack it. We're prepared to have to spend big if we should end up needing kiln dried this season until we get a rotation going for following years. We'll split a few pieces tomorrow to see how wet they are.

I suspect the oak will not be ready to burn for another year. It is very dense wood and takes a long time to dry. How tall will the chimney be on the stove?
 
Sounds good. The stove will be happy with that.
 
We're running a week behind schedule, day jobs got in the way of projects last week.

Update:
We put the first coat of sealant on the stone today, it's sitting until tomorrow when we dry fit before grouting. We bought Aquamix sealer for natural stone, not the enhancing stuff. It doesn't seem to have changed the color, but we're not that picky anyway - more of a curiosity after reading about different sealers. We just want it to have the same rustic look - no gloss.

We just finished the wooden frame and cut and dry fit the backerboard. Only mistake: We were snapping the cement board down, not up. We did have a couple uneven edges that we had to trim with a knife, maybe it would've been cleaner if we'd snapped up. I'm just taking a quick break before mixing up the thinset to put on the backerboard. We got white thinset, as recommended by someone on another forum in case we get somewhere that it shows through with the light travertine tile. I doubt it's a necessary concern, but it was only $1 more expensive than the gray. We bought the cement board screws to attach to the 3/4" plywood underneath.

The baseboard radiator was shortened last Monday. I'm glad we decided to do it; it does make a big difference in how the room looks - but it was not the cheapest route to go.

The wood pile is still on the pavement in the driveway - we're thinking of shed ideas that would use some of the dry pine logs we have on the property. Hoping to find some metal roofing on craigslist.

Proof of progress below.

IMG_2538.jpg
 
Last edited by a moderator:
The stove and chimney were installed today. I've got a real low-n-slow fire going in it now. Still have some finishing to do: stacked stone veneer on wall, wooden beam across wall, molding on hearthpad, tv flush mount to the side, and finding something for a log holder.

Do people usually store the ash inside or bring it out immediately?

Big milestone today with getting the installation complete, just need to clean it up and score away the wood situation.

IMG_20130923_131336_550[1].jpg IMG_20130923_193631_756[1].jpg
 
You're making nice progress. Congratulations.
 
Nice stove and hearth! As for your ash question, I take 'em out immediately in an ash bucket. From there, they stay in the bucket for 3-4 days or so then go safely in the ash dump pile out back. I'm blessed with a big yard so they are at least 50-60ft away from our house at all times. I also try to take 'em out from a cold stove. It's overkill and not always feasible. but I like to be safe with those things.
Take the ashes out as needed, keep an eye on the stove, and learn it inside and out. Have fun!
 
Get a metal can for the ashes. We store them out on the porch in a 10 gallon, small garbage can set on top of bricks so that there is no contact with wood. Ashes will stay hot for a long while so it's best to treat them as hot, even if they're not.
 
Ashes will contain smouldering coals for quite a while. Get them outside right away to avoid CO in the house. Metal for sure.

Nice looking installation and the staggered stone is nice. I often wish I'd raised the hearth on mine, especially when my knees are stiff in the morning. Groan.
 
Since it wasn't mentioned too specifically I'll add that you want to have a tight fitting metal lid on your metal ash can. I have a couple of five gallon buckets that originally held deck sealer in them and they had metal lids. I use two cans so that I can leave ashes in one for a good week while I use the other can. That assures me that there is no chance of dumping some hot coals somewhere that could start a fire.
 
Status
Not open for further replies.