
MH Puzzling Together
- Thread starter byQ
- Start date
-
Active since 1995, Hearth.com is THE place on the internet for free information and advice about wood stoves, pellet stoves and other energy saving equipment.
We strive to provide opinions, articles, discussions and history related to Hearth Products and in a more general sense, energy issues.
We promote the EFFICIENT, RESPONSIBLE, CLEAN and SAFE use of all fuels, whether renewable or fossil.
You are using an out of date browser. It may not display this or other websites correctly.
You should upgrade or use an alternative browser.
You should upgrade or use an alternative browser.

I'm calling the masonry heater done - although there are still a few things to be done like 1) rocking around the chimney, 2) cleaning the gray mortar haze off, 3) installing the glass and concrete screws into the firebox door, 4) filling in all gaps with mortar and 5) placing a granite or rock slab on top (and for shelf?). Time to get back to house building. What a mess I've created!
Final Cost: $1700 to $1800 range. Weight: ? (over 10,000 lbs, pretty dense) Height: over 8' less than 9' (not including chimney height)


Some of the things I did to keep the cost down,
* bought a big door for 1/3 cost because available (I preferred a small door)
* bought new/used firebrick from private parties
* used outer materials that were virtually free ($60)
* did the labor and planning myself - nothing fancy just the basics
* omitted a bake oven (which would have added ~$700)
* omitted a bench (I would have built one if I understood it better)
Final Cost: $1700 to $1800 range. Weight: ? (over 10,000 lbs, pretty dense) Height: over 8' less than 9' (not including chimney height)
Some of the things I did to keep the cost down,
* bought a big door for 1/3 cost because available (I preferred a small door)
* bought new/used firebrick from private parties
* used outer materials that were virtually free ($60)
* did the labor and planning myself - nothing fancy just the basics
* omitted a bake oven (which would have added ~$700)
* omitted a bench (I would have built one if I understood it better)
Last edited:
Simonkenton
Minister of Fire
Looks good. Can't wait to see how it performs.
I am shooting for average performance (75-79% real world efficiency). I knew of some ways to improve performance but chose the path of least financial resistance. The big door and firebox might lower performance.
Things I've learned,
* the amount and weight of materials is daunting
* always use straight bricks - you can cut full bricks in half when you need splits, avoid slanted bricks (trouble)
* refractory mortar isn't a bonding agent - it is used to close gaps between 2 bricks so use as little as possible to accomplish this
or else you will be wasting $ (it is expensive)
* don't use 2X lumber for making slab forms (base, firebox floor, and caps) instead use plywood - line the plywood with plastic such that there are no wrinkles (2X lumber is often untrue and wastes $ because it is taller thus more refractory cement)
* if building a contraflow don't freak out while assembling the side channels being so flimsy - you'll lock them in place later - also the side channels are a repeating brick pattern - that is rows 1=3=5=7-etc & 2=4=6=8=etc... If you freelance and just build these by eye when you get to the top your refractory concrete caps probably won't fit - stick to the numbers.
Things I wish I had done,
* put wire mesh in the forms before adding refractory concrete (adds strength, could allow you to use less refractory concrete if desired)
* made an eco-box, i.e. a door and firebrick with air channels - this is a door that has channels for air which flows through it into the firebrick channels thus providing 'better' air to the burning fire which raises efficiency
* rebar vertically and horizontally embedded in the outer layer of the MH (earthquake protection), costs little
* set up vertical and horizontal plumb strings instead of relying on eye/feel
Sprinter
Minister of Fire
Thanks for sharing your experiences and lessons. Yours will certainly help others with similar projects. I have a neighbor that basically built his log house around his MH and loves it after several years. Quite a project and I admire your efforts.
Thanks, building a masonry heater isn't that hard. They are the best kept secret in wood burning. People who really understand wood burning want them but the price is too high if someone else builds it. And the thought of trying to build one yourself seems to hard for most. But if you're doing new construction and you get a fat slab under the area you are going to build you're ready for a MH.
Buy your firebrick, refractory cement, refractory mortar, hardware, etc.. and you are ready to go (maybe get some plans from MHA.net). And, it is easier and faster to use clay brick for the outside. It amazes me how people can be so gung-ho about old wood stoves, boilers, rocket mass heaters, inserts, zc fireplaces, and wood stoves when masonry heaters are better technology and way to burn than all of these, in fact. You can take a horse to water but you can't make it drink.
Buy your firebrick, refractory cement, refractory mortar, hardware, etc.. and you are ready to go (maybe get some plans from MHA.net). And, it is easier and faster to use clay brick for the outside. It amazes me how people can be so gung-ho about old wood stoves, boilers, rocket mass heaters, inserts, zc fireplaces, and wood stoves when masonry heaters are better technology and way to burn than all of these, in fact. You can take a horse to water but you can't make it drink.
Awesome giant heater.
When you say you got your plans from the MHA, did you adapt a general design from their webpage or did you work with a stove mason to come up with a design for your particular setup? It almost sounds like you changed things a lot on the fly...
When you say you got your plans from the MHA, did you adapt a general design from their webpage or did you work with a stove mason to come up with a design for your particular setup? It almost sounds like you changed things a lot on the fly...
Awesome giant heater.
When you say you got your plans from the MHA, did you adapt a general design from their webpage or did you work with a stove mason to come up with a design for your particular setup? It almost sounds like you changed things a lot on the fly...
My design is just a basic masonry heater - no bench & no oven. I bought a booklet of like 8 designs from the masonry heater association - it mostly shows the ingredients needed. It is pretty minimal but there is some useful info on how to work with mortar and bricks. Are you thinking of building a masonry heater?
I had to change things a little bit because my bricks were bigger than the standard sized bricks in the plans. And when I measured the door I had it was 1/2" wider than the firebox opening in the plans. So I just proportioned things out a little bit - 4" wider and 2" deeper. Because my bricks were 3" thick (plans 2.5") the firebox is almost the same size anyways just 2" wider.
And I had extra material so I figured ,'..why not build a big one?'. This thing I built is a monster standing over 8 feet tall. I really knew it was big when I stood on top of it to work on the chimney - it was a long ways down if I fell. And it has to weigh a lot. The firebrick were about 1.5 times heavier than normal fire brick, and the outer material is granite laid at 5+" thick so it is dense - this is an industrial strength masonry heater.
There are 2 designs that most beginners should stick to - the large contraflow or the small contraflow. It is possible to find photo sequences of these builds which helps a lot. The other designs are more complex and it is harder to find photos.
Generally for a standard sized house with average insulation the large contraflow is usually built. The easiest material for the outside is going to be regular brick.
Last edited:
Knowing that my setup required something a little different (smallest reasonable footprint, fairly low heat output), I had a stove mason design the thing for me--StoveMaster/Alex Chernov. It only cost $200 for how simple I kept it, plus gave me a very detailed plan. With the facing & everything it will come out to around 21x21 inches & 5.5 ft tall; it has an Austrian Ecco firebox with a bell on top as the heat exchange--the contraflow designs take up a bit more floor space.
Knowing that my setup required something a little different (smallest reasonable footprint, fairly low heat output), I had a stove mason design the thing for me--StoveMaster/Alex Chernov. It only cost $200 for how simple I kept it, plus gave me a very detailed plan. With the facing & everything it will come out to around 21x21 inches & 5.5 ft tall; it has an Austrian Ecco firebox with a bell on top as the heat exchange--the contraflow designs take up a bit more floor space.
Your heater is unusual as is your 'house'. That is awesome that a masonry heater could be designed around what you need - a small footprint, and high efficiency. I am really fascinated by your heater and went through all of the photos at the Yurt site. Alex Chernov is one of the bedrocks of the Masonry Heater movement in North America.
You've got the eco firebox. I wanted one but I don't have enough skill in this area, yet. What are you going to use for a facing material?
The eco firebox wasn't that difficult--I built up the outer core halfway, then built the firebox inside it. It would have looked a lot neater if I had been washing the excess mortar off and if I had used a higher quality firebrick for the 1/4" thick air slit spaces. But we'll find out how well it works shortly.
Mutual Materials makes a nominal 2x4x8 cement brick that isn't expensive. HomeDepot has basically the same thing. I paid 28 cents at the concrete yard an hour away, 39 cents at the local lumber yard once I needed 60 more bricks. The firebricks were actually pretty cheap from the concrete yard, too--only $1.26 for full 2.5x4.5x9 firebrick. Not the highest quality or rating, but I'm happy I didn't have to drive half a day just to get surplus brick.
Once I have the heater all faced & sealed up, I'll run it a bit to see how it goes--I suspect it may be on the edge (too much too fast?) for my heating needs. I plan on plastering the facing after that's done, maybe put some tile on it as accents. But the thickness of the plaster may need adjusting based on the response time. I might guess you're heater would be very slow to release heat with your facing thickness--but with your massive firebox that might work out.
Have you fired your heater yet?
I fired it up with progressively larger loads of firewood in order to dry out the mortar . And after this, I ran a few more fires through it just for the fun of it. It would stay warm for a long time even outside. I would open the door and there would be bugs hanging out inside in order to stay warm (early fall).

. And after this, I ran a few more fires through it just for the fun of it. It would stay warm for a long time even outside. I would open the door and there would be bugs hanging out inside in order to stay warm (early fall).I've reached the point where I need to completely finish this masonry heater. How does one transition from masonry to 8" double walled metal pipe? There must be some sort of transition connector? How high should the metal pipe be over the peak of the roof? This MH is centrally located in house plans (you can see left part of MH in house picture through window opening).


Last edited by a moderator:
Prof
Minister of Fire
We used something like this for ours:
https://www.northlineexpress.com/8-...MIlO2Vj_jv3gIVjf_jBx387QF4EAQYAyABEgIe1PD_BwE
But, we put that at the top of the heater--didn't really start a masonry chimney and then transition.
https://www.northlineexpress.com/8-...MIlO2Vj_jv3gIVjf_jBx387QF4EAQYAyABEgIe1PD_BwE
But, we put that at the top of the heater--didn't really start a masonry chimney and then transition.
Most chimney pipe manufacturers make a transition plate for just this purpose. Search on 'chimney transition plate'
https://www.rockfordchimneysupply.com/rock-vent-transition-plate.php
https://www.rockfordchimneysupply.com/rock-vent-transition-plate.php
Last edited:
Most chimney pipe manufacturers make a transition plate for just this purpose. Search on 'chimney transition plate'
https://www.rockfordchimneysupply.com/rock-vent-transition-plate.php
Thanks, that appears to be what I'm needing.
Here's an update on this masonry rig - it is buried in the house building process - doors, thin plywood for thermal shutter coverings, and a boxed Durango swamp cooler. Looks like I'll have lots of scrap wood to burn.


SpaceBus
Minister of Fire
I like the screen, but can it be removed?I fired it up with progressively larger loads of firewood in order to dry out the mortarView attachment 188742 . And after this, I ran a few more fires through it just for the fun of it. It would stay warm for a long time even outside. I would open the door and there would be bugs hanging out inside in order to stay warm (early fall).
View attachment 188743
Yes that screen can and will be removed. It came with the door. I put it in just to see what it was like. I guess it could come in handy if you wanted to burn this rig like a fireplace. I found these rocks last year and bought them. They are roughly 4" x 4" little granite blocks. I asked the seller what they were used for? He said people use them in their driveways instead of pavement. They are the perfect size for a masonry rig. I got mucho granite blocks - gray and red.

I've been collecting firewood too. My back 'stack' is less than 10% moisture content. It consists of a mixture of what is available locally - honey locust, lodgepole pine, cottonwood, russian olive, and red elm. I would stack it but it is already dry and it doesn't rain much here.

And I've got some wood needing processed and some kindling scraps from a cabinetry shop.


And I've got some wood needing processed and some kindling scraps from a cabinetry shop.
Nigel459
Feeling the Heat
Oh yea I forgot to mention 'a little' mistake I made.
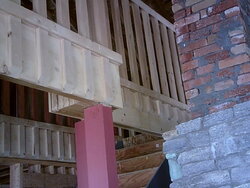
The 11.75" LVL cross support for the loft was running into the masonry heater. It was to close. I asked the inspector how much clearance I needed to leave between the MH and the stairs/railing, and he said at least 2". (remember this thing is about a foot thick of rock/brick and it doesn't get as hot as a wood stove so the gap can be close).
I figured I would leave 5" or 6" clearance gap just to be on the safe side. Since I can't go straight across, how do I get the LVL cross support around the MH? I glued and bolted about 5 chunks of LVL at 90 degrees and worked my way around the MH (last picture).
I had to use extra vertical beams to support this indented cross support. After finish material, the gap turned out to be about a 3-4" gap (I probably should have glued/bolted 6 chunks of wood together).
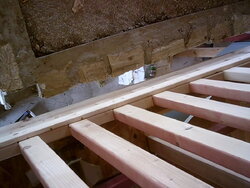
Picture from the top (do you see the little gap?).


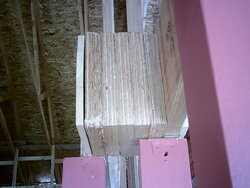
One of the two 90 degree chunks of wood I made.

Live and learn.
The 11.75" LVL cross support for the loft was running into the masonry heater. It was to close. I asked the inspector how much clearance I needed to leave between the MH and the stairs/railing, and he said at least 2". (remember this thing is about a foot thick of rock/brick and it doesn't get as hot as a wood stove so the gap can be close).
I figured I would leave 5" or 6" clearance gap just to be on the safe side. Since I can't go straight across, how do I get the LVL cross support around the MH? I glued and bolted about 5 chunks of LVL at 90 degrees and worked my way around the MH (last picture).
I had to use extra vertical beams to support this indented cross support. After finish material, the gap turned out to be about a 3-4" gap (I probably should have glued/bolted 6 chunks of wood together).
Picture from the top (do you see the little gap?).
One of the two 90 degree chunks of wood I made.
Live and learn.
Attachments
Last edited:
Prof
Minister of Fire
That is good to know. I think this is my building inspector's first masonry heater, so he said, '..at least a 2" gap' ( just to be safe I guess).My heater goes right up to a beam. The beam is still a couple feet from the nearest heat channel and the stones that touch the beam never get hotter than the mid 80s.
weatherguy
Minister of Fire
Similar threads
- Replies
- 8
- Views
- 868
- Replies
- 11
- Views
- 479
- Replies
- 9
- Views
- 2K
- Replies
- 2
- Views
- 524