
- Oct 3, 2007
- 1,539
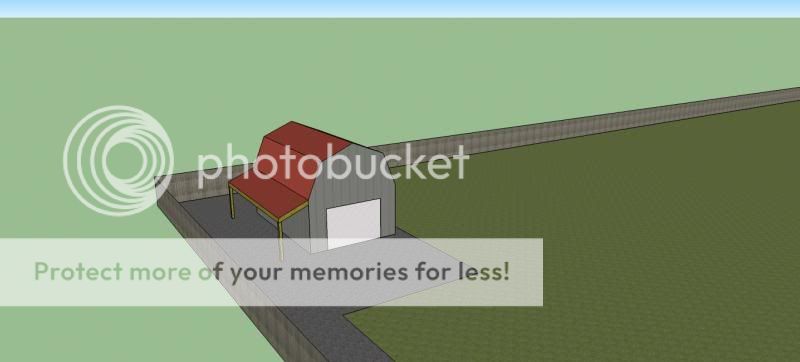
Finally sat down with the building inspector and zoning official today to go over the plans for my 16' x 24' mini-barn-everything is approved and ready to go. I can't wait to get started-this project has been in the planning stages for a long time. At first I had thought about doing a pole barn, but I found that no matter which way I sliced it, doing a building this size as a pole barn really didn't make sense from a cost standpoint. Stick framing the walls turned out to be the way to go, but I am going to use purlins and steel for the roof because it's cheaper (not to mention easier) than sheathing, roofing felt, and shingles. The foundation will be reminiscent of a pole barn though. Since I had originally planned on a pole building anyway, I wasn't planning on a concrete slab-just compacted stone screenings and gravel. I ended up settling on an idea I read about here:
http://bct.eco.umass.edu/publications/by-title/wooden-grade-beams/
Basically the idea is to pour piers rather than conventional footings and walls, and then bolt a treated wood 6 x 6 grade beam or sill to the piers. The sill serves as the perimeter of the building to which the exterior walls are built upon. I'll be pouring eight piers with 24" bases. I'll be using Bigfoot footings to increase the bearing area of the piers while saving on concrete by only using 8" form tubes:
http://www.bigfootsystems.com/
The walls will be stick framed 24" OC and sheathed with a composite OSB product called LP Smartside-basically it's OSB that's stamped with a coating on one side to look like T-111. It comes pre-primed and is pretty durable-definitely the most cost effective solution. I had bought a sheet with the intention of siding my pallet shed with it, but never did buy anymore. The sheet I bought sat leaned up against a fence outside for two years with one edge in the dirt. I finally moved it the other day getting ready to clear space for the barn and it's hardly rotted at all-that sold me. I'm also going to try keep it up off the ground by attaching a 2 x 12 skirt board around the perimeter and then starting the sheathing on top of that. The walls will be framed with 2 x 4 x 10s so that the full sheet will be used and also to provide 8' of clearance below the lofts at either end of the barn.
The lofts will be fairly simple-two 8' x 16' platforms at either end of the barn, framed with 2 x 12 x 16s 24" OC with 3/4" OSB flooring. I placed the lofts at either end for two reasons. First, I figured that two 8' x 16' lofts would make things more accessible than one 16' x 16' loft packed full of stuff. Second, the loft joists will serve to tie the walls together and resist the horizontal force of the gambrel braced rafters. The gambrel roof will be framed using a method that I pulled from old USDA Ag extension plans. In the old days they used dimensional lumber for bracing, but in later years plywood gussets became common. The plywood gussets allow for a very strong and stiff frame that is more of an arch than a truss. They're also fairly easy to construct. I'll be site building mine from 2 x 6s and 1/2" CDX plywood, lots of nails, and glue. The gambrel roof will give me the maximum amount of storage space in a building of this size. Here's the cross section:
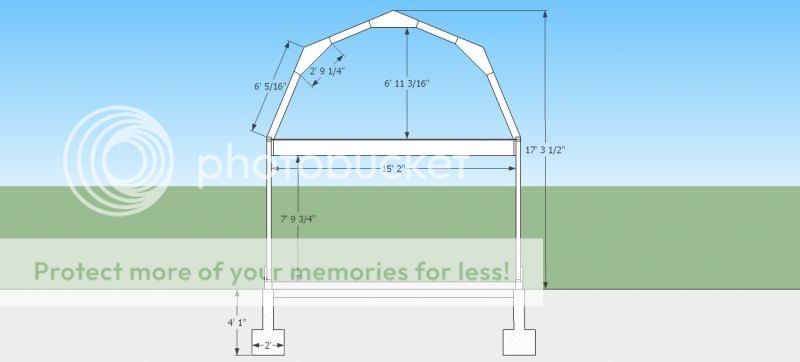
The dimensions are a little off because I was playing around with things, but you get the idea. The barn is going to serve as shelter for all of the equipment I've accumulated over the years. I've got a knack for picking up dead OPE for next to nothing (or in some cases nothing) and reviving it. The problem is I've never had a place to store it so that it was easily accessible. I also plan to do a lean-to along the side for wood storage (I'm demolishing my pallet shed). I'm hoping to start pouring concrete the weekend after Easter-pictures to come.
http://bct.eco.umass.edu/publications/by-title/wooden-grade-beams/
Basically the idea is to pour piers rather than conventional footings and walls, and then bolt a treated wood 6 x 6 grade beam or sill to the piers. The sill serves as the perimeter of the building to which the exterior walls are built upon. I'll be pouring eight piers with 24" bases. I'll be using Bigfoot footings to increase the bearing area of the piers while saving on concrete by only using 8" form tubes:
http://www.bigfootsystems.com/
The walls will be stick framed 24" OC and sheathed with a composite OSB product called LP Smartside-basically it's OSB that's stamped with a coating on one side to look like T-111. It comes pre-primed and is pretty durable-definitely the most cost effective solution. I had bought a sheet with the intention of siding my pallet shed with it, but never did buy anymore. The sheet I bought sat leaned up against a fence outside for two years with one edge in the dirt. I finally moved it the other day getting ready to clear space for the barn and it's hardly rotted at all-that sold me. I'm also going to try keep it up off the ground by attaching a 2 x 12 skirt board around the perimeter and then starting the sheathing on top of that. The walls will be framed with 2 x 4 x 10s so that the full sheet will be used and also to provide 8' of clearance below the lofts at either end of the barn.
The lofts will be fairly simple-two 8' x 16' platforms at either end of the barn, framed with 2 x 12 x 16s 24" OC with 3/4" OSB flooring. I placed the lofts at either end for two reasons. First, I figured that two 8' x 16' lofts would make things more accessible than one 16' x 16' loft packed full of stuff. Second, the loft joists will serve to tie the walls together and resist the horizontal force of the gambrel braced rafters. The gambrel roof will be framed using a method that I pulled from old USDA Ag extension plans. In the old days they used dimensional lumber for bracing, but in later years plywood gussets became common. The plywood gussets allow for a very strong and stiff frame that is more of an arch than a truss. They're also fairly easy to construct. I'll be site building mine from 2 x 6s and 1/2" CDX plywood, lots of nails, and glue. The gambrel roof will give me the maximum amount of storage space in a building of this size. Here's the cross section:
The dimensions are a little off because I was playing around with things, but you get the idea. The barn is going to serve as shelter for all of the equipment I've accumulated over the years. I've got a knack for picking up dead OPE for next to nothing (or in some cases nothing) and reviving it. The problem is I've never had a place to store it so that it was easily accessible. I also plan to do a lean-to along the side for wood storage (I'm demolishing my pallet shed). I'm hoping to start pouring concrete the weekend after Easter-pictures to come.
Last edited:

 Luckily this year the combination of an unexpectedly large tax return plus some long term saving has paid off.
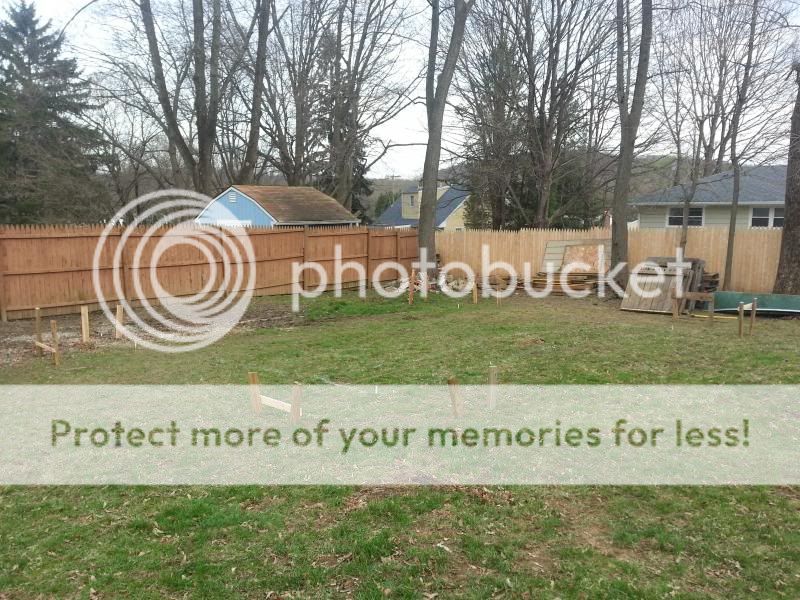
 I plan to get everything marked out for the piers on Saturday.