Modifying a central wood furnace for secondary burn

  • Active since 1995, Hearth.com is THE place on the internet for free information and advice about wood stoves, pellet stoves and other energy saving equipment.

    We strive to provide opinions, articles, discussions and history related to Hearth Products and in a more general sense, energy issues.

    We promote the EFFICIENT, RESPONSIBLE, CLEAN and SAFE use of all fuels, whether renewable or fossil.
Status
Not open for further replies.

FixedGearFlyer

Burning Hunk
Oct 8, 2010
212
Michigan's Upper Peninsula
We're rolling into our first winter using a wood furnace as our primary heat source and Hearth.com has been an awesome resource. Thank you, all!

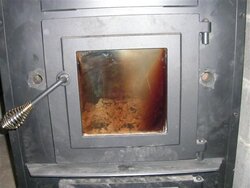
Our furnace is a new Vogelzang Norseman 2500 that was installed in the house last fall before we bought the property. If I'd had my choice, I likely would have gone with something more advanced and efficient like the Wood Chuck or a Yukon, but since we have the Norseman we'll stick with it.

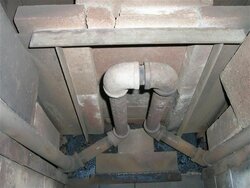
As a former woodstove user, my biggest complaint is that the 'secondary burn chamber' is simply an airspace separated from the firebox by two steel plate baffles. There's no secondary air supply and I'm sure that we're losing a huge amount of our potential energy through the flue and chimney. Granted, the few times we ran it in early spring we had fairly efficient burns based on the vapor-only chimney emissions, but those were hot, short fires for the shoulder season.

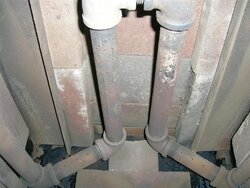
Does anyone have any experience with the risks and rewards of trying to plumb a secondary burn air supply into the top of a furnace like ours? I'm waffling back and forth between, "I don't even want to think about it" and "I don't want to waste a single drop of energy from the wood we put up this year".
 
Beautiful, Geoxman! The secondary air supply is almost exactly what I have sketched out.

I'll gather up the materials and give it a try. I'm thinking that I'll add firebrick to the upper side and rear walls, as well as to the baffle to handle the higher temps at the same time. Maybe I'll even figure out how to keep that steel baffle from rattling when the blowers are running . . .
 
I've always toyed with this idea on the Englander Furnace that I and many others have. It just seems like it should have it, to get every last bit of energy out of the wood. I don't know of anyone who has tried it yet though.
 
The more I thought about it, the less I liked the idea. I would feel much safer with a furnace designed with secondary combustion, and I'm sure my insurance company would, too. The Hotblast, which is the same design as the Norseman but made by US Stove, fit my budget at the time. It does the job, and when I can afford it, I will upgrade to a more efficient unit. I'm comfortable with what I have, and peace of mind and my family's safety are worth more to me than a couple cords of wood.

Just my thoughts.
 
I had a furnace just like that was ran for over 20 years. I toyed with the idea of modifying the furnace for the secondary burn. What I found was I removed the plug in the back of the unit, which allowed for some extra oxygen below the baffle for better combustion. I mounted a thermometer above the loading door and when in the 500 range after a hot fire and closing it down, it would burn pretty hot and clean. With that said, I removed it last year and put a Caddy woodfurnace in its place. A full load with the Caddy is half the load of the old furnace. I always get secondary combustion with the new furnace, I lowered my wood usage and get every bit of heat from each charge of wood. I wouldn't modify the furnace too much. Its not made for the extreme heat thats involved with good secondary combustion. Couple that with a power outage, and your house will fill with smoke when the furnace burns off the paint of the jacket. Been there, done that. If you want to save wood and have a better unit, you can usually get most or all of your money back from the furnace if its only a couple of years old. Factor in the tax credit for a new efficient furnace, and get what you want. If you modify the furnace and you have a house fire, your insurance won't cover you.
 
geoxman said:
http://nepacrossroads.com/about2066.html#p13410

http://www.arboristsite.com/showthread.php?t=37370&highlight=forced+draft&page=2

http://www.arboristsite.com/showthread.php?t=77617&highlight=fire+chief

I did just like the links I posted. I used black cast that you can get at any local hardware store. It also really helps if you add firebrick above the tubes like in the 2nd thread. Good luck and you are on your own if there is a fire because of the modifications. Mine works just fine
gorgeous! how big the pipe, how big the holes in the pipes?
 
got any pictures of the fan set up?? How are you controlling the ratio prime/second air ?? Any idea how hot the air is being heated by coal bed ?? This is a change I want to make on my unit, now we just blow a split air stream that does both primary & secondary, it's simple but it also using boiler room air.
 
mine is regular black 1 inch cast iron pipe that you can find at any local hardware. I believe the holes were 1/32 and I did 64 holes to equal the 2 inches I drilled into the front of the unit. Mine is also fully fire brick lined, top, sides, bottom including most of the grate. I have a little space in front of the for scooping out ashes. It greatly reduced the firebox size but I can easily get 9-10 hour burns. I am not too worried about insurance as the unit is over built, it is an Energy Mate by EROC and it never had a UL to begin with. If I were you I would line the entire firebox as I did. I control the secondary air with two gate valves on the front of the furnace that stick out about 6 inches from the unit. Gate valves cost more than ball valves but there are no rubber parts in them. Late last winter we also modded my brothers Englander furnace the same way and it was night and day difference in burn times and heat output. We also added more firebrick to his as well, including the top. I think I have invested $60-$70 in the mod. good luck
 
Fire brick is no problem, my burn chamber is made with 3 skids of it. I am confused about the burn times, you are saying that by adding the secondary air that the burn time is longer?? One of the reasons I am on the fence about this, is that I actualy shut off the fan [it does both prime & secondary Air] I can get into a low ox environment burn that does gassification. " I think" It goes into what I call Chernobyl it just gets way hot. top of fire box 1800F if I remember correctly. The wood last longer with more heat. If I leave the fan on the whole time it still gets hot, but it goes threw the wood faster, it seams anyway. I burn all flavors of wood and sizes. If you can get it on a two wheel cart,It will go threw the door, one draw back to this is getting all the wood in the game, it takes a while to get it burning good again and fills up the chamber effectively cutting down the throat size which makes this thing work.
 
geoxman said:
mine is regular black 1 inch cast iron pipe that you can find at any local hardware. I believe the holes were 1/32 and I did 64 holes to equal the 2 inches I drilled into the front of the unit. Mine is also fully fire brick lined, top, sides, bottom including most of the grate. I have a little space in front of the for scooping out ashes. It greatly reduced the firebox size but I can easily get 9-10 hour burns. I am not too worried about insurance as the unit is over built, it is an Energy Mate by EROC and it never had a UL to begin with. If I were you I would line the entire firebox as I did. I control the secondary air with two gate valves on the front of the furnace that stick out about 6 inches from the unit. Gate valves cost more than ball valves but there are no rubber parts in them. Late last winter we also modded my brothers Englander furnace the same way and it was night and day difference in burn times and heat output. We also added more firebrick to his as well, including the top. I think I have invested $60-$70 in the mod. good luck
great design! bringing the pipes in thru the coals will cool the coals & avert burning the wood from the bottom up where it can overgassify & exceed the stochiometric requirement of combustion air from secondaries.
 
geoxman said:
mine is regular black 1 inch cast iron pipe that you can find at any local hardware. I believe the holes were 1/32 and I did 64 holes to equal the 2 inches I drilled into the front of the unit. Mine is also fully fire brick lined, top, sides, bottom including most of the grate. I have a little space in front of the for scooping out ashes. It greatly reduced the firebox size but I can easily get 9-10 hour burns. I am not too worried about insurance as the unit is over built, it is an Energy Mate by EROC and it never had a UL to begin with. If I were you I would line the entire firebox as I did. I control the secondary air with two gate valves on the front of the furnace that stick out about 6 inches from the unit. Gate valves cost more than ball valves but there are no rubber parts in them. Late last winter we also modded my brothers Englander furnace the same way and it was night and day difference in burn times and heat output. We also added more firebrick to his as well, including the top. I think I have invested $60-$70 in the mod. good luck

Geoxman - I PM'ed you.
 
bigburner what furnace do you have? I drilled two holes in the front of the unit and it has nothing to do with my fan, which is sealed off now. I guess i am not understanding the question?
 
Sorry for the confusion.what I have is a home made "laid up" fire box that is all fire brick, that has a very tall throat that allows the hot gases to collect at the top. Then air is blow on the fire "down and at the same time "up" into the area where the gas collects. for a secondary burn. Then all the flue gas is forced down into a fire brick chase [which also has a by pass] {use a magnahelic to monitor draft} then it pass threw a wet back fire tube boiler. "My question is" I assumed that there was a fan on both the primary& secondary air supply and how were you controlling the input or what kind of adjustment is there. My original design had a pipe to supply super heated air to the secondary but that was lost along the way, for the lets get this thing finished so we can use it. Have heated with it for two years now and what to start tweaking it. Most of these guys are using down draft system and the ones that use green wood or similar work closer to mine design. But seeing the pictures , looks like you nailed it. Using less wood,would be appealing. another potential issue I have is there are no grates -- start with an empty fire box & burn on top of the last fire. I only clean it out about twice a season. my secondary tubes would get buried in the ashes not sure how hot they would get using your design. Thanks
 
dude that sounds awesome! post some pics or email them to me and I might have a few ideas. Can you run the tubes on the right and left of the firebox to the rear and then up too the top and back to the front under your baffle?
 
some night this week my friends are going to help me put up some cement board on the ceiling of the shed where this thing is located, I have scaffolding set up in there now,so pictures will need to wait a week or so. I promised some of the green wood guys some pictures too.
 
OK, so I did it. Here are my results. http://www.youtube.com/watch?v=6D-zhJqL6JA
It was my first fire, the wood was a little wet, and the camera is old so the ticking you hear is the camera writing to the card, but you get the idea. The secondaries got more intense the longer the fire went. This was about 1,1.5 hours into it.
 
Here are some pics of the outside and inside. It's not pretty on the outside, haven't painted it yet and the glass was dirty.
 

Attachments

  • DSCN4198 (Large) (Small).jpg
    DSCN4198 (Large) (Small).jpg
    40.8 KB · Views: 2,380
  • DSCN4197 (Large) (Small).jpg
    DSCN4197 (Large) (Small).jpg
    45.1 KB · Views: 6,123
  • DSCN4199 (Large) (Medium).jpg
    DSCN4199 (Large) (Medium).jpg
    125.4 KB · Views: 2,387
SWEET! just like I told you! Did you use a bed frame or buy the angle iron? If you don't use the gate valves I would drill another hole above the holes and rig up some sort of air shut off damper with a piece of sliding metal on a screw. What was your total investment and did it take you more than two hours? If you have questions about the air damper I am trying to describe just give me a buzz. Great job!!!
 
I didn't buy anything. It all came out of junk that I had, and some metal pipe left over from a guy I know who was going to get rid of it for scrap anyway. I still owe him for the 90's That he had out of his stock. Other than that, I'd say with a whole lot of running back and forth probably 2 hours in the whole thing, maybe 3. Didn't take any time at all once I figured out what I was going to do.

I don't know if I'm going to do anything as far as shut off, the caddy doesn't have anything built in for that. I'll just keep some fiberglass or non combustible material nearby in the meantime, otherwise, I thought of the sliders you described too (I know what you mean - screw above with sliding piece of metal to cover the hole). Do the secondaries suck more air, the more the outside temps drop? As of right now, they are pulling air, but not enough to make alot of noise. I can't really close the slide draft all the way either or they shut down, is that normal? Some of that has to be wet wood and lack of firebox temps too.
 
When we did his it was very cold outside and remember I told you that we did his from the rear of the furnace because he had some PVC piping coming from his window getting all outside make up air and that was the direction the furnace was facing. His sounded like a roar when engaged and I am betting your wet wood his not helping. Keep playing with it, and not when it is 60 degrees outside, and you will figure it out. Great job!
 
Freeburn, can you give us a post-install report now that you've had it up and running for a few weeks?

What are the differences in your furnace and flue temps? Have you seen a change in your efficiency (amount of wood for a given amount of heat), burn times, or other markers of furnace performance?

How has the black iron pipe been holding up in the heat?

I have my parts list and am just trying to find time to head into town to pick up the odds and ends, then will give it a shot myself.
 
FixedGearFlyer said:
Freeburn, can you give us a post-install report now that you've had it up and running for a few weeks?

What are the differences in your furnace and flue temps? Have you seen a change in your efficiency (amount of wood for a given amount of heat), burn times, or other markers of furnace performance? The obvious difference is the evidence of secondary burn usually within 30 min of start up as well as a much better secondary continual burn once the wood is good and charred. My problem is that I want to load up the firebox right away because I have to leave the house. I ramble on. . . Flue temps are no higher than 400. In fact, I can't get it to go higher than 400 once the secondaries kick in unless I open the ash door. Otherwise, they hover between 350-400 respectively once the air is cut back. I found that if I leave my primary draft open one finger's width it burns much better. I also crack open the spin draft between 1/2 and 1 full turn. (I'm still debating whether that helps or hinders at this point).
Keep in mind that I haven't really been burning all that much, and it warms up so quickly in the day that it's hard to gauge how that will affect the draft later on in winter. Oh, my outlet air temps I do notice are much higher and more constant. I think the firebrick helps with that.
The only thing I don't really know yet is that I have too much smoke still coming out the chimney even when the secondaries are kicking in full force. I think my baffle is too short and some of the smoke goes out the chimney from the front of the firebox. By the way, my baffle is made out of firebrick only. I removed the metal baffle that came with it, and replaced it with firebrick. This gave me more heat and more room in the firebox too.


How has the black iron pipe been holding up in the heat? So far, in my small amt of fires (3-5) there is no evidence of any change in the pipe. I like though that I can change it out in the future for little to nothing. When I do however, I will change the configuration of holes on the pipes. I think the pipes cool the fire a bit too much. My theory on that is that the air should almost be directed sideways not down at the fire, I think that is why the secondaries have a hard time staying lit sometimes. One other thing I did, and this helped me out alot, was add more holes in the front of the firebox nearer the door to burn up some more of those gases before they escape into the chimney. If you look at my pics I added holes in the 90's that are in the middle/front of the the firebox nearest the door.

I have my parts list and am just trying to find time to head into town to pick up the odds and ends, then will give it a shot myself.
What furnace do you have again?
 
freeburn said:
OK, so I did it. Here are my results. http://www.youtube.com/watch?v=6D-zhJqL6JA
It was my first fire, the wood was a little wet, and the camera is old so the ticking you hear is the camera writing to the card, but you get the idea. The secondaries got more intense the longer the fire went. This was about 1,1.5 hours into it.
sweet! sorry u voided your UL listing but life can be so silly.....
 
freeburn said:
What furnace do you have again?

We have a Vogelzang Norseman 2500. It's the same as the Johnson Energy J9000/US Stove Hotblast/etc., under a different branding.

Thank you for the follow up! I'll make my modifications this weekend, put a few fires through it, make any required adjustments, and get some pictures and descriptions up ASAP. I have a slightly different plan for the air tube layout that will give greater coverage and am trying to track down some ceramic blanket for the baffle insulation.
 
Status
Not open for further replies.