
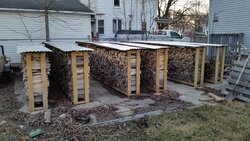
My drying racks
- Thread starter Jason763
- Start date
-
Active since 1995, Hearth.com is THE place on the internet for free information and advice about wood stoves, pellet stoves and other energy saving equipment.
We strive to provide opinions, articles, discussions and history related to Hearth Products and in a more general sense, energy issues.
We promote the EFFICIENT, RESPONSIBLE, CLEAN and SAFE use of all fuels, whether renewable or fossil.
You are using an out of date browser. It may not display this or other websites correctly.
You should upgrade or use an alternative browser.
You should upgrade or use an alternative browser.
- Status
- Not open for further replies.

Lakeside
Minister of Fire
Nice racks, your call on the blocks.
Is the metal roofing attached ? if so a close up pic would be nice to share.
Is the metal roofing attached ? if so a close up pic would be nice to share.
Too dark out now, but I'll try to get a picture tomorrow. The steel is attached with pole barn screws.Nice racks, your call on the blocks.
Is the metal roofing attached ? if so a close up pic would be nice to share.
Firefighter938
Feeling the Heat
TheBigIron
Feeling the Heat
Could you put them on 8" cinder blocks? Or maybe even old railroad ties if accessible to any?? Just a suggestion... I raised some of my stacks that are in the timber off of the ground with fallen trees and seems to stay dry during the snow or rain. IMO
I think I'll try blocks. Think another problem is that the racks are on a concrete pad. The rain splashes up.Could you put them on 8" cinder blocks? Or maybe even old railroad ties if accessible to any?? Just a suggestion... I raised some of my stacks that are in the timber off of the ground with fallen trees and seems to stay dry during the snow or rain. IMO
TheBigIron
Feeling the Heat
heavy hammer
Minister of Fire
Getting them off the concrete a little will help with keeping the bottom ones dry and let more airflow. Nice racks, looks like a great setup.
Thank you. The concrete pad use to hold dog kennels and is pitched towards the grass.Getting them off the concrete a little will help with keeping the bottom ones dry and let more airflow. Nice racks, looks like a great setup.
AmbDrvr253
Minister of Fire
From reading a lot of threads since i first joined, it seems that the general consensus is that snow/rain only makes the wood superficially wet and so wouldn't raising your racks be more work than necessary?? As ana side, how much does one of your racks cost to build....I would love some of them in my yard.....great work. Congrats!
As for cost, I want to say they were around $26. Was wondering about raising them to. I will be doing it, but our snow depth can be up to knee deep at times. Raising them with blocks will get more airflow though.From reading a lot of threads since i first joined, it seems that the general consensus is that snow/rain only makes the wood superficially wet and so wouldn't raising your racks be more work than necessary?? As ana side, how much does one of your racks cost to build....I would love some of them in my yard.....great work. Congrats!
Chas0218
Minister of Fire
Don't put your blocks up so snow can get in the holes, I did this with my shed to get my shed off the ground and the snow melted and the water froze which cracked them so now I have to replace all the blocks. Just a little food for thought.
Ahhh. Like one had said, maybe cut railroad ties? ThanksDon't put your blocks up so snow can get in the holes, I did this with my shed to get my shed off the ground and the snow melted and the water froze which cracked them so now I have to replace all the blocks. Just a little food for thought.
How I attached the steel.Nice racks, your call on the blocks.
Is the metal roofing attached ? if so a close up pic would be nice to share.
mass_burner
Minister of Fire
I think I did it right, left enough room for airflow and can fit a wheelbarrow in between to load/unload. Steel can can easily be taken off.Now that's a smart cover. No need to restack into shed either.
Thank you. Was perplexed by the discoloration of the bottom rows.Very nice setup you have! Just an FYI I have my racks on 8 inch blocks that are placed on the ground and covered with metal. Even with an overhang and no real splashing the bottom rows of wood still do the same as yours.
Poindexter
Minister of Fire
I am perplexed by the discoloration of the bottom rows.
Recent thread here "bottom of the stack blues" includes my thoughts about thermal mass of the woodpile pumping water vapor out of the ground from under the stacks - into the rows at the bottom.
But here you got a water impermeable layer of concrete between your wood and ground water, but you got bottom of the stack blues anyway.
Is the brown chaise lounge on the back porch in post one facing more or less due South?
Blocks under the racks will help, but that isn't the whole story at least at my house.
Chair is facing southI am perplexed by the discoloration of the bottom rows.
Recent thread here "bottom of the stack blues" includes my thoughts about thermal mass of the woodpile pumping water vapor out of the ground from under the stacks - into the rows at the bottom.
But here you got a water impermeable layer of concrete between your wood and ground water, but you got bottom of the stack blues anyway.
Is the brown chaise lounge on the back porch in post one facing more or less due South?
Blocks under the racks will help, but that isn't the whole story at least at my house.
English BoB
Minister of Fire
My first drying racks from last spring. Looks like the snow got the bottom 1/4 a little wet, normal? Should I raise them up on 10" blocks this year? View attachment 176424 View attachment 176426
Very nice setup. I like neat.
bob
gregbesia
Feeling the Heat
Wow, that is really neat set up. No stinking tarps to fight with. Question: does the steel bend from the weight of the snow ?
There is only 1.75 inches between the steel and the parallel 2 x 4s. We had 14" of heavy wet snow one storm. The steel bowed but didn't crease. I'm going to add some 2 x 4 crossmembers this spring for more support. Not attached to the steel, just below it.Wow, that is really neat set up. No stinking tarps to fight with. Question: does the steel bend from the weight of the snow ?
- Status
- Not open for further replies.
Similar threads
- Replies
- 10
- Views
- 691
- Replies
- 17
- Views
- 3K
- Replies
- 54
- Views
- 4K
- Replies
- 44
- Views
- 2K