
Well guys after I posted my block off plate install I wanted to post a few pics of my hearth build and fireview install.
This is my first go at burning wood and I am totally loving it. Have 8 cords already processed (mostly oak) and just last night had my first real fire. The girl friend usually nags how cold it is so it was a first to hear “it’s too hot in hereâ€!
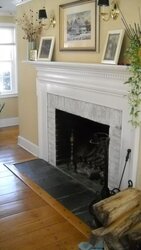
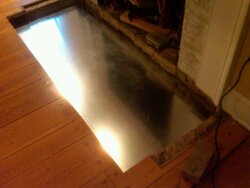
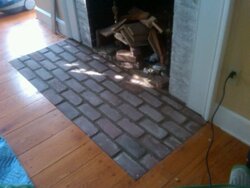
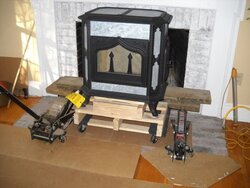
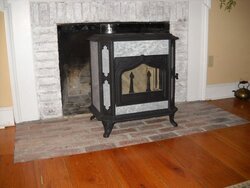
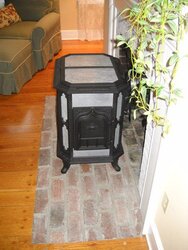
My hearth needed to increase 10 inches in depth to make the required 8 inch clearance off the front of the fireview so I proceeded to rip up the old hearth slate, re-cut to floor to the proper size, added support from below, used ¾ plywood, 22 gauge metal sheet, two layers of durock and finished off with brick which I washed in a lime salt mix to give it that classic look. All in all I think it came out pretty good for a newbie.
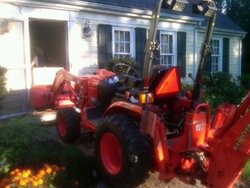
Next getting the stove in place with just me and the 105 lbs of gf was going to be fun. First I thank god for Kubota power (which got it into the front door) and placed onto a wheeled dolly, then used two hydraulic jacks on either side and carefully lifted and placed the stove ever so gently onto the hearth. It was scary how easy this was and the connector length was perfect without any mods needed to fit.
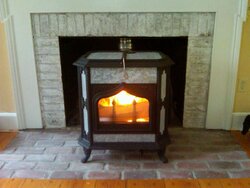
Did a few break in fires and last night was my first real fire. Now the questions;
1) I totally understand the idea of a cold stove, bringing it up to temp slowly and engage the Cat @ 250F (500F inside) however, when I go to reload I assume I do not have to wait another 15 minutes or so to re-engage the Cat as I would think the temp inside the box is pretty hot – so, how does one judge when the Cat can be turned on?
2) I noticed there were times there was no flame present but the Cat was glowing very RED – is this ok?
3) I also was blowing through wood. On a pretty full load I was getting ~2 hours burn time – the wood I am using is sugar maple cut three years ago – it is DRY..maybe too dry (if there is such a thing)…
4) When I engage the Cat I usually bring up the draft to just a hair less than one – there is some flame but no much – I assume this setting will give me a nice long burn but not just 2 hours….comments please?...
5) I was shocked to see how HOT the floor in front of the stove gets – is this normal?....and Yes I will be adding a heat shield to the mantel!
BTW – I assume you will look at my pics and see the floor plugs kind of have a mine of their own! My cuts and dimensions were perfectly square – so I think it’s safe to say the installers back in 1939 didn’t snap lines!
Anyhow just wantd to share this with you since you help in in every part of my selection and installation process.
Thanks!
~jim
This is my first go at burning wood and I am totally loving it. Have 8 cords already processed (mostly oak) and just last night had my first real fire. The girl friend usually nags how cold it is so it was a first to hear “it’s too hot in hereâ€!
My hearth needed to increase 10 inches in depth to make the required 8 inch clearance off the front of the fireview so I proceeded to rip up the old hearth slate, re-cut to floor to the proper size, added support from below, used ¾ plywood, 22 gauge metal sheet, two layers of durock and finished off with brick which I washed in a lime salt mix to give it that classic look. All in all I think it came out pretty good for a newbie.
Next getting the stove in place with just me and the 105 lbs of gf was going to be fun. First I thank god for Kubota power (which got it into the front door) and placed onto a wheeled dolly, then used two hydraulic jacks on either side and carefully lifted and placed the stove ever so gently onto the hearth. It was scary how easy this was and the connector length was perfect without any mods needed to fit.
Did a few break in fires and last night was my first real fire. Now the questions;
1) I totally understand the idea of a cold stove, bringing it up to temp slowly and engage the Cat @ 250F (500F inside) however, when I go to reload I assume I do not have to wait another 15 minutes or so to re-engage the Cat as I would think the temp inside the box is pretty hot – so, how does one judge when the Cat can be turned on?
2) I noticed there were times there was no flame present but the Cat was glowing very RED – is this ok?
3) I also was blowing through wood. On a pretty full load I was getting ~2 hours burn time – the wood I am using is sugar maple cut three years ago – it is DRY..maybe too dry (if there is such a thing)…
4) When I engage the Cat I usually bring up the draft to just a hair less than one – there is some flame but no much – I assume this setting will give me a nice long burn but not just 2 hours….comments please?...
5) I was shocked to see how HOT the floor in front of the stove gets – is this normal?....and Yes I will be adding a heat shield to the mantel!
BTW – I assume you will look at my pics and see the floor plugs kind of have a mine of their own! My cuts and dimensions were perfectly square – so I think it’s safe to say the installers back in 1939 didn’t snap lines!
Anyhow just wantd to share this with you since you help in in every part of my selection and installation process.
Thanks!
~jim
Attachments
-
 DSCN1866.jpg35.1 KB · Views: 1,273
 -
 IMG00656-20110708-1718.jpg46.3 KB · Views: 1,291
 -
 IMG00742-20110805-1735.jpg48.1 KB · Views: 1,295
 -
 IMG00824-20110901-1824.jpg65.5 KB · Views: 1,282
 -
 DSCN2563.jpg47.4 KB · Views: 1,282
 -
 DSCN2567.jpg41.3 KB · Views: 1,279
 -
 DSCN2569.jpg65.1 KB · Views: 1,269
 -
 IMG00895-20111003-1331.jpg58.4 KB · Views: 1,296