My first project saw! (no pics yet) -- a free 034 AV

  • Active since 1995, Hearth.com is THE place on the internet for free information and advice about wood stoves, pellet stoves and other energy saving equipment.

    We strive to provide opinions, articles, discussions and history related to Hearth Products and in a more general sense, energy issues.

    We promote the EFFICIENT, RESPONSIBLE, CLEAN and SAFE use of all fuels, whether renewable or fossil.
Status
Not open for further replies.
Just throwing an old farmer method out for tightening up a bearing surface:

Saw that mentioned in an AS thread about a spun bearing. One hitch that comes to mind is that I'd still have to stop the air leak around the bearing. JB weld?

Other than some bench time, you got nothing to loose.

I don't mind the bench time; it's the $100 top-end kit that I'd rather not waste.
 
Saw that mentioned in an AS thread about a spun bearing. One hitch that comes to mind is that I'd still have to stop the air leak around the bearing. JB weld?


I don't mind the bench time; it's the $100 top-end kit that I'd rather not waste.

The leak was probably from the rubber on the seal, not the back side (and side) surface of the bearing. Remember, you will still be driving the side of the bearing into the case.

Other than a leak that leans out the saw, the top end shouldn't be harmed. And I assume that you would do another leak down test before you tried to fire it up??

Just throwing it out there. I am aware that this is not kosher - and if I was doing a rebuild for a customer, it would not pass the giggle test, but for a personal saw...that was free...what the heck.

Full disclosure - I am NOT a saw rebuilder. Just played with engines my whole life and as a kid with only one nickle to rub, had to find ways to make things work.;) If MM or Dex said "don't do this" - I would heed their warning.
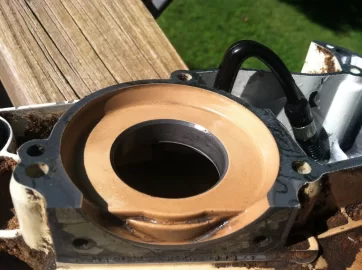
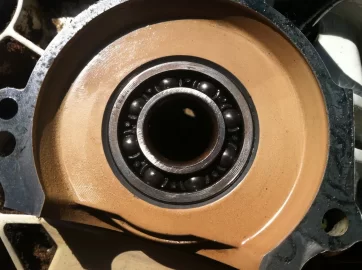
 
Unfortunately it is sloppy enough that it leaks around the outside of the bearing, not just through the seal. When I wiggle the shaft, the entire bearing moves with it.

I'm sure I could get it running with some combination of improvisations, but given the constant stress of chain tension I doubt it would last long.

The new top-end kit hasn't even arrived and is still returnable. The original is toast. Alternative to risking the top-end would be combining this saw with an eBay crankcase, which would put me about $170 in altogether. Not a bad deal for a working 036, but not what I meant to sign up for either.
 
Or if u don't want to fool with it sell it as is to the guy who needs a 36 parts saw or put it up for auction on the bay.
 
If tapping on the bearing tightens up the slop and stops it from spinning? Then the seal should still stop an air leak. As long as the seal is tight, the bearing behind it wont effect its sealing property.

Or if you wanna sell it, I can call my buddy and have him get ahold of you?
 
Unfortunately it is sloppy enough that it leaks around the outside of the bearing, not just through the seal. When I wiggle the shaft, the entire bearing moves with it.

I'm sure I could get it running with some combination of improvisations, but given the constant stress of chain tension I doubt it would last long.

The new top-end kit hasn't even arrived and is still returnable. The original is toast. Alternative to risking the top-end would be combining this saw with an eBay crankcase, which would put me about $170 in altogether. Not a bad deal for a working 036, but not what I meant to sign up for either.


Either cut bait or go fishin'. I wouldn't invest in a new top end for a saw with a questionable/improvised case. Fix it right or part it out. One or the other.
 
Okay, I finally worked up the courage to split the case and get a better look at the situation. Since the bearing was already loose from the case, it was a piece of cake to get the halves apart. My toolkit even includes an official Stihl flywheel puller.

So this is what it looks like:

photo(6).JPG

The bore is really clean and smooth. I pulled the bearing off the crank, and it was immediately obvious that the bearing is shot. The balls may as well be gravel.

The bearing drops right into the bore, though not through it. There's a little ridge towards the outside of the case that seems to still have the original ID, which stops the bearing from dropping all the way through.

photo(7).JPG

I don't even own an inside micrometer and my dial calipers are several miles away at the moment, but by using the unworn ridge as an indicator, I'd say with moderate confidence that the bore was ovaled by about .010", with all the wear occurring towards the bar side, tapering to nothing at the top and bottom. The saw was killed by the loss of a tiny fraction of a gram of metal.
 
Hi Jon
If you are keeping the saw i would do the center punch treatment.Locktite makes a compound that will seal and retain the bearing once it is in place.I've used it on wheel bearings on trailers,etc .
Make it a test mule to alternative repairs.
Thomas
 
Green loctite around the OD of the new bearing. That should hold it better than new.

I didn't let a busted case stop me from assembling a complete MS460 so don't let this stop you. Saw on!
 
  • Like
Reactions: Jags
Can u tap a new bearing in with a socket? How do u reassemble?
 
Heat the case freeze the bearing.

Definitely not needed in this case, at least not as it is now. I suppose the centerpunch approach could provide some interference, but I wouldn't expect it to be enough to require the heat & freeze approach.

With Locktite, I'm guessing you'd want to assemble the case, with the crank, before the Locktite set.
With the loctite I would coat the bore of the case with the loctite and then drop the bearing in place. Then feed a little around the OD of the bearing but just enough to do the job. So long as the bearing is not floppin around all over in that bore, no hurry on assembling the case. If its bad enough to worry about the bearing being way off center then the case likely isn't worth saving.

If you were especially determined to save the case ( let's say it was NLA or a very rare model). You could have a welder TIG the bearing bore to build it up and then a machinist could re-cut the bore. Finding a welder versed in welding magnesium could be tricky but certainly not impossible.
 
Checking with feeler gauges, there seems to be about .010" slop fore and aft, and .005" top to bottom. That seems to be within the range that loctite seems to be able to handle, from looking at their product info sheets. The bearing orients itself nicely because there's a little unworn ledge towards the outside, since the bearing has a little shoulder to accept the oil pump and doesn't contact the bore all the way through.

But then a set of bearings and a little tube of loctite is about $50. Next cheapest option is a used crankcase in nice condition on ebay for $80 delivered, including crank and bearings. So from one angle the question is what's a better bet -- a used crankcase with original bearings built up as intended, or new bearings improvised with loctite? I'd prefer to reuse the old case if it's not a totally foolish thing to try.
 
personally i would get the ebay case, but i have never done this before so my opinion may not matter.
 
Too late, I've already ordered the bearings and loctite. The shipping lag should give me time to work on getting the crankshaft & bearing loose from the flywheel side of the case, and clean up some of the oil-soaked sawdust that's packed into every nook and cranny.
 
You could be like me, order the case to finish off the saw and then end up building a second saw from the "ruined" case. ;lol. That's exactly how I wound up with two MS460s!
 
  • Like
Reactions: DexterDay
Status
Not open for further replies.