My New Year's Project

  • Active since 1995, Hearth.com is THE place on the internet for free information and advice about wood stoves, pellet stoves and other energy saving equipment.

    We strive to provide opinions, articles, discussions and history related to Hearth Products and in a more general sense, energy issues.

    We promote the EFFICIENT, RESPONSIBLE, CLEAN and SAFE use of all fuels, whether renewable or fossil.
Status
Not open for further replies.

Hasufel

Feeling the Heat
Nov 8, 2015
483
Northern Virginia
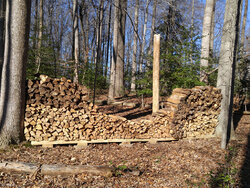
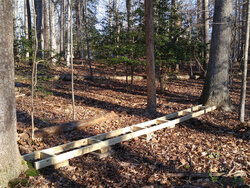
Nothing elaborate, but my splitting has gotten way ahead of my storage capacity so I built a quick & dirty rack sandwiched between two trees. I found a good spot that's breezy and gets wintertime sun from early morning through mid-afternoon. I figured I should do this now while the weather is still decent--around here you never know when a nor'easter is gonna swing through and dump a couple feet of snow. I bought some pressure treated 2X4s but everything else was done with leftovers from various projects so the cost was minimal (in dollar terms at least--there was some time and effort involved). Total length is just shy of 20 feet. I thought it would be plenty large enough but it turns out that I was mistaken, so I may have to repeat this before long. I tried keeping it organized but I'm bad at estimating how much of each kind of wood I had so it ended up a bit jumbled. The dark wood on the left & right is partly-seasoned maple; otherwise I have yellow poplar on the left, red oak in the middle (I left room here because I'm in the middle of bucking & splitting a couple of big oaks), and newer maple on the right.
FirewoodRack-1.jpg FirewoodRack-2.jpg
One potential improvement would be to add adjustable feet, which would have saved me time because the hardest part of all this was getting the supports level. I was thinking of using hex bolts for that but was worried about weakening the 2X4s. Anyone here come up with a good solution?

Happy New Year to everyone out there--stay warm and stay safe! :cool:
 
  • Like
Reactions: FaithfulWoodsman
There are many ways to get the wood off the ground. I use PVC pipe. I would add a second row with a few inches between them. And an occasional long split that goes between them. Two rows adds a lot of stability to each row.
 
  • Like
Reactions: Hasufel
There are many ways to get the wood off the ground. I use PVC pipe. I would add a second row with a few inches between them. And an occasional long split that goes between them. Two rows adds a lot of stability to each row.
Good ideas, thanks! I never thought of using PVC pipe but that sounds like it would be pretty easy. What size/schedule of pipe do you use? I don't have a good idea of what would be strong enough to support the weight of 4-5 feet of wood.
 
Nice Hasufel. Getting the feet level is definitely the hard part. I am using old iron pipes salvaged from the crawlspace cut to 8 ft lengths and fastened to scraps of pressure treated 2x4 on top of concrete pads. The pipes used to be the water pipes long ago, replaced with copper. Now that is leaking thanks to the corrosive well water. I should probably get to that project- I bought the pex a couple of months ago- but the new stove insert and scavenging wood has taken priority. We only have hot water in the kitchen because I had to shut the cold off to stop the leak.
 
  • Like
Reactions: Hasufel
scavenging wood has taken priority

Yeah, totally understand! ;)

FWIW, I'm on well water too and have a filter at the pressure tank to remove metallic particles. My neighbor has basically the same setup EXCEPT for the filter and recently had a major leak in her basement. In the 35 years since these houses were built the metal particles wore away the water supply pipe in her house from the inside out. I used to think that replacing the filter was a PITA but now I know it serves a good purpose.
 
There are many ways to get the wood off the ground. I use PVC pipe. I would add a second row with a few inches between them. And an occasional long split that goes between them. Two rows adds a lot of stability to each row.

x2 on adding a second row, bring the tops of the rows together so they support each other.
Looking good in the wood.

bob
 
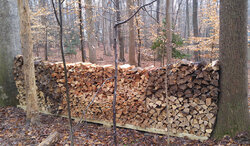
I finally finished populating the rack but didn't get it top covered because it started raining a day sooner than the forecast promised. :mad: But that's OK, there's no hurry and I may just leave it uncovered until next fall. There's probably about 1.2 cords in there. I was a little worried that the piers would start sinking once the rack was fully loaded but so far so good--the county says that the soil here is bad for growing things but ideal for building, so I guess that helps keep things stable.
Firewood-Rack-20160109.jpg
Barely visible above the top of the rack and just right of center is an overflow rack that I put in to hold the rest of my hickory and oak. It's a little smaller so it may hold a cord or less when full. It was much more of a "quick & dirty" project because I was running out of time and was working in the rain. I didn't bother with piers at all and instead used 4X4s cut into 4 foot lengths so that they could more easily follow the slope. I tied the ends of each pair together with 2X4s cut to 16 inches and affixed with some leftover stainless steel screws. It's not as pretty as the main rack but it seems to be working OK and was a lot less effort. Bottom line, I finally have all my split wood stacked with room to spare, so I can get back to splitting more oak when the weather clears up!
 
Looking good. What are your ideas to cover the top of the stack? I use, used tin from the father in laws metal building that he has laying around. Works good, and allows air to move through the stack.
 
Looking good. What are your ideas to cover the top of the stack? I use, used tin from the father in laws metal building that he has laying around. Works good, and allows air to move through the stack.
Thanks! I've got three things I was thinking of trying: roofing felt (not the prettiest stuff but my roofing projects are done for now and I don't have any more need for it), Tyvek housewrap (baby blue oh boy!), and some heavy-duty gray fabric that truck freight guys use to protect irregular stuff during shipment. The last one is probably the best looking (wife acceptance factor is critical)--it's breathable but might not be as waterproof as the others so I may end up using a couple in combination. I'll probably wait until the leaves start dropping this fall but I may decide to top cover it sooner if we get a really long dry spell.
 
Yes! Well almost all. Some of the darker splits were from a maple I had a tree guy take down--it was too close to stuff I care about and I don't like living dangerously. :) But my saw has been a real trooper for everything I've thrown at it. Not to keep bringing up the same point but I REALLY like the convenience of it--slap a battery in, push the "on" button, and it starts up as soon as I pull the trigger. Instantly, every time, no matter the temperature. And there's no maintenance except for keeping the bar & chain clean, sharp, and oiled.
 
  • Like
Reactions: edge-of-the-woods
Wow. That's amazing. I think our next saw might be something like that. I like the convenience too, and don't do a ton of processing. How loud is it?
 
That is what I do @BringinHeat just find the most straight and long pieces that I can find, then stack on top of them between the trees like you have there. Looks awesome!!!!!!!!!
 
Wow. That's amazing. I think our next saw might be something like that. I like the convenience too, and don't do a ton of processing. How loud is it?
It's noticeably quieter than my old gas saws but still loud enough for me to use hearing protection unless I'm just doing a quick cut. There are other battery-powered saw out there--Greenworks also sells a 40V version and Echo has a 56V unit. I think both of those have 16" bars. I wanted a little extra reach so that decided it for me. My biggest beef is the battery life--on a really tough job (like an 18" red oak) I can get maybe three cuts with the 2Ah battery and six with the 4Ah version. That doesn't sound like much but that's an extreme case for me. The performance is much better on poplar and maple. And mostly I cut close enough to the house that I can swap out batteries and charge one while I'm using another.
 
Wow. You guys sure get fancy with your stacks.

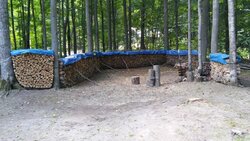
I just throw down a couple long sticks that I find in the forest and use that to get the wood off the ground.

View attachment 171897
Haha, well let's just say that I'm coming around to your way of thinking! :) On the first half of my main rack I had the bubble level out and leveled the footers to within 1/4". On the second half I followed the slope of the ground and just made sure the footers were lined up with each other. For my overflow rack, the only leveling I did was eyeballing a spot that was "good enough" before plopping the 4X4s down on the ground. As long as I don't try to stack it too high I'm thinking that second rack will work just as well as the first and with significantly less effort!
 
Status
Not open for further replies.