My old block-off plate hand drawn

  • Active since 1995, Hearth.com is THE place on the internet for free information and advice about wood stoves, pellet stoves and other energy saving equipment.

    We strive to provide opinions, articles, discussions and history related to Hearth Products and in a more general sense, energy issues.

    We promote the EFFICIENT, RESPONSIBLE, CLEAN and SAFE use of all fuels, whether renewable or fossil.
Status
Not open for further replies.

Rhone

Minister of Fire
Nov 21, 2005
827
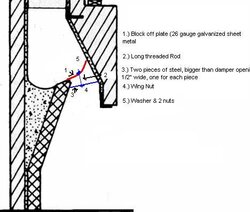
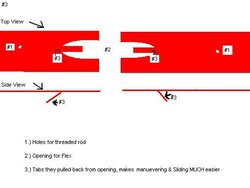
I hand drew some pictures of my old block-off plate and how it fit, if I can I'll take pictures of it as well but a digital camera is going to be tough. I like Craig's block-off better, this one was leaky, and too high in the damper area. But, it does have the benefit of being 2 seperate pieces and the way they used that trick to leave a tab in the middle of the opening for the flex pipe, and bend it back, gave you wings you could hold onto and move the plates around easily. The picture with the thing bending, it wasn't bent that bad, just wanted to show how it was pulled down.

Parts list:

26 gauge galvanized sheet metal
2 pieces 12" threaded rod
4 nuts for threaded rod
2 washers for threaded rod
2 wing nuts for threaded rod
2 pieces of 1/16" thick metal strips (around 10 gauge), 1/2" wide and longer than damper area
 

Attachments

  • Blockoff.JPG
    Blockoff.JPG
    27 KB · Views: 495
  • Blockoff2.JPG
    Blockoff2.JPG
    17.1 KB · Views: 472
Thanks for posting that Rhonemas.

I have a question for you and the web master (or anyone else with some input). I want to combine features of both your damper plate designs. That is, I want to use a two piece design like your original, but I want to install it below the damper, just above the lintel like Craig. This way I won't need to disconnect my stove pipe and things should seal better. It also seems like it would be easier to work in that area with my insert remaining in place.

So, can I use Craig's design and simply cut the template in half, allowing enough extra metal in the middle for overlap and connection of the two pieces?

I invision either a 90 degree bend downward at the center of the two pieces to allow horizontally oriented sheet metal screws to pierce the two flanges that point downward toward the insert (and to have something to hold onto) or else just allowing the two pieces to overlap horizontally for an inch or two and pierce them together with vertically oriented sheet metal screws.

Sound feasible? Any suggestions as to which approach, or any different ideas?

Spike?
 
Like you said, take Craigs design and cut it in half allowing for overlapping. I'd assemble it on top of the insert in the firebox, I wouldn't try to assemble in in place... too difficult. I also don't like sheet metal screws. My experience is they don't make a tight fit and what you may end up with is one sheet of metal that's 1/16" higher than the other. Also, the heating/contraction they can work themselves out or create a loose fit. I'd use pop rivets. They hold better, they pull the pieces tight together before popping, and if you need to remove them, they're easy to drill out. I'd think aluminum okay, stainless better.

I'd follow Craigs directions to a tee except have the piece be 4"-5" wider because you want at least 2 rivets each side so the overlaps stay together. Cut the sheet in half. For the opening, I'd measure out from the sides at the height you wish the block-off to be. Mark and cut out. Then, assemble it around your liner, drill 1/8" holes, rivet the sheets together, and now your block-off is one piece, around your liner, assembled where you have access, and you didn't need to remove the liner at all. Then, follow the rest of the directions, push it up in place, fasten with tapcons and caulk. You certainly don't want to try to be getting the pieces fitted in place trying to work around the liner & insert.
 
Status
Not open for further replies.