My progress in building a wood fired boiler based on the design by Richard C. Hill

  • Active since 1995, Hearth.com is THE place on the internet for free information and advice about wood stoves, pellet stoves and other energy saving equipment.

    We strive to provide opinions, articles, discussions and history related to Hearth Products and in a more general sense, energy issues.

    We promote the EFFICIENT, RESPONSIBLE, CLEAN and SAFE use of all fuels, whether renewable or fossil.
Status
Not open for further replies.
This is interesting to me. Thanks for sharing. Tasmania must get a few shots of cold from the great south ocean. Better hurry if this is to help this winter.
 
I am thinking of making my own boiler as well, but out of fire brick with a fire tube heat exchanger in the exhaust path. Was wondering if you could share any design/build details of your fire tube heat exchanger?
 
Your burn chamber looks a lot like the secondary burn chamber in a Garn. Is this your only burn chamber. Can't wait to see the rest of the build.
 
Very interesting. Keep us posted. I would like to follow your progress and hope it works well for you. Best of luck with it. About how many BTUs will it throw when completed?
 
kuribo said:
I am thinking of making my own boiler as well, but out of fire brick with a fire tube heat exchanger in the exhaust path. Was wondering if you could share any design/build details of your fire tube heat exchanger?

I used a discarded propane cylinder which is approximately one hundred centimeters long and about thirty eight centimeters in diameter. I removed the handles from the top of the cylinder and the steel welded onto the base. I then drilled twelve forty millimeter holes around the perimeter of each end of the cylinder and welded forty millimeter steel pipe from a hole in one end to the corresponding hole in the other end. Please note that holes will be on a curved part of the cylinder ends.

I then made a sleeve to fit around the cylinder at the exhaust end so that I can collect the exhaust gases for discharge through the chimney.

I am hoping this will be satisfactory as the heat exchanger will be operating on a very low pressure.
 
Gasifier said:
Very interesting. Keep us posted. I would like to follow your progress and hope it works well for you. Best of luck with it. About how many BTUs will it throw when completed?

Professor Hill quoted the figure of about one hundred thousand btu's per hour and that was with a bare minimum of insulation. He also quoted the figure of eight pounds of wood being burnt per hour. That capacity to generate heat will be more than enough for my needs. I will be storing heat in a one thousand three hundred liter insulated tank. (340 gallons)
 
Hobartian said:
Professor Hill quoted the figure of about one hundred thousand btu's per hour and that was with a bare minimum of insulation. He also quoted the figure of eight pounds of wood being burnt per hour.

One pound of wood will produce about 8000 btu's. therfore eight pounds will produce a maximum of approx 64000 btu's if 100% efficient.
 
Thanks for your comments and interest which I appreciate.

I couldn't argue with anyone about the actual heat capacity of the boiler at this point of time particularly as I am not strictly following Professor Hill's design. My heat exchanger is much larger and the storage tank will be mounted directly above the heat exchanger with two huge connections.

I am certainly looking forward to firing it and starting trials on how I can get the best performance out of it. In this regard Professor Hill did a lot of experimentation and provides information about different things that he tried that worked and others that were not successful. From a commercial point of view my boiler is very large and lacks portability but this is not a problem for me.

I am certainly hoping the boiler works better that my first two attempts to create the hot water I need. Initially I built a large refrigerated heat pump to extract heat from a water tank under my house. Whilst it produced some heat it wasn't nearly enough. I then tried adding to the heat by installing a three meter stainless steel coil into a slow combustion heater which I completely insulated so that the coil was the only means to take heat away. That worked a little but quickly became ineffective when the coil was covered with a thick layer of creosote. I have no doubt that a very small coil would work if it was used only to heat the domestic hot water supply.
 
:long: It seems when we couple the heat source with the storage source using water, we always get creosote formation. We need to couple the fire box to the storage box with a fluid that is not limited to 212 °F boiling if we don't want a pressurized system. Something safe, cheap, commonly available, and able to absorb, carry, and discharge the energy. Air? Low specific heat and high pumping cost :shut: . But :) , maybe air. Especially if the load was low and the storage side heat exchanger had a high surface area. Air! Eureka. Runs naked in the woods :ahhh: .
 
JimboM said:
:long: It seems when we couple the heat source with the storage source using water, we always get creosote formation. We need to couple the fire box to the storage box with a fluid that is not limited to 212 °F boiling if we don't want a pressurized system. Something safe, cheap, commonly available, and able to absorb, carry, and discharge the energy. Air? Low specific heat and high pumping cost :shut: . But :) , maybe air. Especially if the load was low and the storage side heat exchanger had a high surface area. Air! Eureka. Runs naked in the woods :ahhh: .

I will find out soon whether I am going to create any creosote but Professor Hill in his report said that his boiler did not have any deposits of creosote. I don't think water is the problem. I am more inclined to think trying to burn timber at too low a temperature is the problem. If the heat exchanger is in the firebox or in very close vicinity, the fire is robbed of it's heat. However, if you maintain a high burn temperature and completely burn all the gases before they reach the heat exchanger there would be nothing left to deposit there. This is the basis of Professor Hill's design.

To add further argument to the point that water is not the problem there are multitudes of homes with creosote laden chimneys created by wood heaters and not a drop of water in sight. In these cases the creosote is created because of smoldering oxygen starved fires, damp timber, etc.

Another element of Professor Hill's design is the forced input of high velocity air which is introduced into the burn chamber so as to cause create turbulence. Professor Hill reported that he tried to eliminate the use of the input fan but when he did so the burning process was severely impeded.

Thanks Professor Hill for your detailed report.
 
Hope you are correct. I would like to see your stove succeed. Besides, this running naked in the woods is not all it is cracked up to be.
 
Wet wood can be burned cleanly...of course, but there is no getting around that a lot of the energy in the wood will be lost.

Also, although wood contains 8-9000 BTU per pound, once it is adjusted for moisture and efficiency it turns out that about 5K BTU is the highest output you can get from it. That would mean 8 lbs of wood per hour would produce approx. 40,000 BTU per hour.
 
I have just been reading the patent application for the Wood Stick Furnace designed by Richard C. Hill.

The figures I quoted in my earlier post appear not to be correct as it is stated in the application that a sixteen inch diameter combustion chamber with a height of three to four feet can be loaded with forty pounds of wood which will burn at the rate of twenty pounds per hour and thus create 100,000 BTU per hour.

My storage capacity is one thousand three hundred liters which should be heated in less than two hours. Of course time will tell and I will report on the actual performance in due course.
 
Hobartian said:
kuribo said:
I am thinking of making my own boiler as well, but out of fire brick with a fire tube heat exchanger in the exhaust path. Was wondering if you could share any design/build details of your fire tube heat exchanger?

I used a discarded propane cylinder which is approximately one hundred centimeters long and about thirty eight centimeters in diameter. I removed the handles from the top of the cylinder and the steel welded onto the base. I then drilled twelve forty millimeter holes around the perimeter of each end of the cylinder and welded forty millimeter steel pipe from a hole in one end to the corresponding hole in the other end. Please note that holes will be on a curved part of the cylinder ends.

I then made a sleeve to fit around the cylinder at the exhaust end so that I can collect the exhaust gases for discharge through the chimney.

I am hoping this will be satisfactory as the heat exchanger will be operating on a very low pressure.


How in the world did you drill clean holes through a curved surface and keep the holes in the top and bottom aligned?

How many firetubes are you using? Thanks again....
 
Hi Kuribo,

(How in the world did you drill clean holes through a curved surface and keep the holes in the top and bottom aligned?
How many firetubes are you using?)

It wasn't difficult as due to the length of the cylinder there is quite a lot of tolerance to align the holes. What I did was use the seam along the length of the cylinder as a starting point and marked out the holes. I then drilled the holes at each end which I filed to an elliptical shape to allow the tubes to be inserted and run parallel to the sides of the cylinder.

I have used twelve fire tubes but this is probably more than is needed particularly as the tubes are much longer than in Professor Hill's design
 
I've used 6050 btu/lb available heat energy of wood at 20% MC and 400F stack temperature. My Tarm burns a little hotter than 400F stack, ranging about 380-480F over the course of a burn. In doing this I have calculated 83% efficiency for my Tarm. If stack temperature was constant 400F, the efficiency would be about 85-86%.

I believe this is pretty good based on 1) weighing the wood, including kindling; 2) firing the boiler at a cold start; 3) mixing the 1000 gal storage tank to a uniform temperature before starting the burn; 4) mixing the storage tank to a uniform temperature at the end of the burn; 5) adding 55 gallons of water to account for the boiler; 6) calculating the btu’s based on the deltaT in the tank+boiler from beginning to end of burn; and 7) not drawing heat from the system during the burns.

The "variable" in this calculation is actual MC of the wood. My wood is 2-year air dried but stored outside with a cover to shield from rain/snow, so I also think 20% MC is pretty close. Btu/lb would go up as MC goes down, and vice versa.
 
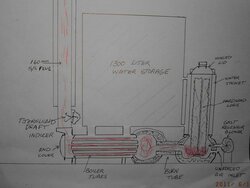
I am including a rough drawing of the boiler.

Steady progress is being made with the assembly and I hope to begin testing soon.
 

Attachments

  • small drawing.jpg
    small drawing.jpg
    26.5 KB · Views: 1,910
Excellent. I can't wait to see the results.
 
Hobartian;

I am VERY intrigued and interested in your design / build. Bravo!! Firstly, I hope it works really well, and perhaps better than you are hoping for. I am also hoping that you are able to provide this forum with more detailed drawings (with dimensions) and more pictures to illustrate some of the details of your interpretation of this Hill Design. Also, I am curious as to what materials (steel wise) were used, especially for the fire tubes, and, of course, the rod used to weld them in to the old propane cylinder. Are the vertical connections from the heat exchanger to the heat storage tanks fabricated, and if so, from what? I am wondering here why you wouldn't used pipe sections? AND, how are you getting ash out of the fire box? As usual, any and all information is very much appreciated. Cheers!
 
Response to The Control Guy

My Google site has a lot of pictures and I will keep updating it. This is the link.

https://sites.google.com/site/mywoodfiredhydronicboiler/my-construction-of-a-wood-fired-boiler

The boiler tubes are mild steel. I used square mild steel tube to connect from the heat exchanger to the tank because I had it on hand and also it is much easier to cut square holes than round ones. All welding has been done with mild steel rods using either a stick welder or tig although some joints I have silver soldered.

How to get the ash out of the burn chamber? Good question! My understanding is that there will be very little ash to remove because at such high temperatures everything is consumed. Apparently I will need to remove some very fine ash from the expansion chamber and there is a hole to access that chamber. I will probably wait for it to cool down and vacuum the ash out. This is a matter that I will experiment with and report on in due course.
 
I have had a major setback with the construction of the boiler which has caused me to modify the design.

I attempted to connect the heat exchanger tank to the storage tank with two rigid square steel pipes. However, each time I have tried to pressure test the tanks, the connecting pipes have failed due to cracking of the silver soldered joints. I have seriously underestimated the forces involved when you connect two heavy tanks together when there is potential for movement.

I have now removed the rigid connections and I will be joining the tanks with a two inch stainless steel flexible hose. I am hoping that the two inch size will be large enough for the heat to equalize between the tanks.

Other parts of the construction are on track and I hope to begin testing soon.
 
Thanks for the update. Your project is very interesting to me. Hope you don't have any more bumps in the road.
 
I am really interested in your project. I would very much appreciate it if you could post more details on your construction when you have more time, perhaps after you have finished the actual work.

There is one thing that puzzles me about your heat exchanger, as shown on your sketch. How does the water circulation work? I would have expected that the pipe exiting the exchanger would need to be taken up to nearer the top of the storage tank in order to get a thermo-siphon working. There may be some thermo-siphon effect due to the firebox end being warmer than the flue end, but is this enough, especially at start-up? Also, having both pipes terminating at the bottom of the tank seems to risk a circulation short-cut and consequent overheating of the heat exchanger.

Will you be potting the whole furnace in vermiculite concrete as Dr Hill did?

Thinking about this design, I was wandering how you would adjust the primary and secondary air flow rates to optimum when you cannot see the flame. Otherwise it seems a really good concept.
 
Thanks Snail for your post.

I will be encasing the burn chamber and the secondary chamber with vermiculite cement but that will be done last as once it is done it will be difficult to undo.

You raised the issue of the way I have connected the heat exchanger to the storage tank.

Originally I intended to do this with two rigid rectangular pipes that each measured about 120mm by 60 mm. I thought the sheer size of the two pipes combined would be enough for the heat to equalize by convection. However, this did not work as the movement between the heat exchanger and storage tanks due to expansion and contraction fractured the connecting joints. Presently I have the tanks joined by a 50mm stainless steel flexible hose. I test fired the boiler today using only a small amount of firewood and I observed there was a huge temperature difference between the heat exchanger and the storage tank. I recorded 88 C in the heat exchanger whilst the water in the tank was only 28 C

I think I will modify the system by installing a 50mm pipe from the top of the heat exchanger to the top of the storage tank. I will then install a pipe from the bottom of the storage tank to the bottom of the heat exchanger. That should enable a good thermosiphon loop.

In regard to adjusting the air input that will be a matter for future experimentation. From my memory of reading Professor Hill's papers, the design allows the fire to draw the amount of air that it needs.
 
Status
Not open for further replies.