Need help with Jotul F500 clearances

  • Active since 1995, Hearth.com is THE place on the internet for free information and advice about wood stoves, pellet stoves and other energy saving equipment.

    We strive to provide opinions, articles, discussions and history related to Hearth Products and in a more general sense, energy issues.

    We promote the EFFICIENT, RESPONSIBLE, CLEAN and SAFE use of all fuels, whether renewable or fossil.
Status
Not open for further replies.

cgeiger

New Member
Nov 22, 2008
121
Northwestern VA
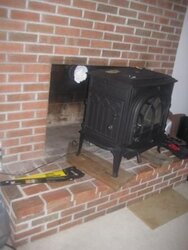
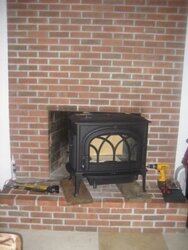
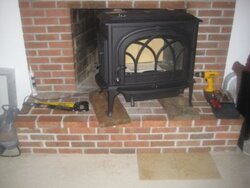
I have been loading up on info at Hearth.com and used it to help me decide to upgrade my old VC Resolute to a new Jotul F500. Alas, I have run into a bit of a problem and can't seem to figure my way out so I'm hoping for some seasoned hearth.com help to point me in the right direction. Here's my situation: I'm installing the stove into an existing fireplace. Both the manual and the sheet of paper I received from the county building comission indicate I need a "noncombustible base" extending 18" on all sides. Rear and sides are all fine, but the front will stop after 3 1/2" or so and then it's air. Can I construct a suitable hearthpad out of durock and ceramic tile on the floor in front of the hearth to make up the remaining 14 1/2." Speaking of 14 1/2", the manual indicates that I need 18" from the left side (loading door) and front "measured from the legs." But in the diagrams it shows the minimum hearth pad size of 50.5". This appears to conflict with the stated distance between front and back legs of 16.25" (i.e. 8" rear to wall + 16.25" for stove depth + 18" base in front = 42.25"). Where do I measure from? The front of the ashlip, the front of the door or the front tip of the leg (as stated in the manual?).

Any help would be greatly appreciated. With our other stove out of commission, it's awfully cold and we want to wrap this install up and get it inspected (passing, of course) right away. Thanks!
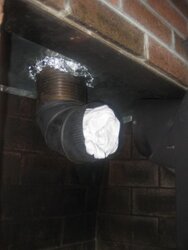
 
I suppose it might help to add that my existing masonry hearth sits 13" above a carpeted floor and is supported by concrete tied to the foundation (I checked from the basement with the builder - my dad ;). The brick is solid from the concrete pad up so 13" of brick and the brick goes all the way to the ceiling. I know it's solid through because I can see the opposite side from the outside of the house. I'm recharing my camera battery and I'll upload some pics soon.
 
ok, I went and got my manual, and also went and measured my hearth. The manual does not state a necessary "r" value for the hearth, though we built ours using 1 inch of durock and two layers of brick, giving us a little over an "r" value of 1. The hearth brick below our stove gets pretty hot when she's crankin'.

My manual references figure 8, page 14 (a misprint as figure 8 is on page 15) for the hearth pad dimensions.

My manual says same as yours. I think the missing inches you are looking for are found in the depth of the rear heat shield. I measured my rear heat shield depth and it's around 8 inches. I think the manual means that using the rear heat shield AND double wall pipe, the minimum hearth depth is 50.5, which would be 18 inches in front of stove, plus 16.25 of stove, plus 8 of heat shield, plus 8 inches to wall equals 50.25.

Our hearth is about 55 inches deep by 64 inches wide.

Figure 1C in my manual shows the total depth of the stove, which is 27 and 5/16th inches. Add to that our 9 inches from the pipe to the back wall, and 19 inches in front of the ash lip and you about get the 55 inches depth of our hearth....yep, we built it a little larger than spec.
 
Thanks for the help. I hadn't planned to put on my rear heat sheild since I'm going into a solid masonry (through to the exterior) fireplace. Wrt, to R value since it doesn't seem to specify and since I'll have a good foot and change of air, I'm assuming the hearth extension I construct is really only for spark/ember control and thus I don't need to worry about thickness. Yes?
 
Sounds right to me. Without a pic, what I see you doing is putting the oslo on a brick fireplace hearth that is 13 inches high, and when installed, the stove will have 18 inches clearance to the rear and each side.

Problem is the front. And I think you are correct, if you remove the carpet in front of the raised hearth and install a layer of durock and tile, extending to give you the 18 inches total required, you'll be fine. You say you already have 3.5 inches of hearth extending from the front of the stove, so you need at least 14.5 inches of tile on the floor there. If I were you, I'd just get some 18 inch tile and put it down there, a little extra out front won't hurt. I just had some big coals come out my side door, hit the brick, and bounced right over that 18 inches of brick on the side there, and onto the hearth rug I have covering the hardwood floor :bug:

Now, I guarantee you somebody on here is gonna be pesterin' you for pictures :)

We like pictures!

northwest Virginia? You talkin' Winchester or thereabouts?
 
North of Winchester up near Point of Rocks. About 35 minutes from Gettysburgh.

I figured folks would like pictures. So hopefully they come through ok. I took several pix to give an idea of what I've got going and what I have planned. :)

Not sure if the pix will come through but there should be enough to see the hearth, stove, firebox, block-off plate (that's aluminum foil filling the extra space around the hole for the SS flex liner), and SS flex liner (to first flue tile only) with a t-shirt stuffed into it. Our home sits on top off a hill and has a nice tall chimney. It drafts so hard cold that with a gentle breeze I can get the flex liner to keep a piece of paper stuck to the end :gulp: In fact, I used it to vacuum out some the dust I created while scrubbing the firebox. So the t-shirt is keeping us from going frigid.

With regard to the taking up of the carpet - I was worried that might be suggested. Although I've read many posts suggesting that inspectors won't always go with a "pad on top" type of solution, what do you think my chances of getting a pass on my inspection are with laying the assembled durock+tile pad on top of the carpet versus going down to subfloor? If we move (not imminent) the stove comes with us and the fireplace is returned to normal. We would then have to rip back up the tile and recarpet. Of course, if you can see the pix it's off-white carpet and we have 4 young children - yikes! So the carpet has to go eventually anyway...

If anyone sees anything off in the pix please let me know. Oh, and the wood under the legs is meant to make moving the stove around for the install a bit easier. We'll obviously take it back off and that gives us just enough clearance to the top of the firebox to shove it in a few inches (with clearance to load from the sidedoor).
 

Attachments

  • IMG_1171.JPG
    IMG_1171.JPG
    22.1 KB · Views: 488
  • IMG_1172.JPG
    IMG_1172.JPG
    26 KB · Views: 461
  • IMG_1173.JPG
    IMG_1173.JPG
    22.3 KB · Views: 467
  • IMG_1174.JPG
    IMG_1174.JPG
    15.8 KB · Views: 427
  • IMG_1175.JPG
    IMG_1175.JPG
    17.2 KB · Views: 405
You'll be fine with a hearth extension the way you want to do it. It should be extra safe with the air gap created by the drop in height.

Good to see that you have a block off plate. I'd replace the aluminum foil with stove cement and I'd caulk the outside edges of the block-off plate with silicone. But other than that you should be good to go.
 
BeGreen said:
You'll be fine with a hearth extension the way you want to do it. It should be extra safe with the air gap created by the drop in height.
Good to see that you have a block off plate. I'd replace the aluminum foil with stove cement and I'd caulk the outside edges of the block-off plate with silicone. But other than that you should be good to go.

Thanks for the feedback. Much appreciated. Does this mean I don't have to rip up my carpet? That would be ideal. As for the block of plate, I plan to fill the hole in somehow but it's about 1" in some spots and I'm not quite sure how to do that without the cement just dripping back down. I had taken an extra bit of plate, cut a square with a 6" hole in the center and then cut that in half. I had planned to slip it around the flex liner and cement it to the block off plate. Is that a good idea or is there a better way. I'm sure I'm not the first to have to make an oval and then backfill it. ;)
 
The original post led me to think that the carpet would be removed in the area of the hearth. That's what I would do.

Your plan for taking a bit of extra plate to meet the liner and close the gap is fine. Then it will be easy to caulk with stove cement.
 
Bite the bullet. Cut the carpet. Do it right. Lay down a nice couple of rows of tile you like that complements the installation. If it's wall-to-wall carpet, you can have it re-stretched by a carpet installer, and it'll look as though you never did it. Make sure you hook up with one (carpet installer) before you start cutting the carpet, he can give you some tips on how to do it in such a way that he'll be able to come back and make it perfect. Unless you already know how to do all that, then you're good to go. A tile hearth extension, I think, will look aces in that installation. Rick
 
A couple things there blueridge....

I'm with the other guys, to do this right, you gotta remove the carpet, and lay the cement board/tile in there that it gives a solid masonry surface 18 inches to the front of the stove. To lay a hearth pad in there creates a gap between the hearth pad and the brick of the current hearth. Also, I don't know if it's referenced in the manual, but the carpet may not be to code under a hearth pad anyway.

Hey, I've bought and sold many houses, down the road, any potential buyer may actually want to KEEP the stove anyway. That way you could go out and buy a new stove that would fit the needs of your new home :)

I know this for sure, that Oslo sittin' there cranked up will heat the heck outta that place fer sure. You'll be impressed!

nice pics....
 
Thanks for the reinforcement on the carpet issue. I don't mind taking it up and tiling down and definitely want to be as safe as possible. Fwiw, I had already bought 12" tile to match the decor of the room. So I either have 12" (too little) or 24" plus the 3.5" on the hearth (extra protection). So a little extra to keep a stray ember or piece of log from falling out should be covered.

Btw, any advice on whether to leave the whole thing partially assembled or to put it all in. I'm afraid to seal up the block off plate and screw in the stove to the flex cuz once I move that stove in to where it meets the elbow you can't actually see into the chimney. I figure the inspector probably wants to see all that but don't want to fail just because I didn't have it assembled.
 
You'll be happy you have that 24 inches of tile down on the floor, trust me :)

As far as whether to hook it up or no, I'm not sure, so I'm givin' you a bump to see if anybody will answer that one for ya.

Otherwise, I'd call an inspector and ask 'em.

Let's get this Jotul fired up....of course, you KNOW we want pics of it burnin' ;-)
 
I can only comment on what our Fire Inspector here in Bangor would want to see and not what the Inspector in your town or city might want to see or approve/not approve.

RE: The carpet. It would have to go. The Inspector's opinion here is that you can say the new pad will always be there from here until Armageddon . . . or you could simply be doing it to just pass the Inspection. While I wouldn't believe that you would move the pad after passing the Inspection the simple truth of the matter is that over time folks (you or others) might forget the purpose for the pad and might remove it to clean under it and forget to put it back . . . or you might think you will take the stove with you when you move, but might not and the future owners might opt to remove the pad on the carpet since they may not realize it serves an important function. In other words -- if something is not more or less permanent the Inspector here would most likely not approve it (the exception being a free-standing floor protective device in one solid piece (home built or commercially built) as this would be under the entire stove and less likely to be removed.

RE: Connect or not connect. Again, speaking only to what our Inspector would most likely want to see. Connected. He would want to see all that all the connections have been made and that the stove is ready to go vs. having someone say they will hook up the stove as promised and then have them shortcut some important step (i.e. say they will screw the pipe together for example and then forget to do so). Our Inspector would most likely ask questions about anything he couldn't see (i.e. our Inspector would ask if the connections have been made and secured and possibly ask about the block-off plate . . . over time he has often learned to be a good judge of character . . . who is just BSing him, who has no clue as to how to do a proper install, who has knowledge and the expertise to have the install done right, etc.). In general, what he can see often tells him a lot about what he cannot see -- in other words, if the stove doesn't have the proper floor protection, clearances aren't met, the mantel is too close, etc. then the Inspector will be more likely to dig a little further with the belief that if he can easily find one or two mistakes through simple observation of what he can easily see, then there is a very good chance mistakes have been made in the places he cannot easily see.
 
Nice hearth and new stove. As a former Marylander, I can say it's a beautiful area you live in, too. I certainly miss deciduous trees and their fall colors--it's mostly conifers here. (I was sorry to read about all the trees being removed for installation of the new HOT lanes on the VA side of the beltway. I always loved the fact that so many green scape areas exist in DC--it made living with the logistics of getting around more bearable. At least sitting in traffic jams on the beltway or gw parkway, I had beautiful vistas to look at.)
 
Firefighterjake - thanks for the feedback. Good points. Though my dad has built all the homes we've ever lived in I'm a noob to the permit/inspection process and nervous about missing something I didn't understand or know about. So all the feedback is invaluable and reduces the stress. As for the carpet, I'm set on removing it - no question. I've got all the supplies and will lay the tile tomorrow (of course, I'll update with pix)! We'll have a generous amount of clearance by the time we're done with 2 rows of 12" tile :D As for assembling versus not assembling I'll go ahead and assemble but call the inspector before I cement on the off chance I might a. get him/her and b. they can tell me what they want to see. Once the cement's all set up on the flexliner and the block off plate it'll take a bit of work to get it back out again. lol.

As far as safety is concerned, I'm right there with ya (saw some of your other posts). Got 4 little ones and have spent most of my life living in the out of place places. Shortcuts and fire just don't mix. Period. Oh and speaking of out of the place places, intherockies, you hit the nail on the head - it is gorgeous out here! The view on the commute never gets old no matter the season. Spent some wonderful time outside Chicago for a few years but couldn't wait to get back. Now my wife loves it too!
 
Status
Not open for further replies.