Need help with preway insert problem.

  • Active since 1995, Hearth.com is THE place on the internet for free information and advice about wood stoves, pellet stoves and other energy saving equipment.

    We strive to provide opinions, articles, discussions and history related to Hearth Products and in a more general sense, energy issues.

    We promote the EFFICIENT, RESPONSIBLE, CLEAN and SAFE use of all fuels, whether renewable or fossil.
Status
Not open for further replies.
Good points - Preway is actually mentioned by name on some ZC insert "approved" lists.....BUT

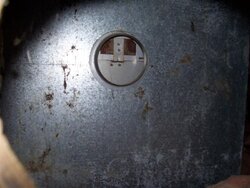
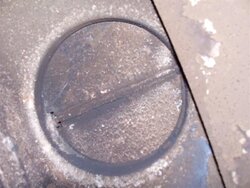
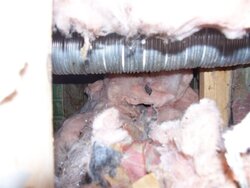
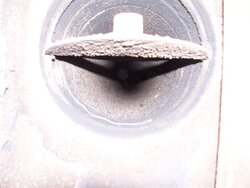
It is really important for the existing system to get a good inspection before step one of buying and installing. This is especially important because Preway is an OLD brand and this fireplace could well be past the age of it's "design life". In short, that means it might be time to rip the thing out! But without a pro inspection, there is no way of knowing. Weather, climate and other conditions mean that one unit might last 25 years and another still be in good condition after 35 years.

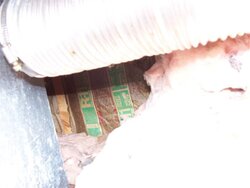
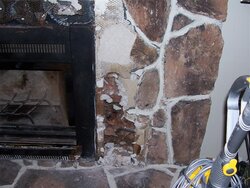
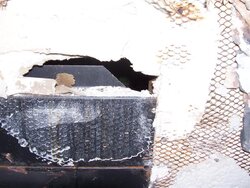
Dabbling a little into the world of common sense here - if such a fireplace is in good condition and capable of safely handling a fire in the existing firebox - well, the addition of a smaller box with two walls of steel between the new fire and the fireplace, plus the air space...then plus the preway construction....then plus a liner inside the existing chimney........I think common sense would say that it will be MUCH safer than it is now (properly installed). But, then again, we don't know exactly how it is now - and that is the rub. It might burn the house down "as is" if you used it for long periods of time.
 
Webmaster said:
You do need to line this older pre-fab pipe to bring it up to current codes. In any case, there is no problem with fitting a 6" down there, either with or without insulation. 6" liner is only 6" OD (or real close)....some liners are pre-insulated, others can be wrapped. You may be able to use rigid as opposed to flex, which is better overall....smaller OD, heavier wall, etc.

Does the rigid cost more or less on average than the flexible? I want to reassure all of you I want to do this correctly and safely. I am well aware of the importance of that aspect of this task. While I am trying to be as cost effective on this, there are certain things I won't skimp on and safety is one of them.

That being said, I think I will just have to remove the surround panels and see what I actually have as well as take some pictures of that and looking up and down my chimney. That way you can see exactly what I am dealing with.

I do wonder if at this point I may be better off to just tear it all out and start fresh? I would assume that would increase my price but if so by how much?
 
Webmaster said:
You do need to line this older pre-fab pipe to bring it up to current codes. In any case, there is no problem with fitting a 6" down there, either with or without insulation. 6" liner is only 6" OD (or real close)....some liners are pre-insulated, others can be wrapped. You may be able to use rigid as opposed to flex, which is better overall....smaller OD, heavier wall, etc.

glad to hear it should fit in my 8" pipe realitively easy. I was getting the mental picture of me on my roof slamming this liner and it not going anywhere. Like watching a monkey hump a football, I'm sure my nieghbors would get a kick out of it. lol
 
If you are doing a pre-inspection, first thing is simply to look up from the bottom and then climb on the roof and remove the cap....and look carefully at the pipe condition - is it rusting, etc? Look down with a strong light and see if all the sections are still mated together. It should be cleaned with a chimney brush to remove all soot, etc

Removing the entire thing will give you more flexibility as to what you can fit in.....that's for sure! You can either use a built in unit with new chimney or build in an HT chimney and then set a regular stove in front.
 
just to give you guys another picture of what I'm dealing with.

Here is the view of the outside air intake after I removed the actual steel hose to the outside. If you look closely in the bottom right corner you cna see the fiberglass insulation. it is about halfway up this metal box you see. The gap between the first box and the whiter one inside of that you can see is about 1 -2 inchs it seems. From what I can tell there does seem to be at LEAST 15" or more from the box and the surrounding "chimney" which is really just a plywood box with a pipe in it. I'll get more exact measurements tomorrow. Regarding the insulation, is this enough or do I need more or less around this box?

does this look like it is even close to safe? I've used this fireplace every day for the past 2 winters and it's operated fine with no issues other than it sucks as a heat source for a house. I use a chimney brush and clean it myself each spring and it has no buildup in it.

The guy that built my house was a contractor and he build a few homes on my street. While he did obviously use some surplus wire and stuff, everything I have come across has been done correctly if not overdone. For example all of the wiring in my house is large commercial wire encased in solid steel conduit. 20 year old house and not 1 crack anywhere from settling. It seems he did this right too, but that was for a fireplace not an insert and thus, here I am.
 

Attachments

  • outside air (Medium).JPG
    outside air (Medium).JPG
    65.5 KB · Views: 279
Webmaster said:
If you are doing a pre-inspection, first thing is simply to look up from the bottom and then climb on the roof and remove the cap....and look carefully at the pipe condition - is it rusting, etc? Look down with a strong light and see if all the sections are still mated together. It should be cleaned with a chimney brush to remove all soot, etc

Removing the entire thing will give you more flexibility as to what you can fit in.....that's for sure! You can either use a built in unit with new chimney or build in an HT chimney and then set a regular stove in front.

There is no obvious rust in the chimney itself. I will look again and closer tomorrow. On the inside top of the current fireplce, the metal is flaking but it is bumpy and not really rusty. I am pretty sure it was some green wood I was burning at the end of winter this last year. It comes right off to reveal black metal when I scrape it.

Attached is a picture of what the inside of the fireplace looking up. I will get another one with it open.
 

Attachments

  • 103_1499 (Medium).JPG
    103_1499 (Medium).JPG
    58.5 KB · Views: 298
well as luck would have it, I am going to have to remove the stone veneer on my hearth anyways. I was leaning on it yesterday looking up into the flu and a large stone fell off in my hand. So upon further inspection I found 4 loose stones. I think it's ugly so I didn't need much excuse to remove it. Well, I decided to do a little exploratory surgery and see what I had. Below are some pics of what I found.

Not sure what my options are now. It is surrounded in drywall and 2x4's and fiberglass insulation. I'm going to put cementboard up for the new stone veneer anyways. Any help is of course greatly appreciated.
 

Attachments

  • behind firebox (Medium).JPG
    behind firebox (Medium).JPG
    35.4 KB · Views: 247
  • bottom right corner (Medium).JPG
    bottom right corner (Medium).JPG
    89 KB · Views: 255
  • right side in chimney (Medium).JPG
    right side in chimney (Medium).JPG
    48.9 KB · Views: 233
  • straight up flu (Medium).JPG
    straight up flu (Medium).JPG
    46 KB · Views: 219
  • top right corner (Medium).JPG
    top right corner (Medium).JPG
    90.6 KB · Views: 243
I would hire a pro to remove it and reinstall a built in EPA unit. You could also do it yourself I suppose. You want to have the cavity behind the fireplace insulated and drywalled just like an outside wall. This prevents cold air from coming in and also from the insulation sagging like I see in the pics.
 
Status
Not open for further replies.