Need help with thimble

  • Active since 1995, Hearth.com is THE place on the internet for free information and advice about wood stoves, pellet stoves and other energy saving equipment.

    We strive to provide opinions, articles, discussions and history related to Hearth Products and in a more general sense, energy issues.

    We promote the EFFICIENT, RESPONSIBLE, CLEAN and SAFE use of all fuels, whether renewable or fossil.
Status
Not open for further replies.

looch

New Member
Jul 20, 2008
4
Quebec
So, after having made the 8 hour round trip from the Woodstock Soap Stone Company, I am anxious to get everything installed. Here's the situation:

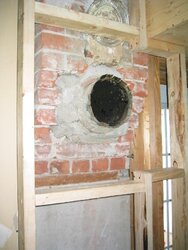
My house was built circa 1890. It's a brick Victorian - not stick-framed, actually solid brick. The orginal chimneys were brick and on the inside of the house. At some point, one owner had a new, clay-lined, exterior chimney installed. The new chimney opening is below the original and has a 26" horizontal "run" from the interior of the house to the vertical part of the chimney. This horizontal section is clay set in mortar and is lined with single wall steel pipe - 8" in diameter. The steel liner protudes about 3" into the interior of the house.

I am/have been adding 2x4" stud walls to the interior, as there were none (and very little insulation). I have rough framed a stud wall in front of the opening. There is approximately 1" of space from the brick surface surrounding this 3" flange to the back side of the 2x4" studs.

My intention is to immediately reduce this 8" flange down to 6", pass through a Saf-T Thimble, and then continue with 6" single wall pipe to my new stove.

I have 2 concerns:

1) I don't think I'm doing anything wrong, but I would certainly appreciate any critiques of my plan. It's early enough in the project (not to mention, it's July) that I can make changes.

2) The instructions for the thimble include drilling through the masonry and attaching the thimble to it through 2 flanges located on the top and bottom of the thimble. The interior surface of the masonry surrounding my chimney is not conducive to this. the bricks "fall away" from the bottom of the clay liner. How could I deal with this situtation?

Many thanks.
 

Attachments

  • IMG_1238.JPG
    IMG_1238.JPG
    56.3 KB · Views: 526
I am not a mason, but am bumping this thread to hopefully attract someone that is or has good experience in this area. My concern is about the pie plate block above this outlet. Why wasn't this properly bricked in before putting the stud against it? The current thimble also looks cobbled in. My inclination would be to remove the studs, fix the old, top hole. Then take out the 8" thimble and cement work, and correctly brick in a new 6" thimble. Have you consulted with a professional mason about the problem?
 
Those brick are corbelled there...staggered out to change the profile of the flue inside, that's why the outside surface isn't just a vertical face. The thimble looks like kind of an amateur hack job. The previously used flue entrance with the pie plate, as BG pointed out, should be properly sealed. If you need a vertical face on which to mount a new thimble into this masonry structure, I'd say you need the help of a professional mason, and the old thimble needs to go. Rick
 
BeGreen,

This was my first stop to try and get some information about what I can do about this issue. The old wall was just 2x2's with 3/8" sheetrock on top. The original 8" stove pipe was mated directly to that metal flange and then covered by a decorative black ring. I was pretty sure that was not okay, but when my insurance company inspected the house prior to issuing a policy, they had nothing to say about this connection. They were only concerned with the clearances around the stove.

My idea to redo the stud wall with an appropriate "pass through" is better than what was there, but apparently not good enough to be able to comply with the instructions that came with the Saf-T thimble. That's when I thought I would be a good idea to check with some other knowledgeable source. I appreciate your suggestion to consult wih a mason and I will do so. Maybe I'll even get him to redo that wall section in brick, pending feasibility.

fossil said:
...staggered out to change the profile of the flue inside, that's why the outside surface isn't just a vertical face.

Rick,

I'm not sure I understand what you mean by "to change the profile of the flue". It is a straight run from the opening to the chimney. The interior definitely looks "botched" but the exterior work is quite nice.

In any case, I will be calling a mason to hear what he has to suggest.

Thanks to you both.
 
Masons will corbel, or stagger, the bricks for a number of reasons. To widen the chimney structure as it rises from its foundation, to align the flue with its intended path, to provide interior support for the chimney liner, to form a smoke chamber where the damper is installed, etc. Exactly why these particular bricks are corbelled, I don't know. Rick
 
I wouldn't trust an insurance agent with the safety of my home. A good mason that knows his code will get you on the right track and you'll have a nicer looking installation afterward.

BTW, congratulations on addressing the insulation too.
 
Trust an insurance agent - yeah, good one. I figured they would want to at least protect themselves.

As for the insulation/condensation, I was taught to always apply vapour barrier on the hot side. That would be the inside up here and the outside in warm climes. I have between 1-2" of space from the parged brick wall to my free-standing 2x4" interior walls. I made them about 1/8" to 1/4" taller than the actual measured height and drove them home with a sledge hammer to add some support to the second floor. There is R12 batting in between the studs, and then a bubble-wrap vapour barrier. Furring strips (1x3"s) screwed horizontally on 16" centers provide the mounting surface for the drywall.

I have kept every furnace oil receipt I have ever received and have entered the data into Excel. There is a huge drop in consumption the winter following the above-mentioned work. The price of oil went up by the same amount that I saved, so I ended up paying the same amount anyway.

Had I known earlier, I would have involved both my provincial and federal governments. They have a program where they send a certified contractor to your house to evaluate its current efficiency by documenting the current conditions. They then provide you a list of recommendations/upgrades and how much money in grants for which you would be eligible for applying each. I will be doing this before continuing with any other efficincy projects.
 
If you make that single horizontal 2" x 4" that you've installed beneath the existing thimble into a suitably strong header, then, after removing the old thimble and cleaning that area all up, new masonry can be laid up supported by your new header, and "reverse corbelled" to flatten that vertical wall to give you a surface onto which the new thimble mount ring would rest comfortably and snugly. Rick
 
What precisely are you referring to when you say to remove the old thimble? Do you mean knocking out the entire horizontal section of crock?

I apologize for my ignorance when it comes to naming the individual components.

I had thought about doing what you mention. Also, the house is built on a stone foundation that is about 2' wide. There is about an 8" "shelf" on the inside on all of the exterior walls about 2" below the surface of the floor. I am leaning toward having the whole thing bricked in right up from the floor.
 
I'm calling the thimble that horizontal cylinder that penetrates the masonry and provides a path for the flow of your flue gases from your appliance to the chimney. If the new thimble you're planning to install will fit through that, then perhaps the old one can remain in place. Laying in new masonry all the way up from the footer might be overkill, unless you want it exposed on the interior of the room, in which case I think it would look terrific. Rick
 
Status
Not open for further replies.