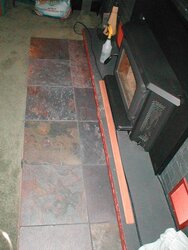
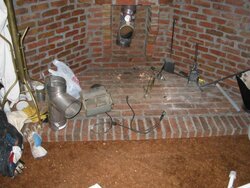
As many of you know, I'm working towards replacing the old smoke dragon that we've been using for our primary heater with a newer stove. One part of the change is that the old stove was side load only, and the existing hearth isn't deep enough to meet clearance requirements for a new stove with a front loading door, therefore I need to extend the existing hearth in some way.
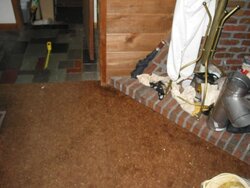
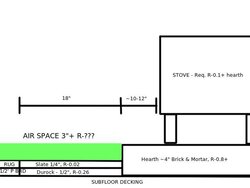
The old hearth is brick, raised one brick edge above the floor level - it runs diagonally across one corner of the living room. In order not to lose any more useable floor space, I want to make the extension flush with the floor, currently I'm planning to cut the carpet back, remove the particle board flooring and replace it with cement board (I don't think I need to touch the decking under the particle board) and then cover that with non-combustibles.
The stove manual calls for "1/4" non-asbestos mineral board or equivalent" so this should be plenty. It looks like we will end up needing to make a strip about 18" wide and about 12' long
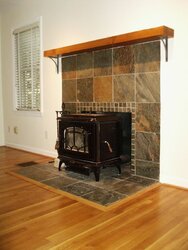
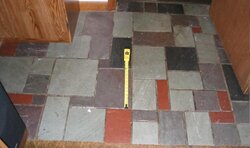
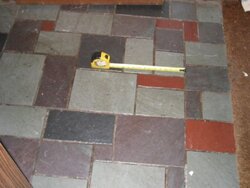
There is an entryway next to the hearth that has been finished with a natural slate tile in various colors and sizes in an interlocking semi-random pattern. The GF and I are of the opinion that trying to do a similar slate covering on the extension will make the most visual sense. We think we have a couple sources for suitable material, and I'm thinking I'd like to do the job myself rather than spend the large minimum cost our local floor shop charges to do an install. (it would probably be 2-3x the material...) However I've never done a tile job before, and I need a bit of a primer -
1. What materials do I need?
2. What tools are needed?
3. What is the procedure?
(If it's involved, pointers to other "how to" writeups might also be useful...)
Thanks,
Gooserider
The old hearth is brick, raised one brick edge above the floor level - it runs diagonally across one corner of the living room. In order not to lose any more useable floor space, I want to make the extension flush with the floor, currently I'm planning to cut the carpet back, remove the particle board flooring and replace it with cement board (I don't think I need to touch the decking under the particle board) and then cover that with non-combustibles.
The stove manual calls for "1/4" non-asbestos mineral board or equivalent" so this should be plenty. It looks like we will end up needing to make a strip about 18" wide and about 12' long
There is an entryway next to the hearth that has been finished with a natural slate tile in various colors and sizes in an interlocking semi-random pattern. The GF and I are of the opinion that trying to do a similar slate covering on the extension will make the most visual sense. We think we have a couple sources for suitable material, and I'm thinking I'd like to do the job myself rather than spend the large minimum cost our local floor shop charges to do an install. (it would probably be 2-3x the material...) However I've never done a tile job before, and I need a bit of a primer -
1. What materials do I need?
2. What tools are needed?
3. What is the procedure?
(If it's involved, pointers to other "how to" writeups might also be useful...)
Thanks,
Gooserider
")