
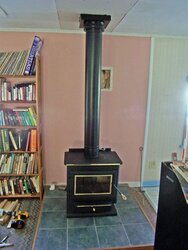
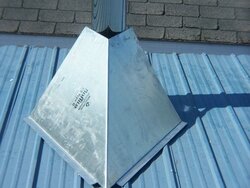
Heres a few photos of my install. Others are encouraged to post new install photos.....Of coarse the cricket has not been fastened to the roof deck and caulked yet
New 13NC Install Photos
- Thread starter JPapiPE
- Start date
-
Active since 1995, Hearth.com is THE place on the internet for free information and advice about wood stoves, pellet stoves and other energy saving equipment.
We strive to provide opinions, articles, discussions and history related to Hearth Products and in a more general sense, energy issues.
We promote the EFFICIENT, RESPONSIBLE, CLEAN and SAFE use of all fuels, whether renewable or fossil.
You are using an out of date browser. It may not display this or other websites correctly.
You should upgrade or use an alternative browser.
You should upgrade or use an alternative browser.
- Status
- Not open for further replies.
moondoggy
New Member
looks good man.
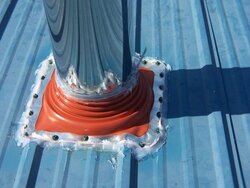
not sure about the roof pic....i might be inclined to put some silly-con around screw heads, but i'm obsessive with silly-con.
nice job...... now anticipate.....soon we can fire.
not sure about the roof pic....i might be inclined to put some silly-con around screw heads, but i'm obsessive with silly-con.
nice job...... now anticipate.....soon we can fire.
Hanko
Minister of Fire
smokinj
Minister of Fire
would make for a nice break in fire!Hanko said:you should get a good 12 hour burn out of those books
Oh Hanko, I know you love to pull my Cranko.... Ever heard of "Cooking The Books"? HA HA.... This stove has yet to have it's side sheilds installed which should reduce side clearances to 11" but still I think i might go further in order to prevent the cooking of my books... But thanks hanko for the observation
Maybe the screws should be covered, but there is so much RTV 500 degree silicone under the boot that i doubt i could improve upon it.
Maybe the screws should be covered, but there is so much RTV 500 degree silicone under the boot that i doubt i could improve upon it.
Hanko
Minister of Fire
Hanko
Minister of Fire
what size englander is that?, how much, and where did you get it? I looked at a summer heat model 12or something like that, supposed to be the cousin on the NC 13. $699 Mexican Lowes
You know old "Woody A.K.A. Be Green " has suggested most vociferately that I add a storm collar to this roof boot.....What do the rest of you think? I do have a huge metal pipe clamp around the top of the boot and it has been siliconed to death in place. Give me your opinions.
I did have a $25 coupon off, Hanko for Home Depot...so i paid $575 complete with the gold trim etc. The stove is an Englander 13NC, made to heat 1500 sq ft
iceman
Minister of Fire
JPapiPE said:You know old "Woody A.K.A. Be Green " has suggested most vociferately that I add a storm collar to this roof boot.....What do the rest of you think? I do have a huge metal pipe clamp around the top of the boot and it has been siliconed to death in place. Give me your opinions.
storm collar
encourages water/ snow..(when it melts underneath) away from the pipe that looks flat but it could be my eyes
edit: more flat than on a smooth angle from storm collar water/ice can stay in between those rigids
Metal
Minister of Fire
- Nov 18, 2005
- 701
Where did you get the flashing? I take it it was from the pipe manufacturer (Selkirk?). Their flashing kits now come with a "special storm collar." Maybe you got an old kit? You may want to call them and see if you can get the "special storm collar" separately.
www.selkirkcorp.com/WorkArea/downloadasset.aspx?id=1932
www.selkirkcorp.com/WorkArea/downloadasset.aspx?id=1932
Nice avatar Particle Man , but I did buy the boot wholesale from WW Grainger for $145 ...stove shops get $200 for the same rig
Hogwildz
Minister of Fire
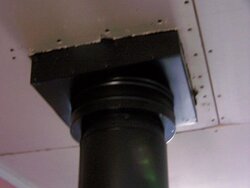
Looks good. WHat did you end up doing in the limited attic area as far as insulation shielding?
Yes on the storm collar, keep the water away as much as possible.
The dark night lost a wing it appears")
Not to bust your balls, but I believe the stove needs to be bolted to the floor for mobile home install?
Yes on the storm collar, keep the water away as much as possible.
The dark night lost a wing it appears
Not to bust your balls, but I believe the stove needs to be bolted to the floor for mobile home install?
Hey Hogz, Nice to see you are still alive ...Word had it that you were eaten by tigers while touring India...Glad to see it's not true. I did use a full cathederal ceiling support box, so my HT stove pipe is in a metal chase from the ceiling through the roof.
Hogwildz
Minister of Fire
JPapiPE said:Hey Hogz, Nice to see you are still alive ...Word had it that you were eaten by tigers while touring India...Glad to see it's not true. I did use a full cathederal ceiling support box, so my HT stove pipe is in a metal chase from the ceiling through the roof.
Worked out nice then. Box looks similar to mine, cept mine is not cathedral, still may be able to cut an angle on it and do similar set up.
savageactor7
Minister of Fire
Joe nice job on the inside but I thought the pointy side of the cricket had to face up to spread the ice away from the chim pipe?...
...or is it just my perspective that's off? Anyway good luck with your 1st burn...and the rest of them too.
...or is it just my perspective that's off? Anyway good luck with your 1st burn...and the rest of them too.
Hogwildz
Minister of Fire
Its the photo angle.savageactor7 said:Joe nice job on the inside but I thought the pointy side of the cricket had to face up to spread the ice away from the chim pipe?...
...or is it just my perspective that's off? Anyway good luck with your 1st burn...and the rest of them too.
Notice the roof pipe is though is steel. The other shingle roof I believe is garage roof, and think there is actually a gap between the two.
savageactor7
Minister of Fire
WILDSOURDOUGH
New Member
Hogz I did cut the roof angle on the top of the support 3/4" about the roof line ,then sliced the corners and used a pair of seaming pliers to fold down the lip onto the roof for extra support and extra heat protection. I did have to get 24" long ceiling support though, but it only costs $7 more than the 11" one.
Hogzilla is right, that shingled roof is my garage and it is about 3' away from the metal roof. I did use metal roofing screws that come with a rubber washer installed on each screw and then they have a steel washer between the screw head and the rubber washer. It this installation leaks I'll just put another layer of RTV 500 degree silicone on it.
ScottF
New Member
Nice job. Thanks for posting pictures. You apply as much silicone as I do. glad to see im not the only one
Dear Mr Hogz: I do appreciate all the compliments you have sent my way. I know those are rare indeed. But if you think i am not going to bolt this stove to my hearth...You are wrong...sorry ...just won't do it. If this stove starts to shucking and jiving then i'll know the earth is coming to an end...so it won't matter.
P.S. Portals Plus, the company i bought the roof boot from claims there is no reason to put a chimney collar on this system as it is cinched by a 3/4" S.S. clamp at the top of the rubber boot and is a finished product with that procedure. Plus there is tons of RTV 500 degree silicone covering everything. If you prove me wrong i shall fully admit it.
Also I plan to break another rule by putting my chimney brackets on the adjacent garage roof. I only do this becase there is no solid framing in the metal roof beyond the 4'-up from the eaves . Then the pikers tried to save screws by not screwing into every piece of strapping going up the roof. So guessing where there is a piece of framing is too chancey and trying to hit the trusses is another guessing game. When my chimney falls I will freely admit defeat with my improvised methods.
I did call Portals Plus engineering dept and they assured me high temp silicone was the way to go...I also spoke with Ray at Dura-Vent and he reiterated that only HT silicone was the only caulk that would work...sawdustburners said:good luck= i dont think silicone will stick to silicone.JPapiPE said:Hogzilla is right, that shingled roof is my garage and it is about 3' away from the metal roof. I did use metal roofing screws that come with a rubber washer installed on each screw and then they have a steel washer between the screw head and the rubber washer. It this installation leaks I'll just put another layer of RTV 500 degree silicone on it.
Thanks for your concern....SawDustBurner
- Status
- Not open for further replies.
Similar threads
- Replies
- 8
- Views
- 667
- Replies
- 0
- Views
- 179
- Replies
- 7
- Views
- 540