
I have a few questions regarding constructing my hearth in my new home. It is currently dryed in and nearly ready for insulation. I have been working on running my chimney pipe. My questions however are about constructing a faux river rock corner hearth. How should I begin? Place backer board over sheet rock? Or place backer board instead of sheetrock ? I plan to build up the floor approx 1 foot then top with slate and cover the toe with rock. This is my first time attempting something like this and any advice would be much appreciated. Thanks in advance
new contruction stove plans
- Thread starter fisherman73
- Start date
-
Active since 1995, Hearth.com is THE place on the internet for free information and advice about wood stoves, pellet stoves and other energy saving equipment.
We strive to provide opinions, articles, discussions and history related to Hearth Products and in a more general sense, energy issues.
We promote the EFFICIENT, RESPONSIBLE, CLEAN and SAFE use of all fuels, whether renewable or fossil.
You are using an out of date browser. It may not display this or other websites correctly.
You should upgrade or use an alternative browser.
You should upgrade or use an alternative browser.
- Status
- Not open for further replies.
sullystull
Feeling the Heat
I don't have much experience with the manufactured stone, but a 1" air space behind the backer board may not be a bad idea.
My original plan was to frame over the sheet rock to give my stone back some more depth but then was thinking that it would take up more of my already tight corner. Any body else have any experience building a hearth like this from scratch ?
We'll need to know the stove first. Then we need to know whether you are going build with the clearances from the stove direct to combustibles or for clearances as defined to an NFPA approved wall sheild.
The stove is a vc encore. The clearance is negotable. I have already purchased the heat shields but was wondering if I really need them. What is the minimum air clearance required for no shields ? And does the rock mantel count as a "combustable"
It really depends on what you want to design to. If you are not happy with the non-heat shield clearances then keep them and design around the heat shield clearance spec. The spec is for clearances to combustibles. If the mantle is solid rock that is not combustible and is a non-issue.
The design I would like to do is a faux river rock corner hearth approx 5 ' high with each side of the corner having a 4' width. the hearth floor I would like to raise up 1 foot. The clearances on the stove to combustable will be several feet as the entire hearth will be covered with rock. Question is does the framing behind or under the hearth rock need to be accounted for ? And what should be done first? do I need to frame against the sheet rock to create an air space behind the rock or can I place backer board directly against the sheet rock or framing of the house ?
Sorry, more questions so that specific dimensions can be given. Which Encore, the cat model or non-cat? The distances to combustibles discussed in the manual pertain to what is behind and along side of the stove and supporting the faux rock wall.
The Encores gets hot in back. The 2550 needs generous clearances of 24" from the corner to combustibles. In your case that would be the studs behind the stove. The corner clearance distance can be reduced to 8" with proper wall shields as described in the manual. To make a proper wall shield, the faux rock is mounted on a non-combustible backer board (durock or wonderboard) wall shield that is properly spaced at least one inch from the wall and has a 1" air gap at the bottom and top to allow air to circulate behind it.
As for the the hearth floor, assuming the stove has a bottom heat shield, plan on putting a layer of sheetmetal, then at least 1/2" durock as underlayment before the floor tile. If this is the Encore NC1450 then I would use 2 layers of durock.
Thanks for the info it is begining to become more clear. I just received my 2550 cat model yesterday and havent yet had the time to read up on it yet. It sounds like what I should do is build a 2x4 frame over the wall then install the heat shields inside, cover with backer board (around here we use hardi backer concrete board) then rock. As for the floor probably build the frame out of 2x6 then cover with sheet metal, backer, and rock/tile. If I go that route can I reduce my clearances to 8" ? What about fresh air ?
No need to build out the wall using 2x4s. Look at the diagrams in the manual for a wall shield and hearth. The wall shield just needs spacer anchors to create the 1" air space. I like using doubled-up, 3" x 48" strips of durock as shims to create the air space. Attach these shim strips to the existing wall studs over the wall board and then attach the durock backer board over the shims. As long as you follow the manual guide lines you can reduce corner clearances to the minimum, but I would add a couple inches for extra peace of mind. Note, the hearth will need to extend farther than 48" per corner side to meet spec.
Here's a link to Durock's website instructions for building a wall shield:
http://tinyurl.com/nmmt3
Here's a link to Durock's website instructions for building a wall shield:
http://tinyurl.com/nmmt3
I see what you are saying about the air space. How can the edge be finished, that is the open 1" air space with shims on each edge. The other problem it looks like I will have is one side of 4' from corner is a open walk through and the other is a window. but I see what you are saying that with the 27 inch width of the stove each side of the hearth would need to be approx 5 foot to achieve the min 8" past the corner of the stove. What if there is an open space where that would be ?
That sir is what we call a design problem. ") Time to go fishing!
Time to go fishing!
Just kidding. Can you take a picture of this corner? It will help to see what you're up against. You may need to offset the stove towards the window, but that might circumvent the wallshield protection. The hearth requirements are set by the manufacturer and have to be honored. Fortunately they are not brutal, but it may take some creative thinking to make this work. Just supposing, would you be open to a change of plan with a hearth that is flush with the floor?
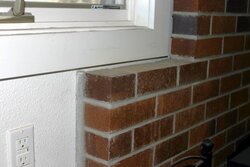
The vertical edges of the wallshield can be solid and trimmed in stone. And as long as the vertical cavities are vented just below the top, the shield can be capped.
Time to go fishing!Just kidding. Can you take a picture of this corner? It will help to see what you're up against. You may need to offset the stove towards the window, but that might circumvent the wallshield protection. The hearth requirements are set by the manufacturer and have to be honored. Fortunately they are not brutal, but it may take some creative thinking to make this work. Just supposing, would you be open to a change of plan with a hearth that is flush with the floor?
The vertical edges of the wallshield can be solid and trimmed in stone. And as long as the vertical cavities are vented just below the top, the shield can be capped.
Ill take some pictures tonight and get them loaded. Does the situation change if the stove is at floor level ? Thanks again for the advice. I especially like the going fishin idea !
Just process thinking at this point. My thought was if the hearth was flush with the existing floor, then if it intruded on the open walk through you wouldn't be colliding into it. You could still have the stove on a raised hearth, then drop down to a flush hearth extension.
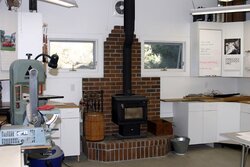
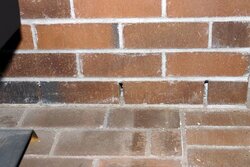
Basically, the rock doesn't count for beans if it's fastened squarely against a combustible material (studs, drywall, whatever, even with a layer of Durock). It's the 1" airspace that buys you reduced clearance. That 1" airspace simply needs to be ventilated, meaning that there are spacers mounted behind it to anchor it structurally (none immediately behind the stove), and that channels be provided along the bottom to allow cool air to come in down there, and corresponding spaces along the top to allow the air to convect out. The vertical side joints between the wall and the hearth wall structure can be completely filled with mortar, grout, whatever. I'll try to post a pic or two of my workshop installation. Rick
Attachments
Hopefully here are some pics of the proposed location, the piece of osb on the floor is the same dimensions as the widest points of the 2550 and the corners are exactly 8" from the wall studs. I penciled in the floor pad hopefully it will show up. I think ideally I would like to raise it up but floor level would be ok if it works out better. What do you think ?
Attachments
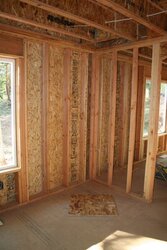
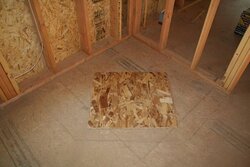
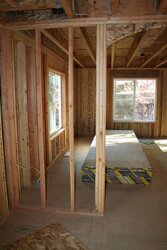
Pictures help a whole lot. The hearth pad is inadequate. It needs to meet the specs in the manual which call for it to extend at least 18" in front of the stove door. Also, the 8" measurement is fron the wall shield. If there is say 1" of rock veneer and the 1/2" durock + the 1" wall space + 1/2" sheetrock, there needs to be at least 3" added to the 8" or 11" from current studs. Considering that you are in the framing stage, I would offset the room opening to the right about 16" so that this can be done correctly.
PS: Have you already purchased the stove?
PS: Have you already purchased the stove?
yes we already purchased the stove. If I ad up the 11 inches of rear clearance plus the 24 inches of stove and then another 18 inches in front I would need 53 inches measured from the closest point of the wall to the front of the hearth or approx. 4 1/2 feet I will look at it in the morning and see how much of the door opening I would need to close to make that happen. Sounds like I need to definatly make it at floor level so that my hearth pad can be walked on as the room is not that big and that much pad will take up alot of it.
If the room is small, how is the heat going to get out of there? It could end up being a real hot spot. Have you considered opening up that room by removing the door partition completely? That would allow you to place the stove flat against the wall.
Yes I did consider that but then was concerned that that wall is the only load bearing wall on a 32 foot span of bci as it is 2 story. Which is what really limits my stove placement in the first place. The other side of the room is open and also has the stair well in it so I think the heat will be able to get out, although I am accepting that the room will probably be very warm when we are burning but it is a living room that will not get much use anyway.
Ok so what if I shorten up the door way say 6" then add a row of slate tile at the bottom of my raised hearth. That should give me 18" in front and the proper clearance in the back. I have been reading my instruction manual, they keep refering to chimney connector, where does the chimney connector end and the chimney begin ?
- Status
- Not open for further replies.
Similar threads
- Replies
- 2
- Views
- 1K
- Replies
- 3
- Views
- 2K
- Replies
- 10
- Views
- 868
- Replies
- 3
- Views
- 2K