New Hearthstone Shelburne project

  • Active since 1995, Hearth.com is THE place on the internet for free information and advice about wood stoves, pellet stoves and other energy saving equipment.

    We strive to provide opinions, articles, discussions and history related to Hearth Products and in a more general sense, energy issues.

    We promote the EFFICIENT, RESPONSIBLE, CLEAN and SAFE use of all fuels, whether renewable or fossil.
Status
Not open for further replies.

MGC67

New Member
Hearth Supporter
Oct 15, 2008
58
NW Ohio
Just purchased a Hearthstone Shelburne with the brown finish for 1500 plus tax. I would like to thank BeGreen for the suggestion, my wife and I are super happy. This will be a three week project with the hearth being project #1.

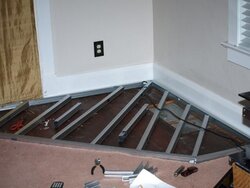
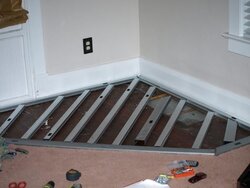
I need only 0.9 R value for the stove as stated in the manual, I want to frame it out with 2x4’s , laying them down flat as opposed to them being taller, thus a lesser air gap. ¾ inch OSB with 2 half inch layers of wonderboard. Topping this off will be porcelain tile. I would appreciate anyobodys opinion or comments. I will attempt to post pics as I go.

I originally wanted to use metal 2x4’s but I didn’t like spending 6 bucks for one length, is this a mistake on my part?

Thanks
-Mike
 
......I see that the 1 inch wonderboard will only give me about 0.4 R value, I may need a larger air space. I had also read about some hearth builds not screwing the

wonderboard or durock, just mortar so as to not having to worry about the skrews transfering heat?

I think I am getting gun shy about this.
 
Nice pics.....thank you,

what was your first layer that you used on the wood floor? How do you like the stove?
 
Directly on the floor is a layer of 1/4" Hardi-Backer board. It has a "softer" face, and I laid that directly against the face of the brand new flush hearth tile (this is the part where i go Hulk-Ra over having made a really nice hearth THE WEEK BEFORE and then being forced to cover it over. grr.) No fasteners - the hearth has to weigh over 200 lbs, and the stove is 500 more. It ain't going anywhere. There is 1/4" Wonderboard mortared to the Hardibacker, and then steel studs mortared to the Wonderboard. Man was it fun skil-sawing the steel studs. My inner metallurgist just loves the smell of burning steel a bit much. The top 1/2" layer of Wonderboard is mortared and screwed to the studs but I bet I didn't need those screws really. The tile on top is literally the cheapest ceramic floor tile known to man. 77 cents/sq.ft. i think they were at HD.

And if we decide we hate everything, we can rip it all out and there's no harm, no foul. Just sell the stove, lift off the hearth, and carry it outdoors. *poof* right back to where we started.

But at the moment OMFG we love this stove! :lol: After firing up at 5:45am, poking & setting the primary to almost full-off around 7:15, I came home at 5:15pm and if I'd really wanted to, I could have rebuilt from the few coals that were there. But A) I'm not on Survivor and B) I was running back out for a couple more hours. so I opted to run the heat (set it all the way up to 64) and planned to light it later. Then C) Woodstove Wife got home before I returned and started it up herself.
 
MGC67 said:
......I see that the 1 inch wonderboard will only give me about 0.4 R value, I may need a larger air space. I had also read about some hearth builds not screwing the

wonderboard or durock, just mortar so as to not having to worry about the skrews transfering heat?

I think I am getting gun shy about this.

Congratulations on the new stove. It's a beautiful heater.

2 layers of cement board will get you to R .52. The air space created by the flat laid 2x4s doesn't count as they are wood and combustible. Simplest thing would be to use 4 layers of durock or wonderboard as the tile underlayment. Screw it down as per the recommended intervals for a solid, stable foundation for the tile. Or put a layer of micore down with a layer of wonderboard on top of that and it's ready for tile. Or use metal studs or hat channel 12' OC as the sleepers for a couple layers of cement board and you are good to go.
 
I will be taking back the wood 2x4's and get the "hat channel" or "metal" studs. Can the 3/4" OSB still be used over the studs and under the 1" wonderboard to provide a more rigid structure?

thanks, mike
 
I'd consider OSB to be combustible (despite the pain in the @ss it is to ignite OSB...). I wouldn't use it. Orient your steel studs to line up with the feet of anything you're going to put on top of the hearth, and you'll find 2 mortared layers of Wonderboard between the steel and the tile to be more than sufficient.
 
I picked up some steel supports.... these look similar to the hat channel's BeGreen spoke of. I get almost an inch and three quarter air space, I also have them doubled onto themselves for

extra support. These havn't been secured yet. I'm gonna keep on grinding away today, more pics as I go.

Thanks guys!

Just finished sandwiching the wonderboard together with thinset and skrews, 2 one half sheets. The tile is just laying on the pad, just for fun till tomarow.
 

Attachments

  • PB131034.jpg
    PB131034.jpg
    40.1 KB · Views: 270
  • PB141037.jpg
    PB141037.jpg
    27.9 KB · Views: 237
I hope you spaced them a little closer together than the pic seems to show. And took into consideration the actual contact spots of the feet of your stove - those look like pretty big spans for just the wonderboard and tile to bridge...
 
Actually it looked more like this pic, I was laying it out kind of rough and got excited and had to post. I do notice that some of the cement board screws slightly protrude. After the thinset

is laid down, does that level the minor protrusions?
 

Attachments

  • PB141037.jpg
    PB141037.jpg
    27.9 KB · Views: 226
  • PB141036.jpg
    PB141036.jpg
    36.3 KB · Views: 232
Looks good, you'll have good support. No screws should protrude. If any screw heads stick up they will be a royal PITA. Your trowel will snag on them and they will push up the tile(s). You want a perfectly level surface for the tile.
 
I don't mind a slight protrusion of heads into the thinset bed. Yes they will snag the trowel to remind you of them but you keep going and when you bed the tile it will be fine so long as the screw isn't sticking way up. It is sometimes hard to countersink those special durock screws.

You were able to but the durock sheets together weren't you? And use the special tape and thinset to secure the joints?
 
Yes, the sheets were butted together, taped and mortar applied. I could have used more, I only had 1 gallon of pri-mix at the time.
 
Status
Not open for further replies.