New to wood stoves, have a few questions

  • Active since 1995, Hearth.com is THE place on the internet for free information and advice about wood stoves, pellet stoves and other energy saving equipment.

    We strive to provide opinions, articles, discussions and history related to Hearth Products and in a more general sense, energy issues.

    We promote the EFFICIENT, RESPONSIBLE, CLEAN and SAFE use of all fuels, whether renewable or fossil.
Status
Not open for further replies.

Timberwolf530

Member
Feb 12, 2014
38
Carmel, IN
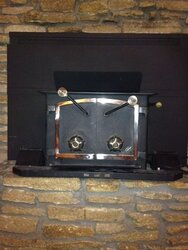
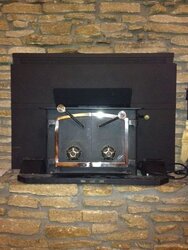
Hi everyone I have been looking around on here and have found a wealth of information on how to operate a wood stove. I just purchased a Fisher Honey Bear fireplace insert a couple weeks ago. It looked to be in good shape, not rusted too bad, all the parts are there (even the screen door), and everything works. I sanded it down and repainted it, and it looks pretty darn good. However, when I fired it up, I noticed that I could see a glow back where the outlet to the chimney is welded to the stove. It's not a huge gap, probably no more than 1/16th inch. Upon further inspection, I noticed that the top of the stove was warped back under the air channel, and this is what caused the weld to break. I take it to mean that the stove was overheated at some point by a previous owner. The fan on the stove pushes air from underneath through a channel that runs accross the bottom from front to back, up the back of the fire box, and out of the top half way to the front of the stove, so it pushes the air right past the outlet. So, I'm thinking that's not good for CO. I bought some Meeco's Red Devil furnace cement and coated the joint (I had to use an extra long screwdriver to spread it), and it seems to be holding, but my question is if this stuff is strong enough to be considered a permanent fix (it says it can withstand 3000 degrees), if it needs to be welded, or do I need to start looking for a new stove? I have smoke detectors, & have ordered a CO alarm. I never had a need for one before, because I have a heat pump.

Some general information about my setup: I have installed a 6" SS chimney liner covered with 1/2" insulation & a SS cap. Since the stove has a square outlet, I fabricated a plemun with a 6" round take off which I attached to the stove with sheet metal screws. All joints are sealed with furnace cement. My chimney is in the middle of my house, and is 13 ft high. It's pretty much a straight shot up with just a very slight bend to attache to the plenum. It has an excellent draft. When I start a new fire, I can see the smoke really getting sucked up the flu. Something that I pleased to see in comparison to the old open fireplace.

My second question is how to properly use the damper to control the fire. I have done searches, but can't find any topic devoted solely to damper use.
 
I'm going to move your thread up into the fisher room for best exposure to folks who know and love these things.

pen
 
Welcome to the forum;
The opening at flue outlet will allow the higher pressure of barometric air pressure to leak INTO the lower pressure chimney flue, so it's not a leakage factor into the home. The blower increases air pressure even more, as long as it's blowing INTO the plenum area and forced out at top. (like you describe)

Inserts were originally designed to sit in the hearth and vent directly into the existing chimney flue without a liner. They had to be sealed well around the front block-off plate to prevent air leaks into the flue which cooled the flue and prevented ALL intake air from going through the Insert. The insert also had to be slid out each time the chimney was cleaned to empty and clean behind it. You have eliminated all these problems and made a much better installation.

Did you take any pictures of the unit before installing so I'm sure of the model you have? Something like this?

Honey Bear Insert 1.JPG Honey Bear Insert Front.jpg

When doors are open in "Fireplace mode" with screen in place, the damper is the only control you have of the fire. With fire established, close it slowly until smoke starts to roll in at top, and open slightly to allow smoke to rise, yet retaining as much heat as possible. With doors closed, it is considered a radiant heater.
 
Thanks for the answer Coaly. I did take some pics (well my daughter did). The angled picture in my avatar is one of them - front view with doors removed.

Timberwolf Honey Bear 1.jpg Timberwolf Honey Bear 2.jpg
The size looks right on the pics you posted, but mine has solid doors, not glass, and the vent spinners are on the doors, not the side. I don't currently have any pics of the doors. I'll take a picture of it installed and post it tonight. Also, the hot air output in your picture looks to have a horizontal divider, where mine does not. There is a label on the right side (looking at the stove) that says Honey Bear on it. Did they make several variations of this model? I wish it did have the glass doors, otherwise I really like it. Oh, one more question. Did these stoves ever have a gasket for the doors. I tried to install one, but the doors wouldn't close correctly with it. We don't get any smoke into the house, so I guess it does ok without.
 
Last edited:
I fixed your pics. The adapter you made for connecting to chimney liner is called a "boot". They are available in cast iron, steel, or stainless. You did good.

Honey Bear started as a smaller pedestal type stove with glass or solid doors. They were made in a convertible model with a solid square pedestal that draws it's air through the floor and is certified for mobile home use. For conventional housing, there was a three sided pedestal to allow air in from the back. The pedestal was removable and could be used with 4 legs, but not in mobile homes in that configuration. They were also made with a single brass and glass door. The HB Insert is a downsized unit from the full size "Fisher Fireplace Insert" with no bear name given. They were available with glass and brass doors, or solid cast iron like yours. Only the glass doors used gasket material. Your door seal is the steel 1 inch channel iron that makes contact in three areas on the door and is considered air tight never requiring a gasket. (The larger opening across top was also used for zero clearance prefabricated fireplace installation)
Other Honey Bear models;

Honey Bear 1.jpg Honey Bear after 2.jpg

Honey Bear 2 12-2013.jpg MH Honey removable Ped. 4.JPG

The last one with single door was missing original legs and pedestal, so a member here used the cast iron accessory "bear legs" and etched his own glass.

They were also available painted with Metallic Brown. (Stove Bright brand still available)

Honey Bear eBay Ohio front.jpg Honey Bear Brown Pedestal Ohio.jpg


You can't add glass doors to yours since they had an air wash over the glass and had the side air inlets with no place on doors for vents.
Here's the air intake "slider" above and below doors for glass air wash; Notice the special tool on ash fender in brown bear pictures above.

Honey Bear top air closed.JPG Honey Bear lower air closed.JPG
 
Here's a couple of pictures of the stove installed. When I bought it, the whole stove was black (and rusty). As I started to sand, I noticed the brass on the doors. I just sanded the paint off and polished the brass up with the Dremel earlier this week. I'm pretty happy with the results. I still need to get some metal polish to put the final shine on it, but I'm very happy with the results. Should I paint the cast iron, or use stove black on it?
 

Attachments

  • Stove 3.JPG
    Stove 3.JPG
    47.6 KB · Views: 280
  • Stove 4.JPG
    Stove 4.JPG
    38.7 KB · Views: 310
  • Stove 5.JPG
    Stove 5.JPG
    54.8 KB · Views: 308
Paint ! Stove Bright Satin Black looks the best against the polished brass.
Stove black needs to be redone from time to time and makes a mess.

You would be amazed how many people have messaged me after buying a black stove wanting tips cleaning it up. I tell them to try lacquer thinner first to see if there's any brass or nickel under the paint. People get lazy and instead of simply polishing, they paint right over the whole stove. Then they get tired of looking at this big black thing and want it gone. That's what happened with my Honey Bear pedestal too. You may have solid brass draft caps on that one as well. Amazing.
 
First, Thanks for all your help. Your knowledge on these stoves is incredible. Yes, the caps are solid brass, but I'm debating on whether or not to leave the just the vanes polished. I kind of like that look. I do wish the center caps were brass too. They're not on in the picture, but they're just standard steel. I may have them plated. I have a buddy who has a machine shop, and I'm going to have him fab a baffle for me. I've already made a cardboard template to make sure I could fit it in the stove when completed. I have it coming about half way to the front of the stove (about 12 in), and made sure I have a 2 inch gap at the top (36 sq in). Is that about right on the length, or should I make it longer. Obviously, to get it to fit, I'm going to have a gap of approximately 3/8" on the sides, and was thinking of having it made with a slider, so once it's installed, I could slide it out flush with the sides. Is that a good idea, or should I just not worry about the gap?
 
That's about the right size baffle, and the side clearance is fine.

Here's what a new brass draft cap looks like unpainted. Cheesy.

Solid Brass before and after.JPG

I could tell they were solid by the thickness of the fins. Here's the newer plated type. They are MUCH lighter weight with rounded edges.

Brass Plated Draft Caps.JPG

I think you'll like the center cover better black. Here's plated bolts; not original

Plated Hardware Finest Fishers.JPG Insert Nickel Napa 9.jpg


insert w bottom blower 8.jpg Original
 
Status
Not open for further replies.