Finally purchased a digital camera for posting and selling on the internet. You are the innocent victims of my first attempt at posting photos.
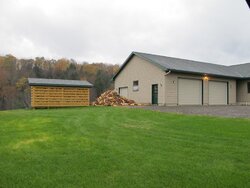
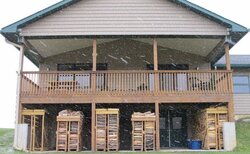
Started construction of this shed in June(?) and finished in mid-September. My goal was to have it store four cords of 16" splits, be close to the garage, last a million years, have southeast exposure, ventilated on bottom and all sides, and look like a piece of outdoor furniture belonging to the house.
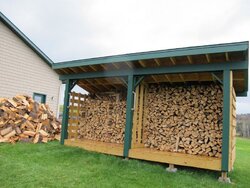
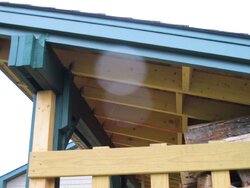
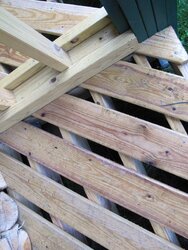
Inside dimensions are 16' wide, 66" front to back, approx. 66 1/2" high in the back, and approx. 7' high in front. All lumber exposed to the elements is "treated". A "Light Natural" Sekkins semi-transparent stain was applied one month after construction. Roof is 1-in-3 pitch and constructed with 5/8" Advanteck T&G sheathing secured with 8d galvanized ring shank nails. It is covered with a double overlap (needed for low pitch of roof) of #30 roofers' felt and 50 year Architectural grade shingles which match the house.
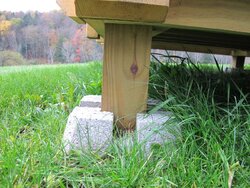
Except for the roof sheathing, all fasteners are screws designed for treated lumber. The short vertical posts are treated 4" x 4" lumber. The cut-to-fit rafters are 2"x6" lumber 16" o.c. with mid-position bracing the entire width of the roof. Hurricane ties secure all rafters at front and back. The siding and flooring are 5/4" x 6" bull nosed treated decking. The sub-structure beneath the diagonal flooring is treated 2" x 8" lumber. This sub-structure is too difficult to explain and I didn't have the digital camera during construction. Rear header is 3 ea. 2" x 6" lumber with 1/2" plywood sandwich. Front header is 2" x 8" lumber with 1/2" plywood sandwich. Roof overhang is 18" in front and 12" at sides and rear.
My legs have a walking handicap so the grab railings allow me to get on the platform. Noticed my friends who do not have a walking handicap also enjoy using the rails.
Construction was a lot of work and I had to call upon some friends for help during various phases of the project. Total cost of finished construction was about $1,500.
Now, all I need do is re-split and move all this maple into the shed so it will be ready for the 2011/2012 burning season.")
John_M
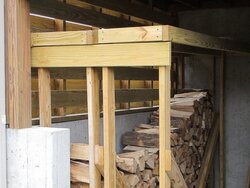
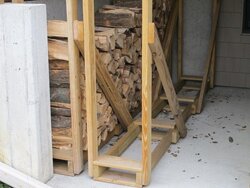
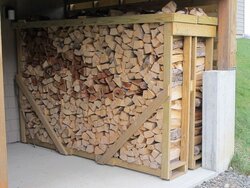
PS: I have added a photo of the "down back" racks mentioned in one of the posts below. Will also start a new thread about the outside and inside racks I am using. Weatherguy and others might pick up an idea or two.
Started construction of this shed in June(?) and finished in mid-September. My goal was to have it store four cords of 16" splits, be close to the garage, last a million years, have southeast exposure, ventilated on bottom and all sides, and look like a piece of outdoor furniture belonging to the house.
Inside dimensions are 16' wide, 66" front to back, approx. 66 1/2" high in the back, and approx. 7' high in front. All lumber exposed to the elements is "treated". A "Light Natural" Sekkins semi-transparent stain was applied one month after construction. Roof is 1-in-3 pitch and constructed with 5/8" Advanteck T&G sheathing secured with 8d galvanized ring shank nails. It is covered with a double overlap (needed for low pitch of roof) of #30 roofers' felt and 50 year Architectural grade shingles which match the house.
Except for the roof sheathing, all fasteners are screws designed for treated lumber. The short vertical posts are treated 4" x 4" lumber. The cut-to-fit rafters are 2"x6" lumber 16" o.c. with mid-position bracing the entire width of the roof. Hurricane ties secure all rafters at front and back. The siding and flooring are 5/4" x 6" bull nosed treated decking. The sub-structure beneath the diagonal flooring is treated 2" x 8" lumber. This sub-structure is too difficult to explain and I didn't have the digital camera during construction. Rear header is 3 ea. 2" x 6" lumber with 1/2" plywood sandwich. Front header is 2" x 8" lumber with 1/2" plywood sandwich. Roof overhang is 18" in front and 12" at sides and rear.
My legs have a walking handicap so the grab railings allow me to get on the platform. Noticed my friends who do not have a walking handicap also enjoy using the rails.
Construction was a lot of work and I had to call upon some friends for help during various phases of the project. Total cost of finished construction was about $1,500.
Now, all I need do is re-split and move all this maple into the shed so it will be ready for the 2011/2012 burning season.
John_M
PS: I have added a photo of the "down back" racks mentioned in one of the posts below. Will also start a new thread about the outside and inside racks I am using. Weatherguy and others might pick up an idea or two.