Newbie looking for install picture forums...diy pellet floor protector

  • Active since 1995, Hearth.com is THE place on the internet for free information and advice about wood stoves, pellet stoves and other energy saving equipment.

    We strive to provide opinions, articles, discussions and history related to Hearth Products and in a more general sense, energy issues.

    We promote the EFFICIENT, RESPONSIBLE, CLEAN and SAFE use of all fuels, whether renewable or fossil.

Newbie looking for install picture forums...diy pellet floor protector

  • Install

    Votes: 1 33.3%
  • Floor protector

    Votes: 2 66.7%

  • Total voters
    3
Status
Not open for further replies.

zrtmatos

Feeling the Heat
Nov 26, 2012
352
Connecticut
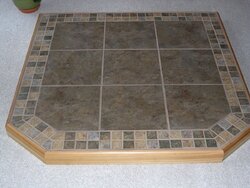
I am new to this forum but have looked before to find how to's and diy on building floor protection for a pellet stove, in my case a Lopi Leyden (2008 model). ;? I am unable to find a good forum with pics on making up a hearth floor protector and the install through a wall. o_O

Can someone steer me to it? ;?

By the way, I love this forum!!! :)
 
SCAS, do you have any build pics of how you put that together?

Smoke Show , any particular forum you know of or any search criteria to use?
 
Thanks TheMightyMoe. Nice install and pics. :cool:

Exactly what I was looking for. So no plywood base needed? ;? Just 1/2 inch ( I assume) backerboard/durock with tile affixed with adhesive? No problem with it cracking when you moved it into place? ;?
 
How did you attach the wood trim? I missed that part in your install.
 
Just finished our hearth pad last night. Didn't take any build pics, but attached a photo if it helps you get a general idea. Basically a 40"x40" square with corners cut off. Used 2"x2" 's for main outline and internal bracing; half-inch OSB screwed to top of that, and finally half-inch cement board on top of the OSB. All the 2"x2", and OSB was glued and screwed; used layer of thin set between OSB and cement board; then tiled away. Border is cedar with a natural stain, and top coated with 3 coats water base satin. You will want to use special coated screws on the cement board so they don't corrode. Rented a tile saw from local hardware store. I'm a total amateur...just comfortable with hand and power tools...if I can do it, anyone can do it. Post pics when you get yours done.
 

Attachments

  • DSCN2957.JPG
    DSCN2957.JPG
    176.4 KB · Views: 161
Just finished our hearth pad last night. Didn't take any build pics, but attached a photo if it helps you get a general idea. Basically a 40"x40" square with corners cut off. Used 2"x2" 's for main outline and internal bracing; half-inch OSB screwed to top of that, and finally half-inch cement board on top of the OSB. All the 2"x2", and OSB was glued and screwed; used layer of thin set between OSB and cement board; then tiled away. Border is cedar with a natural stain, and top coated with 3 coats water base satin. You will want to use special coated screws on the cement board so they don't corrode. Rented a tile saw from local hardware store. I'm a total amateur...just comfortable with hand and power tools...if I can do it, anyone can do it. Post pics when you get yours done.

That came out great, hard to believe it is not a commercial piece in a store! Thanks for the input, yes, I will post pics later on.
 
Somewhere I had seen someone tale outdoor patio pavers, and backed them with rubber as to not scratch the floor, and made an interesting hearth.
 
Status
Not open for further replies.