
I joined Hearth.com this year and got a lot of great advice on buying a new stove. What made my particular porject challenging was that my stove was going into a small dining room and it would be a hearth mount installation. Accordingly, i purchased a demo unit from the Hearthstone factory sale for a steep discount that fits nearly perfect in my fireplace. The biggest problem was clearance to a combustible mantel. See below.

This photo was actually taken before i purchased the house, but depicts the original design. So the first job was to (sadly) dismantle the mantel and replace the drywall behind it with hardi backer (non combustible ) material. One particular feature i wanted was to allow for outside air to infiltrate near the stove, thus preventing or reducing cold floors. So i installed a dryer vent conduit through the wall.

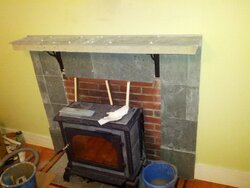
With all of the drywall removed and replaced, i needed to prepare the mounting surface for thinset and tile (vermont slate). As you can see in the photo above, i stacked three layers of backer board to allow the bottom tile to have a dead space behind it which would allow for outside air to enter the room. The photo below shows the finished state. The bottom extruded tile also adds a nice grounding feel to the mantel surround.

With the sides of the mantel all but finished, i had to make a decision as to whether or not to include a mantel shelf. Per Hearthstone's requirements, if it was to be combustible with a shield, it would have been located more than halfway up to the wall to the ceiling. Not ideal. I researched for a long time on how to build a non combustible mantel shelf and it seems like almost everyone just has a piece of granite or other stone cut and mounted. I wanted something with more depth and boldness, not to mentioned more affordable. So i set out to build a shelf, made out of cement board and reinforced with steel. I couldn't find much in the way of how to actually do this, so i hope this helps.
I purchase wrought iron brackets from an online retailer to build a strong base. These brackets are lag bolted to the studs behind. I then cut out a long piece of cement board that would be reinforced by 1/8" angle iron on both the wall side and the room side of the shelf. See below.

Top View:

Instead of wasting cement board filling in the cavity between the angle irons, i tediously filled the cavity with smaller cutouts of cement board and screwed it all tight.

Finally i capped it with a large piece of cement board. I also had to cover the front side with cement board in order to provide a suitable surface to thinset tile on to.

With all the cement board tight, i cut tiles and thinset them on the mantel shelf:

With the new, non combustible fireplace mantel complete, i ventured down the road of making a custom hearthpad extension that matches the nice cherry floor trim pattern with matching slate tile. This hearthpad was another project that i may post.

The finished product! Hope this post helps someone out there. I know it certainly would have helped me!!
This photo was actually taken before i purchased the house, but depicts the original design. So the first job was to (sadly) dismantle the mantel and replace the drywall behind it with hardi backer (non combustible ) material. One particular feature i wanted was to allow for outside air to infiltrate near the stove, thus preventing or reducing cold floors. So i installed a dryer vent conduit through the wall.
With all of the drywall removed and replaced, i needed to prepare the mounting surface for thinset and tile (vermont slate). As you can see in the photo above, i stacked three layers of backer board to allow the bottom tile to have a dead space behind it which would allow for outside air to enter the room. The photo below shows the finished state. The bottom extruded tile also adds a nice grounding feel to the mantel surround.
With the sides of the mantel all but finished, i had to make a decision as to whether or not to include a mantel shelf. Per Hearthstone's requirements, if it was to be combustible with a shield, it would have been located more than halfway up to the wall to the ceiling. Not ideal. I researched for a long time on how to build a non combustible mantel shelf and it seems like almost everyone just has a piece of granite or other stone cut and mounted. I wanted something with more depth and boldness, not to mentioned more affordable. So i set out to build a shelf, made out of cement board and reinforced with steel. I couldn't find much in the way of how to actually do this, so i hope this helps.
I purchase wrought iron brackets from an online retailer to build a strong base. These brackets are lag bolted to the studs behind. I then cut out a long piece of cement board that would be reinforced by 1/8" angle iron on both the wall side and the room side of the shelf. See below.
Top View:
Instead of wasting cement board filling in the cavity between the angle irons, i tediously filled the cavity with smaller cutouts of cement board and screwed it all tight.
Finally i capped it with a large piece of cement board. I also had to cover the front side with cement board in order to provide a suitable surface to thinset tile on to.
With all the cement board tight, i cut tiles and thinset them on the mantel shelf:
With the new, non combustible fireplace mantel complete, i ventured down the road of making a custom hearthpad extension that matches the nice cherry floor trim pattern with matching slate tile. This hearthpad was another project that i may post.
The finished product! Hope this post helps someone out there. I know it certainly would have helped me!!
Attachments
Last edited by a moderator:

") I saw a video the other day of the new Ideal Steel from woodstock and it made me jealous of the secondary burn that my stove cant touch.
I saw a video the other day of the new Ideal Steel from woodstock and it made me jealous of the secondary burn that my stove cant touch.