Active since 1995, Hearth.com is THE place on the internet for free information and advice about wood stoves, pellet stoves and other energy saving equipment.
We strive to provide opinions, articles, discussions and history related to Hearth Products and in a more general sense, energy issues.
We promote the EFFICIENT, RESPONSIBLE, CLEAN and SAFE use of all fuels, whether renewable or fossil.
I've gotten some sort of summer flu, so I've been out of commission the last couple of days..... No grouting, or anything else going on.
I think it will take the right kind of morning to fire this puppy up. Just recently it cooled, but until this week we'd been flirting with 100 degree temperatures.... Terrible. As soon as I get it going though, you guys will be the first to know. This entire site has been a wonderful resource, from the stove, liner, wood, and even chainsaw knowledge that I've been able to pick up.
Ok, so I'm getting ready to finish this puppy up.... but questions remain, so help would be appreciated.
First, I've read a lot of posts about not running single wall pipe through any wall. My question is, if I use steel studs, then hardibacker and tile to close in my fireplace surround will I be ok? I don't think there are any combustable materials there right?
I've also read of this micore stuff and would this be a better option then the hardibacker?
Let me know if I've lost it sending a single wall pipe through this wall.
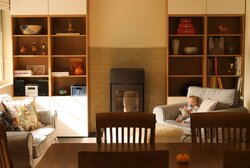
Final product attached below... Almost. Just need to caulk the edges, and get something to put over the stove.
Thanks for all of your help guys, I would have been lost without this forum. Thanks to you, I was able to install the entire thing myself, and I'm convinced, do a better job then any professional install.
What a great site this is. It really gave me the confidence to do it myself, and now I'm warm and toasty..... I don't even want to look at what date I started this thread originally though, it might just depress me......
This site uses cookies to help personalise content, tailor your experience and to keep you logged in if you register.
By continuing to use this site, you are consenting to our use of cookies.