Old Brick Chimney - Line It? Fix It? Abandon It?

  • Active since 1995, Hearth.com is THE place on the internet for free information and advice about wood stoves, pellet stoves and other energy saving equipment.

    We strive to provide opinions, articles, discussions and history related to Hearth Products and in a more general sense, energy issues.

    We promote the EFFICIENT, RESPONSIBLE, CLEAN and SAFE use of all fuels, whether renewable or fossil.
Status
Not open for further replies.

IrishCowboy

New Member
Feb 9, 2016
7
Northeast Indiana
Greetings, wood burning enthusiasts! I've been learning from this website and the knowledgeable people on it for years, but haven't had the impulsion to join and post anything until now. I'll try to keep this relatively short, but I always tend to err on the side of more information, rather than less.

My wife and I (and a whole bunch of kids) live in a 2200 sq. ft. "old farmhouse" in northeast Indiana. It's a 2-story house that was built in stages, with each stage a generation or two after the previous. The oldest part was built around 1860, so it's one of the older homes in Whitley County, I'd imagine. At some point in the past, someone blew in insulation from the outside, and it was done fairly well. As part of a major renovation in 2011 (right after we bought it), we gutted the inside and filled in where the insulation had settled and left air pockets. So it's pretty well insulated for what it is. The windows were all replaced with Andersen new-construction windows a couple of years ago.

We added an insert into an existing fireplace about 2 years ago, a Harman 300i. Other than the junk fans that came with it (I warrantied 3 of them in a year before replacing them with aftermarket), it's been good for us, and we have no complaints. The location of the insert in the house is not ideal for maximum heat distribution, however, and needing the fans is a drag when the power goes out. Motivated by a desire to have more reliable heat (with or without power) in a more central location in the house and the ability to cook when there's no power, we're planning to get a Progress Hybrid soon.

There's an old brick chimney that goes from the crawl space that's under most of the house, through the interior of the home, and all the way up through a second story roof. I don't know when the chimney was put in, though its placement suggests it was possibly an exterior chimney until the kitchen was put on. I'd date it somewhere between 80-100 years old, unless it's been redone (which is possible). I was up on the roof yesterday to take the attached pictures. The chimney is about 16 x 22 inches, exterior dimensions, and has what appears to be an 8 x 12 clay liner (6.5 x 10.5 interior dimensions). Judging from what I saw when looking down (and looking at the photo afterwards), the liner looks like it's probably cracked in places, but not in terrible shape. Further likely evidence of cracks/infiltration is the presence of water staining along the upstairs ceiling/wall junction adjacent to the chimney after heavy rains, this despite a brand new roof 3 years ago.

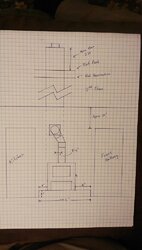
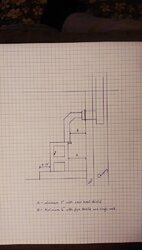
I don't know what was burned into that chimney over the years, but it has 2 round holes that have been cemented in. One hole is in a small cellar that only exists under 2 rooms and houses the propane furnace and water appliances. There may have been an oil burner down there at one point. The other hole is in the dining room on the first floor, about waist high (now behind drywall). Our plan is to build a hearth (with appropriate non-combustible flooring and shielded clearance to the wall) where the blue tape is located in a couple of the attached photos of the dining room. Since the highest plugged hole (that we know of) is waist high or so (just above the wainscoting), we figure we could join the existing chimney about head high or so to maintain clearance to the roughly 8.5 foot ceiling.

Of course, this depends on the chimney being usable. I figure an insulated stainless steel 6-inch liner is pretty much a given, assuming the chimney itself can be trusted. I plan to have 2 or 3 certified chimney sweeps/masons have a look at the chimney and give me opinions and quotes. But I thought I'd show my problem to you folks and get your opinions, too. I have closeup photos of the top, south, east, and west sides, as well as a zoomed-out shot of the north face. Is there anything that stands out to any of you? Red flags, alarm bells? The alternate (and less desirable for several reasons) placement would be on the far wall of the dining room visible in the one photo. That would involve running new stovepipe up through 2 ceilings and a roof. Because of where that would come out upstairs and on the roofline, I'd rather not do it, especially if the existing chimney can be lined and re-purposed.

So, what do you think? I welcome any and all opinions about any stage of the above. Thanks!

IMAG0582.jpg IMAG0583.jpg IMAG0584.jpg IMAG0586.jpg IMAG0589.jpg IMAG0590.jpg IMAG0591.jpg IMAG0594.jpg IMAG0596.jpg
 
From your pics i would say the liners are deteriorated pretty badly and it should be lined. I would also bet that chimney does not have the required 2" of space from the outside of the chimney to any combustible materials which means you liner needs to be insulated. To insulate you have a couple options. You do not have room to put in a 6" round liner with insulation with those old liners in there so you can either have the old liners removed which is typically what we do. Or use an oval liner with comparable volume to that 6" round. You can either get an oval liner and insulate it or get one of several preinsulated options. The chimney itself does not look to bad at all It looks like there are a few spots that should be repointed but it is worth saving in my opinion.
 
I think I would have a mason inspect that. If you look at the rear picture it looks like there's a crack that weaves its way all the way from the top to at least two thirds of the way down. Looks like there are four or five bricks cracked or broken along the way.

All that goop confirms that water leakage has been a problem and will probably return if the whole thing isn't checked out and fixed properly. I question whether the flashing is high enough on the backside of the chimney. Your roof looks relatively recent so I'm surprised the roofing company didn't recommend putting a cricket behind it to prevent snow and ice build-up.
 
From your pics i would say the liners are deteriorated pretty badly and it should be lined. I would also bet that chimney does not have the required 2" of space from the outside of the chimney to any combustible materials which means you liner needs to be insulated. To insulate you have a couple options. You do not have room to put in a 6" round liner with insulation with those old liners in there so you can either have the old liners removed which is typically what we do. Or use an oval liner with comparable volume to that 6" round. You can either get an oval liner and insulate it or get one of several preinsulated options. The chimney itself does not look to bad at all It looks like there are a few spots that should be repointed but it is worth saving in my opinion.
Yep, I figured a new liner was probably necessary. I assumed I'd have to go with an oval one to get the insulated 6-inch equivalent down the shaft. Removing the old clay liners sounds like a very difficult job. I wouldn't have thought that even possible without tearing the chimney down. But it sounds like it's something you do a lot. How involved/expensive is it?

I think I would have a mason inspect that. If you look at the rear picture it looks like there's a crack that weaves its way all the way from the top to at least two thirds of the way down. Looks like there are four or five bricks cracked or broken along the way.

All that goop confirms that water leakage has been a problem and will probably return if the whole thing isn't checked out and fixed properly. I question whether the flashing is high enough on the backside of the chimney. Your roof looks relatively recent so I'm surprised the roofing company didn't recommend putting a cricket behind it to prevent snow and ice build-up.
I saw the crack you're talking about. I assumed that was 2 or 3 separate cracks, but I can see how they might be the same one moving laterally in places. The roof is only about 3 years old. It was put on by a local Amish crew, and they did a really good job in most places. I remember them talking about what to do on the high side of the chimney. They may have mentioned a cricket, though I didn't know what that was at the time. I think they decided with the pitch of the roof in that spot (about 10/12) and how close it is to the peak they either couldn't or didn't need to put one in. The chimney is only about 21" or 22" wide, so perhaps they figured it would be alright. It's something I can probably install or see if the mason/sweep is capable and can quote that as part of the process.
 
Removing the old clay liners sounds like a very difficult job. I wouldn't have thought that even possible without tearing the chimney down. But it sounds like it's something you do a lot. How involved/expensive is it?
We do it prety often when it makes sense it usually adds about $200 to $250 to the cost of a liner
 
Removing the old clay liners sounds like a very difficult job. I wouldn't have thought that even possible without tearing the chimney down.
Most of the old guys I worked around didn't mortar the liners but stacked them and bricked tight to them. That way the liner can expand and contract without breaking. When I took the top liner off my chimney ti put on the copper the cap I made, it slid right out.
 
Most of the old guys I worked around didn't mortar the liners but stacked them and bricked tight to them. That way the liner can expand and contract without breaking. When I took the top liner off my chimney ti put on the copper the cap I made, it slid right out.
Well that is wrong in several ways. First if there is no mortar between them there is nothing to keep the flue gasses in the liner and if it is bricked tight then the liner cannot expand and could possibly damage the chimney structure. It also means those liners would not be installed to code which requires mortar ans space around those tiles.
 
Thanks very much for the responses so far. I'll have some sweeps/masons come and give me opinions and quotes on relining. I'll plan to go with an insulated liner, probably an oval 6-inch equivalent either pre-insulated or insulated with wrap unless one of them can convince me it's mechanically and economically more sensible to bust out the clay liner. I think I'd prefer rigid if it will fit. It's a straight shot down, so as long as mortar doesn't get in the way, we should be alright. I'll have them quote the necessary repair/re-point/re-flash efforts at that time.

Now I have another question. Looking at the interior photos of the dining room wall (with the blue tape on it), what are my options for entering the chimney, and which option(s) would you all recommend? I plan to use a rear shield and pipe shield on the Progress Hybrid to reduce the required clearances to 8" (or is it 7"?). With that in mind, I don't plan to brick up that wall with a 1-inch air gap or anything. Since the chimney is only about 21" or 22" wide, I won't have 18" to combustibles on either side of where the stovepipe enters the chimney (thimble?). Is there a specific device I need to use in that situation? I'm thinking of something resembling a ceiling box where the stovepipe transitions to double-wall or whatever and there's a box around it to protect the ceiling. Is there something similar for the wall around the chimney entry point? I'm thinking of putting it (whatever it is) about even with the top of the door there, which would give approximately 24" from the topmost part of the stovepipe to the ceiling.
 
Well that is wrong in several ways. First if there is no mortar between them there is nothing to keep the flue gasses in the liner and if it is bricked tight then the liner cannot expand and could possibly damage the chimney structure. It also means those liners would not be installed to code which requires mortar ans space around those tiles.
First off, these guys made their living doing this. Actual tradesmen. If they half assed it like today they'd never get another job. The clay sits flush and square one on another, any gaps are so small smoke and soot fill them in as well as sealed by expansion of the clay. The brick sits more snug than right tight to the liner keeping them plumb and square. Both houses I've had were done like this and even small vertical cracks don't shift after 50 years of use. But that's just what I saw working and being around it my whole life. Who am I to argue with an expert. Not butt hurt, just a little pissed at your snide attitude. Sorry to OP for hijacking the post.
 
First off, these guys made their living doing this. Actual tradesmen. If they half assed it like today they'd never get another job. The clay sits flush and square one on another, any gaps are so small smoke and soot fill them in as well as sealed by expansion of the clay. The brick sits more snug than right tight to the liner keeping them plumb and square. Both houses I've had were done like this and even small vertical cracks don't shift after 50 years of use. But that's just what I saw working and being around it my whole life. Who am I to argue with an expert. Not butt hurt, just a little pissed at your snide attitude. Sorry to OP for hijacking the post.
Well I apologize for the tone of my comment but I also make my living at this and am an actual tradesman. And the way they built that chimney is not to code period. At the time they where building these there may have been no code requiring they do it otherwise but codes where applied because the way many masons where doing it was not safe. As far as your comment about stuff being half assed today there are just as many good contractors working now as there where then the only difference is that the bad ones are required to follow code at a minimum so while it can still be crappy work it atleast needs to meet a minimum standard.
 
First off, these guys made their living doing this. Actual tradesmen. If they half assed it like today they'd never get another job. The clay sits flush and square one on another, any gaps are so small smoke and soot fill them in as well as sealed by expansion of the clay. The brick sits more snug than right tight to the liner keeping them plumb and square. Both houses I've had were done like this and even small vertical cracks don't shift after 50 years of use. But that's just what I saw working and being around it my whole life. Who am I to argue with an expert. Not butt hurt, just a little pissed at your snide attitude. Sorry to OP for hijacking the post.

I correct folks often that tell me that they are right because they've been doing it that way for 30 years! It just means they've been doing it wrong for 30 years. You don't know what you don't know and ignorance is bliss. This is why we have codes, permits, and inspections.
 
Hi, again, everyone. I picked up our Progress Hybrid from the ABF freight yard this morning, so it seems like a good time to give an update on where things stand with this project and ask for a sanity check on our current plan. I've drawn up some detailed sketches (see photos) of a front-view and side-view of the location in our dining room where we're planning to put the stove. I'm also hiring a local brick mason to do chimney repairs up top. He'll redo the flashing, do a 100 percent grind and tuck, and pour a new flat cap with a drip edge.

Given the size of the flue and the need to insulate the liner, we're planning to use rigid pre-insulated DuraLiner. In the room, we're thinking of going with DVL for reduced clearance without the need for a pipe shield. I've assembled a parts list of what I think we need, both for the in-room hookup and for the chimney. I have a few questions for the experts:

1.) From looking at the drawings of the DuraLiner wall pass-through, it looks like it protrudes 12" into the room before I even attach the 90-degree elbow. Is this right? Is there any way to reduce this? Is it possible to use a different brand of wall pass-through and still mate correctly with DuraLiner and DVL? With the DVL, I think I can get both A (with a rear heat shield) and B in the side-view drawing below 12", and I'd like to do so, if possible.

2.) Is anything required at the top besides the liner cap extender kit I have listed?

3.) Can anyone think of a better way to make the 5-6" offset work out more cleanly than what I have depicted in the drawing? I was thinking of having the 90 elbow turned counterclockwise 45 degrees from down to meet up with the 45 elbow. I can afford a little left or right play to make that happen without a short connector piece between them, I think. Is any sort of coupler required to make a 45 mate directly to a 90?

4.) What are your opinions on getting a damper in the stove adapter? Good idea or bad? I think I'll have at least 20' of liner in the chimney.

I think that's it. Here's the prospective parts list and where I found them:

DVL:
1 x 6DVL-ADWD DVL Adapter/Damper Section - 8679
OR 6DVL-AD DVL Adapter Section - No Damper - 8680
1 x 6DVL-46TA DVL Telescoping length 29-48" - 8646
1 x 6DVL-E45 DVL Double-Wall Black 45 Degree Elbow - 8645
1 x 6DVL-E90 DVL Double-Wall Black 90 Degree Elbow - 8690

DuraLiner:
1 x 6DLR-WPT DuraLiner Wall Pass Through - 4644
1 x 6DLR-OTRB DuraLiner Oval Tee With Round Branch With Cap - 4667-O
1 x Insulation (if necessary) for the Tee
5 x 6DLR-48O DuraLiner Oval Rigid Pipe 48" - 4648-OP
1 x 6DLR-24O (If necessary) DuraLiner Oval Rigid Pipe 24" - 4624-OP
1 x 6DLR-KXC20 DuraLiner Extend-A-Cap Kit (oval 13 x 20) - 4688-O

Links:
DVL: http://www.woodstovepro.com/store/Chimney-Pipe-Venting-Pipe/Wood-All-Fuel-Piping/6-inch/DVL-c160/
DuraLiner: http://www.woodstovepro.com/store/C...e/Wood-All-Fuel-Piping/6-inch/DuraLiner-c180/
Installation Manual: http://www.duravent.com/docs/product/L402_W.pdf

Alternate Wall Pass Through:
Rockford Chimney: https://www.rockfordchimneysupply.com/insulated-chimney-thimble-rigid-pipe-connection.php
Installation Instructions: https://www.rockfordchimneysupply.com/PDF/insulated-wall-thimble-instructions.pdf

Thanks!
Luke
 

Attachments

  • IMAG0614.jpg
    IMAG0614.jpg
    83.1 KB · Views: 268
  • IMAG0616.jpg
    IMAG0616.jpg
    81.3 KB · Views: 305
Last edited:
Status
Not open for further replies.