Olso F500 - Installation pics

  • Active since 1995, Hearth.com is THE place on the internet for free information and advice about wood stoves, pellet stoves and other energy saving equipment.

    We strive to provide opinions, articles, discussions and history related to Hearth Products and in a more general sense, energy issues.

    We promote the EFFICIENT, RESPONSIBLE, CLEAN and SAFE use of all fuels, whether renewable or fossil.
Status
Not open for further replies.
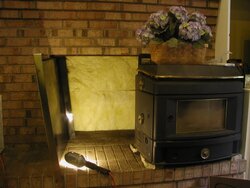
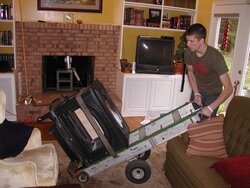
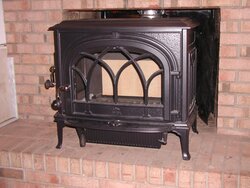
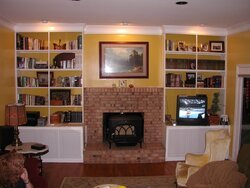
My Olso is now installed and made the first break-in fire. Just wanted share some pics of the project.

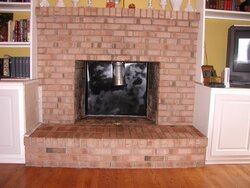
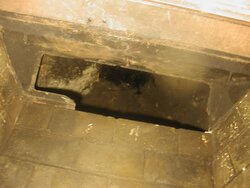
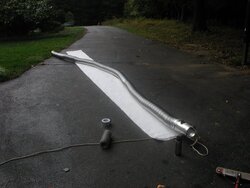
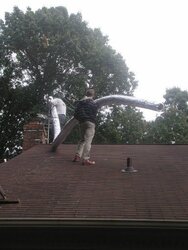
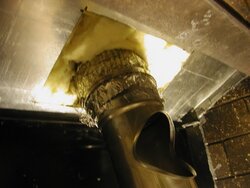
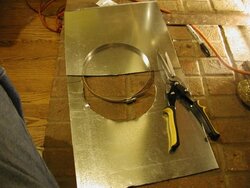
First, I prepared the fireplace by widening the smoke damper opening by breaking the back part. Then I insulated the back and installed a heat shield. Then put a 25' x 6" SS 316T flex liner in with a T at the bottom. The spray adhesive for the liner insulation is nasty stuff to get on your hands. I recommend using latex gloves. Because it is unavoidable that you are going to be touching this when you wrap the liner.
 

Attachments

  • Insulating back of fireplace.jpg
    Insulating back of fireplace.jpg
    40.8 KB · Views: 756
  • back heat shield.jpg
    back heat shield.jpg
    48.2 KB · Views: 771
  • Smoke damper frame.jpg
    Smoke damper frame.jpg
    33.9 KB · Views: 733
  • liner insulation.jpg
    liner insulation.jpg
    36.3 KB · Views: 751
  • Chimney Liner on roof.jpg
    Chimney Liner on roof.jpg
    35.7 KB · Views: 740
  • Fireplace blockoff plate w liner T.jpg
    Fireplace blockoff plate w liner T.jpg
    35.2 KB · Views: 896
Next the sons brought the stove in on a cart we borrowed from the dealer. Rolled it up a ramp (I had made for wheelchair access) on to the hearth. Installed the baffle plate and top of the stove and now its connected. A tip the dealer gave me was to put squares of sheet metal under each foot so to make easy to slide the stove on the hearth during installation. Oh, I also made a fireplace block off. Used the pipe clamp as a guide to cut the circle for the block off.

I did make a hearth extension that I have a picture of, but it is still in the camera. So the advice and research on this forum helped inform and inspire me to do-it-myself in what I consider a fairly professional installation. Thanks for the advice and encouragement.
 

Attachments

  • Stove coming in.jpg
    Stove coming in.jpg
    55.4 KB · Views: 744
  • Olso set on hearth.jpg
    Olso set on hearth.jpg
    44.8 KB · Views: 740
  • Fireplace blockoff plate w liner T.jpg
    Fireplace blockoff plate w liner T.jpg
    35.2 KB · Views: 720
  • cutting block off plate.jpg
    cutting block off plate.jpg
    43.9 KB · Views: 743
  • Oslo installed closein.jpg
    Oslo installed closein.jpg
    51 KB · Views: 754
  • Olso installed wide shot.jpg
    Olso installed wide shot.jpg
    48.1 KB · Views: 751
Sweet install! Wanna come to my house to do the same thing now that you have the experience? :)

Shari
 
"Wanna come to my house to do the same thing now that you have the experience?

I thought it was fun doing it for my house, but not might be as much fun a second time. ;-)

Actually, this was a much better install than my first one 20 years ago. Direct connect of 6 foot oval flex into the masonry clay lined chimney. Just wanted to get the stove fired up as it was in November and wanted the heat.
 
In my 'dreams' I would love an Oslo so bear with me with my questions.

I see you got a Tee in there. How deep is your hearth and how far out does your stove sit from the brick on your fireplace face? Can you reach the Tee for cleaning purposes? (Can you tell that in my 'dreams' I would have an Oslo installed with a Tee so I could do 'bottom-up' cleaning?)

Shari
 
Shari,

The fireplace is 19" deep after I installed the 3.5" insulation and heat shield in the back. The hearth is 20", there is about 3.5" of hearth in front of the stove. I have installed a 18" hearth extension in front of the hearth made of four 18"x18" ceramic tiles mounted on 3/4" plywood. This met with approval from the code inspector. It is mainly for ember protection. The side door is accessible for loading the wood.

I have 6" of clearance on the side of the stove. I can get one arm behind the stove. I figure that will be enough to pull off the clean out cap and figure a way to get a bag to catch the black stuff from the sweep.

The chimney cleaning job will be much easier than my old stove, which I had to disconnect, roll out of the way, and pull out my direct connect block off plate and 6 foot flue. So yeah, after 18 years of that, this new system will be a dream! :)

GE
 
Shari said:
In my 'dreams' I would love an Oslo so bear with me with my questions.

I see you got a Tee in there. How deep is your hearth and how far out does your stove sit from the brick on your fireplace face? Can you reach the Tee for cleaning purposes? (Can you tell that in my 'dreams' I would have an Oslo installed with a Tee so I could do 'bottom-up' cleaning?)

Shari


The oval plate on top of the Oslo is supposed to 'float' - i.e. you remove the bolts that it ships with. I will be using this to access the stove pipe and tee (snake a vacuum pipe down). I can't see that I'll be able to do bottom up though...
 
Green Energy said:
Shari,

The fireplace is 19" deep after I installed the 3.5" insulation and heat shield in the back. The hearth is 20", there is about 3.5" of hearth in front of the stove. I have installed a 18" hearth extension in front of the hearth made of four 18"x18" ceramic tiles mounted on 3/4" plywood. This met with approval from the code inspector. It is mainly for ember protection. The side door is accessible for loading the wood.

I have 6" of clearance on the side of the stove. I can get one arm behind the stove. I figure that will be enough to pull off the clean out cap and figure a way to get a bag to catch the black stuff from the sweep.

The chimney cleaning job will be much easier than my old stove, which I had to disconnect, roll out of the way, and pull out my direct connect block off plate and 6 foot flue. So yeah, after 18 years of that, this new system will be a dream! :)

GE

Sounds like you are still planning on top down cleaning of the chimney. I was hoping, maybe, you could do a bottom up via the Tee and snake around your fireplace smoke shelf.

Shari
 
I have always done top-down chimney sweeping. I can get up on my garage roof, one story up, and walk up the roof to the gable above the second story. The top of the chimney is about chest height. So top down cleaning is fairly easier for me.

I have read about bottom-up cleaning, but I only have 16" between the floor of my fireplace and the bottom of the tee. I have a set of three 6 foot heavy duty yellow fiberglass rods that don't bend much. I guess I could get some shorter, more flexible rods, but I'm still not sure if this can work with only 16" between the bottom of the clean out and the floor.

I do need to get a poly brush for my flex liner. The old heavy duty yellow 6' rods I already have are equipped with threaded fittings that are 5/8" in diameter. So I probably need an adapter and another 8' of rods.
 
Nice installation and setup.. Love the look of the Oslo as a hearth stove.. Let us know if you notice any improvement with that rear heat shield working in addition to the damper block off plate..
 
Already can feel the difference around the fireplace. We had a few days with rain in the 40s. I was waiting for the permit inspection before I fired the stove up. My old installation would have been cold and drafty around the stove on days like that. With this installation, I did not notice any draft and it was the same temp around the stove as the rest of the room.

I think it is a combination of the insulated rear heat shield and the chimney liner with a better block off plate. I am sure it will significantly help reduce heat loss when it gets cold.
 
Great job! I have an Olso with a similar setup. It is a great stove!
 
Nice . . . now all we have to see are some pics of those break in fires . . . or one of the "real" fires with secondaries in action.
 
Status
Not open for further replies.