Osburn 2400 insert, is SS liner up to flue tile ok ???

  • Active since 1995, Hearth.com is THE place on the internet for free information and advice about wood stoves, pellet stoves and other energy saving equipment.

    We strive to provide opinions, articles, discussions and history related to Hearth Products and in a more general sense, energy issues.

    We promote the EFFICIENT, RESPONSIBLE, CLEAN and SAFE use of all fuels, whether renewable or fossil.
Status
Not open for further replies.

mrwebman

New Member
Feb 28, 2008
5
NC
I have searched every which way on here and can not find the answer to my question. I need to know if installing my insert with a 6 inch stainless steel liner to just the first clay flue tile in the chimney is acceptable. Here's some background...

I just received my Osburn 2400 insert and had intended to install it into my existing masonry fireplace by making a block off plate right below the damper (damper door removed) and putting stainless steel pipe or liner from the top of the insert through the block off plate to just past the start of the first clay flue tile in the chimney. If I'm not mistaken that block off plate would or is called a positive flue connector?

My problem is that the owner's manual that comes with the insert is contradictory. Under "masonry fireplace requirements" it says that the 2400 insert if not approved for use with a positive flue connector into a masonry flue then under "venting requirements" it says that the minimum requirement of a flue will be the installation of a flue connector from the insert into the first flue tile of the chimney. Is there such a thing as a masonry flue instead of a clay tile lined masonry flue?

I wrote Osburn last night and to their credit they got right back to me but their answer was that they cut and pasted the section of the manual that says the 2400 insert is not approved for use with a positive flue connector into a masonry flue and then in French, signed his/her name. That was absolutely no good to me.

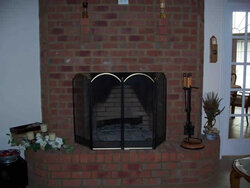
I have spent many hours on this forum reviewing installations and directions given and I think this will be trivial to the folks here. I have attached a picture so you can see the existing fireplace that the insert is going in. By the way, the fireplace, as is the house, is new - less than a year old and it's located in the US not Canada. The flue tiles are 11 x 16 which is the required code size for this size fireplace in accordance to the building inspectors in this area. We have burned a fire in the fireplace several times and it drafts and works perfectly but of course, it's a normal fireplace in that the heat goes right up the chimney hence the insert.

All help much appreciated.

Cheers,
Dennis
 

Attachments

  • fireplace-front.jpg
    fireplace-front.jpg
    23.9 KB · Views: 398
You are better off with a stainless flue liner that goes from the flue collar right to the top of the chimney. You'll get better draft, and it will be easier to clean too.
 
I'm very sure you are right but I'm trying not to use a full reline if possible because of the way the top of the chimney is made. If I go with a full reline I'll have to have brick work done too and there's the problems associated with that like the possibility of damaging the shingles again like they did when they finished the chimney, etc.

Of course, I don't want to be unsafe either.

Thanks for the input.

Cheers,
Dennis
 
mrwebman said:
I'm very sure you are right but I'm trying not to use a full reline if possible because of the way the top of the chimney is made. If I go with a full reline I'll have to have brick work done too and there's the problems associated with that like the possibility of damaging the shingles again like they did when they finished the chimney, etc.

Of course, I don't want to be unsafe either.

Thanks for the input.

Cheers,
Dennis

If the brick needs work to start with, you best do a full reline to top.
 
No, the fireplace is new as is the house. The tiles are thus in perfect condition having only been fired a few times. Matter of fact, the fireplace was installed with the express intent of installing an insert. Now that the walkways and all are done I'm putting in the insert now.

Cheers,
Dennis
 
Most inserts are approved to install with a stubby liner to the first clay tile, at which point you need a sealed block off plate. Yes there can be masonry flues with no clay, old block and mortar chimneys sometimes were built with no clay liner and they are not very safe.

Now that I answered the question, why do you think brick work needs to be done if you do a full liner?
 
My chimney terminates at the top with what looks like a castle wall. In other words there are about three bricks stacked on each corner and on each middle section for a total of roughly 30 bricks. On top of those 30 bricks is a sheet of heavy metal that runs from wall to wall of the brick. When you look at my chimney from the side you can see that the smoke goes out sideways by the sets of 30 bricks, not the top (see pictures, below). Anyhow, in order to completely reline the chimney I will have to remove those 30 bricks, drop the heavy metal top plate down, use a acetylene torch to cut a round hole in the top plate in order for the new liner to be inserted. That's bad enough but the position of this chimney is such that I probably can't just walk up to it and work, I'd probably have to build some sort of platform and the last time that they did that they nailed into my shingles and it cost me a thousand dollars to repair the roof. To be fair that was for both chimneys not just this one but it was still a pain. I've never mentioned the other fireplace before but it's exactly the same as the one I'm putting the current insert in. I'm just not installing an insert in the other fireplace yet. But... if I were to reline one fireplace and thus change the top cap, I would have to install the new cap on the other fireplace just to make it look right and there we go... more changes.

Long story short... I was just hoping not to go up on that roof again but at the same time I want to be safe of course.

I would be happy to have a professional do this job for me but I'm in an area of the country where the only way you can buy a wood insert is to mail order it because no one within reasonable driving distance of here deals with wood any more. I actually had one dealer laugh at me when I asked if they sell wood inserts. He said that wood was old world and that no one used wood any more. There actually was one dealer that would do the job but he wanted $240 per hour labor charge and I'm sorry but that ain't happening! So, I either do this job myself or it doesn't get done. Don't get me wrong, I'm capable of doing this, it's just not my area of expertise thus all of questions.

If a stubby pipe to the first flue liner is ok to use, what type of pipe would be acceptable? It's 4 feet from the top of the insert to the first tile. Would single wall pipe be ok to use?

Cheers,
Dennis

Here's some pictures of the exterior:
 

Attachments

  • fireplace-detail.jpg
    fireplace-detail.jpg
    118.8 KB · Views: 329
  • fireplaces-both.jpg
    fireplaces-both.jpg
    94.8 KB · Views: 316
Just old BB's inflation adjusted two cents worth.

1. I would leave the tops of the chimneys just like they are and push a full SS liner up from the bottom.

2. With those chimneys you aren't going to need a chimney cap. Just a flat plate at the top to anchor the liner.

3. Cleaning will be an issue but instead of using a brush and rods you use a brush and ropes. Drop the rope down the pipe into the insert and pull the brush through from inside the stove. The same way I do it now.

4. Getting to those chimney tops is a walk in the park compared to most other chimneys. Ya lean a ladder against the back of them and then do what ya gotta do.
 
Hey, that's a good idea about the ladder! That should work perfectly.

I opened up the existing damper area today so that the liner can make it through that area. It wasn't that hard to do - sawzall and a big pipe wrench to snap the cast iron and I've got about 7 1/2 inches of clearance for the 6 inch pipe - should work fine.

I also set the Osburn in place - took 4 of us to do. I hope it burns as good as it looks! I've never seen a unit with the quality of this. For example, the arm that rotates to latch the door usually just slides behind a piece of metal on the unit but not on this one. It has a wheel on the door handle arm that rotates behind a bracket so it's super smooth and has an absolutely positive closure. I'm happy it!

I'll put some pictures up here when it is completed.

Cheers,
Dennis
 
You should use a short piece of SS flex liner for the stubby install. Single wall pipe should not be used because it does not last.

We had an install similar to this we and just took the top off, ran the full liner, and put the top back on again. No big deal.
 
Status
Not open for further replies.