P68 Feeder Weldment? Or just where the Burn Pot assem meets the Feeder assem?

  • Active since 1995, Hearth.com is THE place on the internet for free information and advice about wood stoves, pellet stoves and other energy saving equipment.

    We strive to provide opinions, articles, discussions and history related to Hearth Products and in a more general sense, energy issues.

    We promote the EFFICIENT, RESPONSIBLE, CLEAN and SAFE use of all fuels, whether renewable or fossil.
Status
Not open for further replies.

gbreda

Minister of Fire
Aug 3, 2009
1,255
Lakes Region, NH
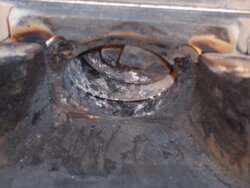
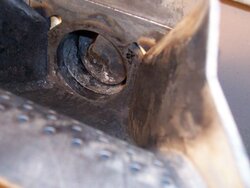
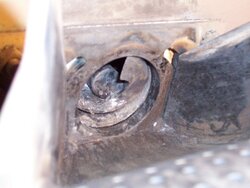
OK, with the posts of a few cracked feeder weldments on Harmans, I am questioning mine. I have seen this since it was installed in September, but to me it looks like where 2 pieces meet. Am I right and this is OK, or not?

Not completely cleaned (that was done Friday night and has been running since then), but just shut down and vac enough to take this picture.

Thanks !!!!

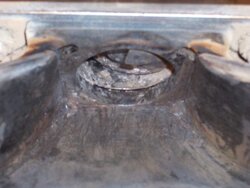
edit: Looking at the parts diagrams, it looks like where the feeder weldment assemby and burnpot weldment assemblies meet. I never thought anything of this until I looked at the recent pics of a P38.
 

Attachments

  • Feeder Weldment.jpg
    Feeder Weldment.jpg
    39.4 KB · Views: 588
  • Feeder Weldment 2.jpg
    Feeder Weldment 2.jpg
    35.7 KB · Views: 603
  • Feeder Weldment 3.jpg
    Feeder Weldment 3.jpg
    38.4 KB · Views: 578
  • Feeder Weldment 4.jpg
    Feeder Weldment 4.jpg
    38.3 KB · Views: 530
That's where the 2 pieces meet, so you're in good shape.
 
gbreda said:
rap69ri said:
That's where the 2 pieces meet, so you're in good shape.

That's what I was thinking from day one with the stove, but isn't this thread the same thing? or am I missing something in those pics?

https://www.hearth.com/econtent/index.php/forums/viewthread/47362/

The other thread is a definite wear hole in the actual tube where the auger is. Your picture shows the seam clearly where the feeder body and burnpot meet. Have you checked to see if the nuts are tight that hold the burnpot in place to see if you can close the gap a little more? Other than that it looks very similar to my P-61.
 
Stove is firing high again now, catching up from being off for 3 hours. Will check the bolts next time I shut down or its firing low.

Thanks for thr re-assurance.

geno
 
gbreda said:
Stove is firing high again now, catching up from being off for 3 hours. Will check the bolts next time I shut down or its firing low.

Thanks for thr re-assurance.

geno

No problem at all< and good luck with your stove.
 
First post here so this'll have to do as an intro....

I found a similar crack in our invincible albeit a little smaller. What I had wondered was whether it was affecting the burn characteristics by allowing combustion air in thru the crack rather than thru the holes in the burn pot. The other side of the crack is in the area providing air to the burn pot.

I ended up trying a repair where I cleaned the area as best I could and applied muffler cement from the back side of the crack...let it set up some...layed a bit of brass wire in the crack and applied a layer of cement from the front side.

No idea yet as to whether this is standing up or not as we haven't cleaned out the pot since.

I haven't read any other posts regarding this issue but thought to share my experience in this regard.

All the best....Bob
 
BobbyMagee said:
First post here so this'll have to do as an intro....

I found a similar crack in our invincible albeit a little smaller. What I had wondered was whether it was affecting the burn characteristics by allowing combustion air in thru the crack rather than thru the holes in the burn pot. The other side of the crack is in the area providing air to the burn pot.

I ended up trying a repair where I cleaned the area as best I could and applied muffler cement from the back side of the crack...let it set up some...layed a bit of brass wire in the crack and applied a layer of cement from the front side.

No idea yet as to whether this is standing up or not as we haven't cleaned out the pot since.

I haven't read any other posts regarding this issue but thought to share my experience in this regard.

All the best....Bob

My friend picked up an Invincible insert this fall, and it had a wear hole or burn hole in the auger tube. SInce it was still plenty warm out we took the stove down to the shell, put a weld around the auger tube, and ground it down. It looks and operates like new. I wouldn't want to run the stove with a crack in the auger tube. When the stove is running in low the burning pellets are in that area, and I can see it causing a fire on the outside of the stove. Certainly not what any of us want to see happen.
 
rap69ri said:
BobbyMagee said:
First post here so this'll have to do as an intro....

I found a similar crack in our invincible albeit a little smaller. What I had wondered was whether it was affecting the burn characteristics by allowing combustion air in thru the crack rather than thru the holes in the burn pot. The other side of the crack is in the area providing air to the burn pot.

I ended up trying a repair where I cleaned the area as best I could and applied muffler cement from the back side of the crack...let it set up some...layed a bit of brass wire in the crack and applied a layer of cement from the front side.

No idea yet as to whether this is standing up or not as we haven't cleaned out the pot since.

I haven't read any other posts regarding this issue but thought to share my experience in this regard.

All the best....Bob

My friend picked up an Invincible insert this fall, and it had a wear hole or burn hole in the auger tube. SInce it was still plenty warm out we took the stove down to the shell, put a weld around the auger tube, and ground it down. It looks and operates like new. I wouldn't want to run the stove with a crack in the auger tube. When the stove is running in low the burning pellets are in that area, and I can see it causing a fire on the outside of the stove. Certainly not what any of us want to see happen.

Thanks for the response....

The crack is on the bottom side or edge of the tube in the area of the air intake passage and is contained in that particular area. I've got our local dealer pricing out a new feed housing and if he takes too much longer I'm gonna do as you guys did only I'll take the feeder housing right out and take it to work with me and weld /dress it up.

I gotta pick a good weather window though as it looks like a bear of a job to take the stove down to the point where the housing will come out. I'd take the whole damn thing to work but it's on the second floor and I'd rather avoid it if I can.

When you's welded it did you gouge it out around the tube or just lay in a bead around the mouth of the tube? I don't wanna create any kind of lip in that area if I can help it. It's quite thin in the area of the crack....I'm not sure if the metal has been consumed to that thinness or of thats the actual dimension of the tube....sure seems thin.

Bob
 
We laid in a bead around the mouth. We had limited equipment, so we did it the only way we could. It took quite a bit of grinding after the welding was done, but it worked great.

Taking the feeder assembly out was a pain in the a$$, but gave us a better understanding of harman stoves. You'll need to remove pretty much everything before the feeder body will come out, including the hopper which is siliconed to the top of the feeder.
 
Status
Not open for further replies.