
Yes. On Monday I'm going to find out if my supplier offers ovalizing or how it works with them. Rockfords site shows a 6" liner being able to be ovalized down to 4"x7.7" outside measurement dimensions. If that's the case, then that seems like it would leave enough room for 1/2" insulation wrap top to bottom.
PE Super Insert. Opinions/Info?
- Thread starter Squisher
- Start date
-
Active since 1995, Hearth.com is THE place on the internet for free information and advice about wood stoves, pellet stoves and other energy saving equipment.
We strive to provide opinions, articles, discussions and history related to Hearth Products and in a more general sense, energy issues.
We promote the EFFICIENT, RESPONSIBLE, CLEAN and SAFE use of all fuels, whether renewable or fossil.
You are using an out of date browser. It may not display this or other websites correctly.
You should upgrade or use an alternative browser.
You should upgrade or use an alternative browser.
Looks like ArmorFlex is 4.5" x 10". Rockford has a conversion chart to figure sq in equivalent.
https://www.rockfordchimneysupply.com/blog-2/oval-liner-table
Note their oval kit does not have an insulation option.
https://www.rockfordchimneysupply.com/oval-chimney-liner-kits.php
https://www.rockfordchimneysupply.com/blog-2/oval-liner-table
Note their oval kit does not have an insulation option.
https://www.rockfordchimneysupply.com/oval-chimney-liner-kits.php

Ahh I'm seeing how that chart works now. To get down to 4"s I need to go quite a bit wider to keep the same volume.
I think if I wanted to insulate I'd need to be 4" as I've read 1/2" insulation will add about 1.25-1.5"s on to the outside dimension. 4.5" could be tight to impossible to fit down my 6" minor dimension liners.
I see they don't list insulation in their kits but I have to guess that you can get insulation or that it's still approved to wrap a ovalized liner?
A lot will depend on what is available to me through my supplier. Or I may have to look at getting hooked up through the other wholesaler available up here if possible.
My supplier I'm already connected with just sells duravent I think?
So.
My supplier I'm hooked up with doesn't ovalize. So I need to contact the other couple of wholesalers I know of and get set up I suppose.
I have replied to duraliner and sent them a link to this thread as well.
My supplier I'm hooked up with doesn't ovalize. So I need to contact the other couple of wholesalers I know of and get set up I suppose.
I have replied to duraliner and sent them a link to this thread as well.
So. No word from duraliner yet but I'm going to measure out one more option I think using duraliner still.
I think. That possibly if I cut out the damper and the surrounding metal of the old heatilator firebox I could then bust out part of the smoke shelf and skip the three foot flex piece and run rigid further down in even and then just use the 14" flex oval to round piece onto a 30' stainless round duraliner to round 6" male that they make as a much cleaner appliance attachment. I'll need to verify a bunch of measurements but it just might reach and then I'd have zero worries of insulation and would meet ZC having flex only running 14"s off the stove and I'd stuff all that area with rock wool anyways. I'm going to mull this over and measure a bunch later.
Looking at it I'm guessing torches would be best for doing this? I have oxy/acetylene torches. Just seems counterintuitive to use them in the house but obviously I looks like you'd be there a lifetime otherwise?
I think I'm going to wind up just shy of 15' with this setup I've got to double check measurements. I might be able to swap some rigid piping up and make it just shy of 16' but I believe that will put me a solid 3' + out of the top of the masonry with the insulated rigid? I'm guessing that the extra height would be worth it though if I can swing it.
Thanks. Re-reading your comments about busting out further to make the attachment up in the smoke chamber led me down this path of thought. I think if I go this route I might be wise to cut and bust out my path or atleast most of it first. Then I could for mor accurately figure for certain if it would work or not. Because if it didn't then I'd be looking at the 3' oval to round flex piece.
My only concern over being sort of short on height is because I'm going with the oval instead of round.
My only concern over being sort of short on height is because I'm going with the oval instead of round.
First check to see how the damper is installed to see if it can be removed. Some lift out, some have a pillow block on the ends that is bolted down. Others are captive and cutting is the best option. An angle grinder will also cut the steel. Be sure to wear eye, ear and nose protection.
Thanks for the tips on the damper removal.
I've got all the proper safety gear for my day to day work so no problemo there.
Got a heavy workload all of a sudden so I'll have to pick away at it as I can.
I've got all the proper safety gear for my day to day work so no problemo there.
Got a heavy workload all of a sudden so I'll have to pick away at it as I can.
Well. I've been busier than heck with work so i haven't made any progress but now another pe insert that looks exactly like the one I just bought was just listed locally for $150.  Man oh man. If it's there Sunday or maybe Saturday after work still it's probably coming home with me too. If nothing else I'll refurbish it and flip it.
Man oh man. If it's there Sunday or maybe Saturday after work still it's probably coming home with me too. If nothing else I'll refurbish it and flip it.Well missed out on that deal. Someone picked it up last night. I've been swamped with chimney cleanings and wouldn't have been able to make it until later this afternoon. Such is life, I don't get excited about missing classified deals, sometimes you score, sometimes you don't. Heh maybe I'll get called to clean it one day by whoever bought it. Lol.
I've got one cleaning I've got to do today and after I finish that and catching up my farm chores I'm hoping to get back to confirming my measurements so I can move forward with my insert install.
I've got one cleaning I've got to do today and after I finish that and catching up my farm chores I'm hoping to get back to confirming my measurements so I can move forward with my insert install.
Finally ordered the pipe today. It'll be duraliner going in. I'll make sure to finish this thread off and get some pics of the install and also describe exactly how I did it and what parts I've used.
Lots of progress today.
I removed the damper and cut up a bunch of the old 'heatilator'. There's no going back now. Then I chained the whole chimney again and chained the smoke chamber area and cleaned everything right out.
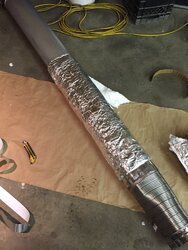
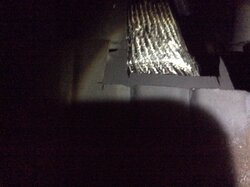
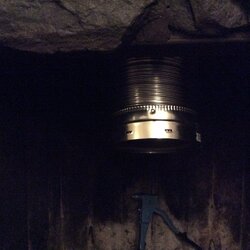
Then insulated a 3' oval to oval flex piece and sent it down the chimney followed by a 3' rigid oval and then two 4' rigid oval. The insulation fit down well, snug but made it no problem. I pulled flex down and right through enough that I could then get my 14" oval to round piece in.
That's where I'm at now.
I removed the damper and cut up a bunch of the old 'heatilator'. There's no going back now. Then I chained the whole chimney again and chained the smoke chamber area and cleaned everything right out.
Then insulated a 3' oval to oval flex piece and sent it down the chimney followed by a 3' rigid oval and then two 4' rigid oval. The insulation fit down well, snug but made it no problem. I pulled flex down and right through enough that I could then get my 14" oval to round piece in.
That's where I'm at now.
Attachments
So next up my plan is to insulate that 14" piece of oval to round flex because I have the insulation left over from the kit to do it and the room. Then I'll push/pull the chimney liner back up to the height I'll need to fit onto the insert. Then I'll stuff roxul all in the smoke chamber area and install a block off plate.
I mean to use a 15 degree appliance adapter that I ordered with everything but it has no male end to fit in the insert? I have a male six inch appliance adapter around for a different liner system and it fits male end into my insert very nicely. The duravent supplied adapter is not crimped or pressed?
I really want to use this appliance adapter after all of my agonizing over their goofy ones. I can't seen why it isn't shaped for the male end down into an insert?
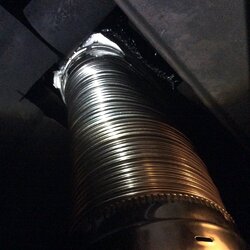
Now that I've been looking this piece over. It has a hole in one of the welds. Somewhat disappointing, but it'll come together. I said no rush when I started but now my wife has warned its taking too long. So I'm in a rush! Lol.

I've looked everything over really well and have been thoroughly impressed with the quality until this piece. I hadn't looked it over much until now that it was up to get attached.
I've looked everything over really well and have been thoroughly impressed with the quality until this piece. I hadn't looked it over much until now that it was up to get attached.
Last edited by a moderator:
Hogwildz
Minister of Fire
The piping comes pre-packed with s.s. rivets in each box of pipe.Good to hear there's progress. Be sure to use stainless steel pop rivets for the joints.
Hogwildz
Minister of Fire
So the elbow has 2 female ends? Strange. You could crimp it with a set of crimpers. Can you go straight down onto the stove with the heatilator cut out, or do you still need the elbow?So next up my plan is to insulate that 14" piece of oval to round flex because I have the insulation left over from the kit to do it and the room. Then I'll push/pull the chimney liner back up to the height I'll need to fit onto the insert. Then I'll stuff roxul all in the smoke chamber area and install a block off plate.
I mean to use a 15 degree appliance adapter that I ordered with everything but it has no male end to fit in the insert? I have a male six inch appliance adapter around for a different liner system and it fits male end into my insert very nicely. The duravent supplied adapter is not crimped or pressed?
I really want to use this appliance adapter after all of my agonizing over their goofy ones. I can't seen why it isn't shaped for the male end down into an insert?
View attachment 188940
I'd like to use it. If I try to go straight to the duraliner round I'll have to cut the insert surround. I'm going to get some crimpers and give it a go, hopefully get to town tomorrow.
And yes the adapter has female duravent on top and female six inch on the bottom? And in their literature it says it can be used as a stove connection?
Hogwildz
Minister of Fire
Post a photo of the other end of the elbow. I'm thinking you may have it reversed. I believe the other end may go onto the stove outlet.
As far as the casing, I know you are wary about cutting it out, but the casing is just that, it is not tight to the outlet from the factory, and was never intended to be tight. If it was me, I and I could get a straight shot onto the stove outlet with the liner, I would go straight onto the liner and send that elbow back for a refund. One less part, and one less headache.
I had to trim my casing outlet opening back so that I could accommodate the adapter. I wish I would have thought to have scrapped the adapter and went right onto the outlet with my liner. Was my first install, and wanted to go by the book. The book is not real life scenario. Should have sent the adapter back.
Last edited:
I have a different adapter for a different liner system around. The male end of it fits into the one end of the duravent, the other end of the duravent is even bigger. But here's the pic.
The male end of the duravent pipe will not fit the flue collar cleanly as in I can't get it to fit into a female 6". It's too big, So cutting the insert surround is a moot point. It looks close, and it is but it doesn't fit.
My only option seems to be to try to crimp this adapter.

The male end of the duravent pipe will not fit the flue collar cleanly as in I can't get it to fit into a female 6". It's too big, So cutting the insert surround is a moot point. It looks close, and it is but it doesn't fit.
My only option seems to be to try to crimp this adapter.
Last edited by a moderator:
To reiterate. The duravent adapter is 6" female on one end and 6" duravent female on the other which is slightly bigger than 6", because the male end of duravent pipe is larger than normal 6" male. That being said male duravent will not fit directly into female 6". It's to big.
Obviously I've tried both ends of th adapter on the flue collar of the stove. One end is thesame size as the flue collar 6" and the other end is bigger.
Still thinking crimping this appliance adapter is my best option if I can crimp the stainless effectively?
Obviously I've tried both ends of th adapter on the flue collar of the stove. One end is thesame size as the flue collar 6" and the other end is bigger.
Still thinking crimping this appliance adapter is my best option if I can crimp the stainless effectively?

Similar threads
- Replies
- 23
- Views
- 2K
- Replies
- 4
- Views
- 1K
- Replies
- 1
- Views
- 561